With rising privacy concerns, ensuring your personal information or photos are secure and only visible to people you trust is essential. Therefore, if you value your privacy and want to safeguard your data, you must know how to make your Facebook photos private.
You can do this to limit who can see your photos and ensure nobody else has access to your personal information.
Additionally, you can easily change the privacy settings for any photos on your Facebook account. Depending on your choice, choose the privacy you prefer for an individual photo and Album.
In any case, this guide will go over how to make your photos private, giving you control over who sees and accesses your images.
This guide will assist you in safeguarding your online identity on Facebook, whether you are worried about your privacy or want to keep your photos hidden from prying eyes.
Furthermore, if you do not feel safe enough by making your photos private, you can delete them after downloading all your Facebook photos.
Why Should you Make your Facebook Photos Private?
For the following reasons, you should consider making your Facebook picture private:
1. Safeguard your private info
If your photos contain personal info, such as your location or the faces of your loved ones, you can manage who has access to this information and stop it from being abused by making your photos private.
2. Prevent identity theft
Someone can use your public Facebook photos to create false profiles or steal your identity. You can lower the possibility of identity theft by making your photos private.
3. Limit who can view your photos
Sharing pictures with the wrong group of people can make you look bad or even hurt your reputation. You can manage who sees your photos by making them private and only share with those you know and trust.
4. Maintaining a professional reputation
Keeping your personal and business lives separate is important. If you have turned on the Professional mode on Facebook, you can avoid any potential conflicts arising from sharing personal photos with followers by making your photos private.
Overall, if you keep your pictures private, it can help you maintain your privacy and control your personal information.
Furthermore, if you are extremely concerned, we recommend you make your Facebook account private or hide your Profile entirely for maximizing privacy. You can also restrict someone on Facebook if you don’t want a specific user to see your photos.
How do you Make your Facebook Photos Private?
Making photos private on Facebook does not always mean they are only accessible to you. You can also private your photos so only certain friends on your account can see them.
Therefore, to make a photo private, you can select “Only Me,” “Friends,” or “Friends except..” for the privacy settings.
Furthermore, Facebook allows you to change the privacy settings for photos before and after publication. You can change the privacy of an individual photo and an Album on your FB account.
So, let’s learn how to make your Facebook Photos Private using a Smartphone and a PC.
1. Make Specific Facebook Photos Private
If you want to make an image account private, you can easily do so using the Facebook app and the web.
When you make your Facebook profile or cover photo private, it will only be removed from your timeline or newsfeed. As a result, you cannot hide your Profile or Cover Photo. Instead, you can lock your Facebook Profile to limit exposure to the public.
Make individual FB Photo Private using a Smartphone
You can individually edit the privacy of any photo on your Facebook account. It can prevent that photo from appearing in other people’s news feeds.
So, follow the process below to make a photo private using Facebook or FB lite application on your Mobile Phone.
1. To begin, tap Facebook in your Android or iOS (iPhone or iPad) app drawer and find the photo you want to make private on your account.
If you recently published your photo, it will appear in your Facebook feed. If it isn’t there, go to your Facebook Profile and look for it on your timeline.
2. After finding the photo you want to make private, tap three dots from the top right corner of that post and select the “Edit privacy” option.
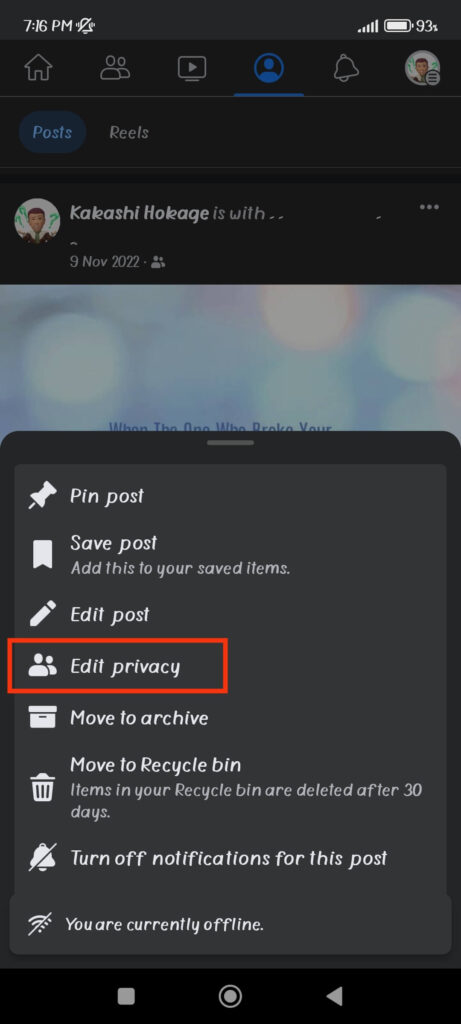
3. Now, you can customize settings for “Who can see your post?.”
If you don’t want anyone to see that photo, select the “Only me” option at the bottom of the page. On the other hand, you can choose “Friends except…” or “Specific friends” to limit who can see your photo.
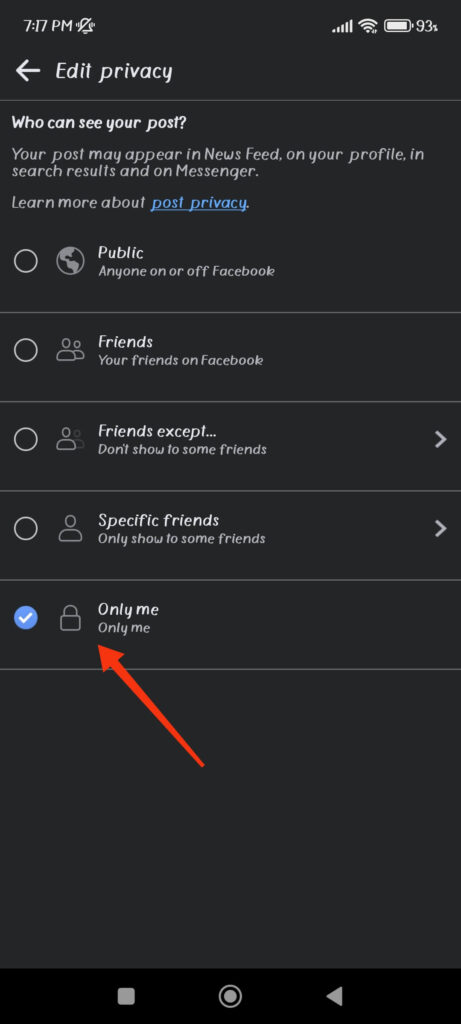
The “Friends except…” option allows you to exclude friends from seeing your photo. However, with the “Specific friends” option, you can select a few friends to share your photo with.
Make Individual FB Photo Private using a PC (Windows or Mac)
If you prefer using a computer or laptop to access your Facebook, follow the steps below to make a photo private on your account.
1. First, locate the image you want to make private after opening your Facebook account on a desktop web browser. You can find it on your news feed or your FB Profile.
2. Next, click three dots from the top right and select the “Edit audience” option.
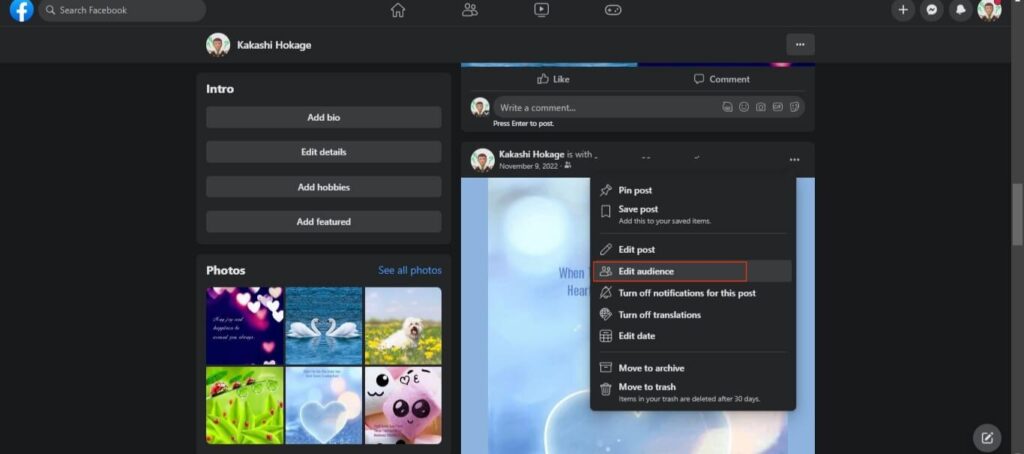
3. Facebook will now show you various privacy options for that photo. So, choose “Only me” from the list to make that photo private on your account.
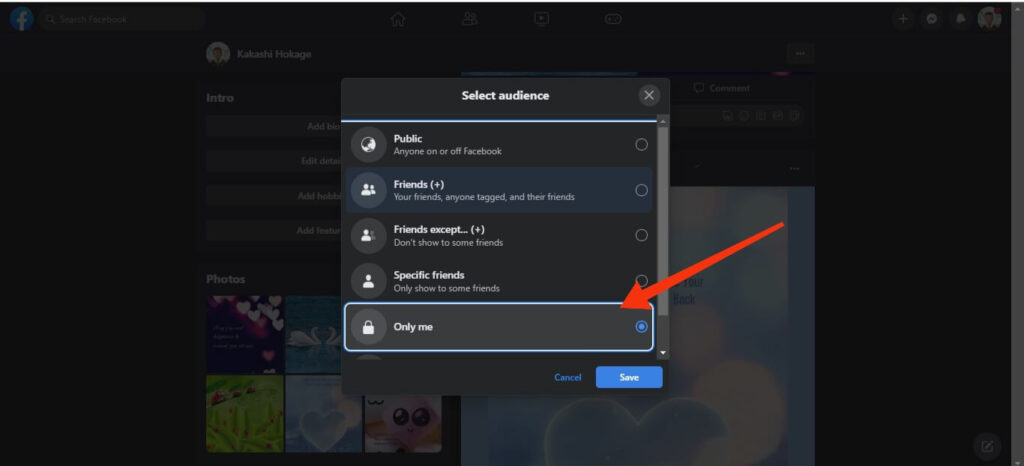
Depending on the degree of privacy you want, you can also select the “Friends except” or “Specific friends” option.
In addition, press the “Custom” option to include and exclude friends and list for your Facebook image.
2. Make your Facebook Albums Private
Changing the privacy settings for each photo can be time-consuming at times. In such cases, you can make all photos in your Album private directly.
If you don’t already have an Album on Facebook, you can create one with all of the photos you want in a private setting and then make that Album private with a single click.
So, here’s how to change the privacy settings on a Facebook Album using a Smartphone and a PC.
Disclaimer: Please remember that you cannot change the privacy of the default Album and can only change it on a custom Album you created. Default Albums include “Timeline photos,” “Cover photos,” and “Profile photos.”
Make FB Album Private from a Smartphone
If you have a custom Album in your Facebook account, then you can easily edit its privacy from the application. So, follow the steps below to make your FB Album private using a Smartphone (Android or iOS).
1. On your Mobile Phone, open Facebook and navigate to your Profile. To do so, go to your home page and tap the Profile icon next to the Status section.
2. Next, scroll down and tap “Photos” above your timeline.
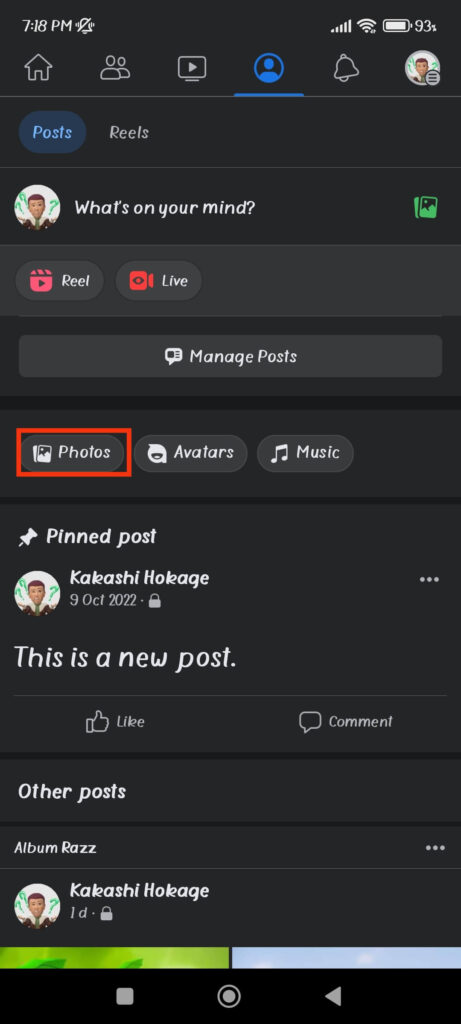
3. Now, select the “Albums” option from the top and open the Album you want to make private on your FB account.
4. Next, tap three dots from the upper right corner of your Album page and select “Edit.”
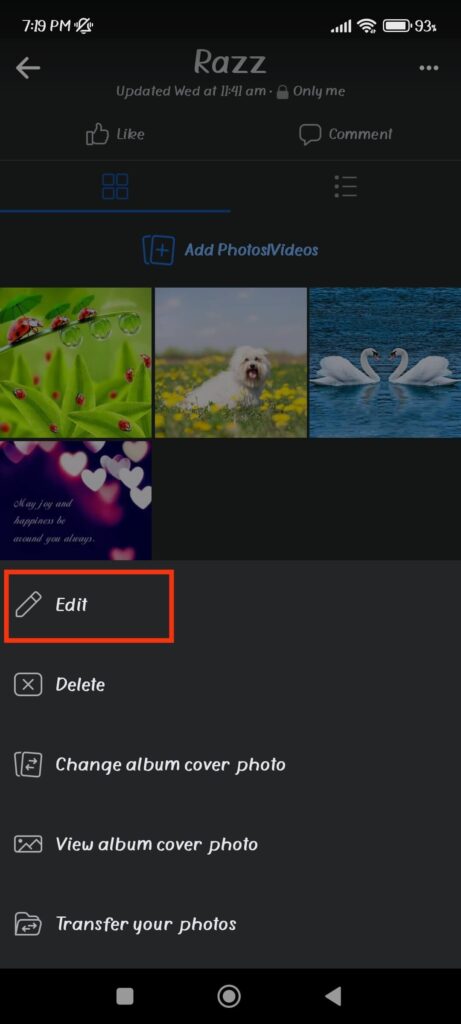
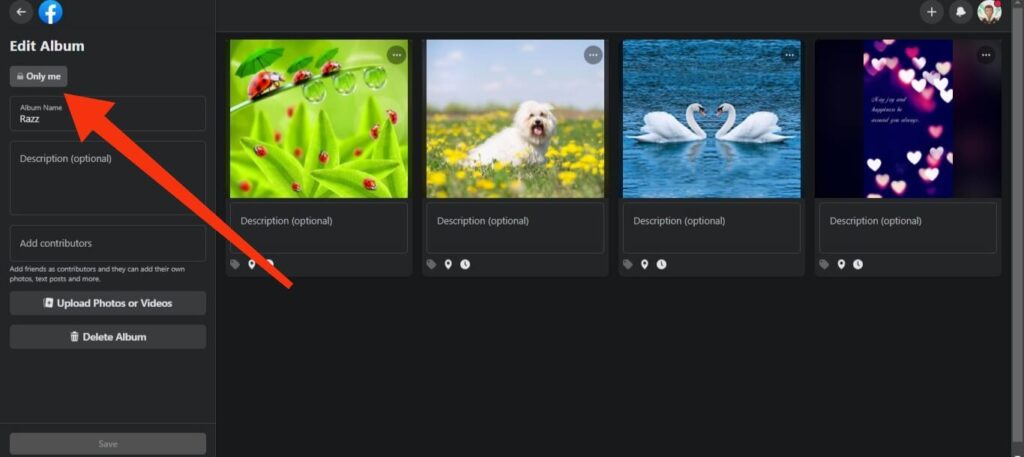
5. You can now press the privacy option and select “Only me” on the “Edit album” page to make that Album private on your Facebook.
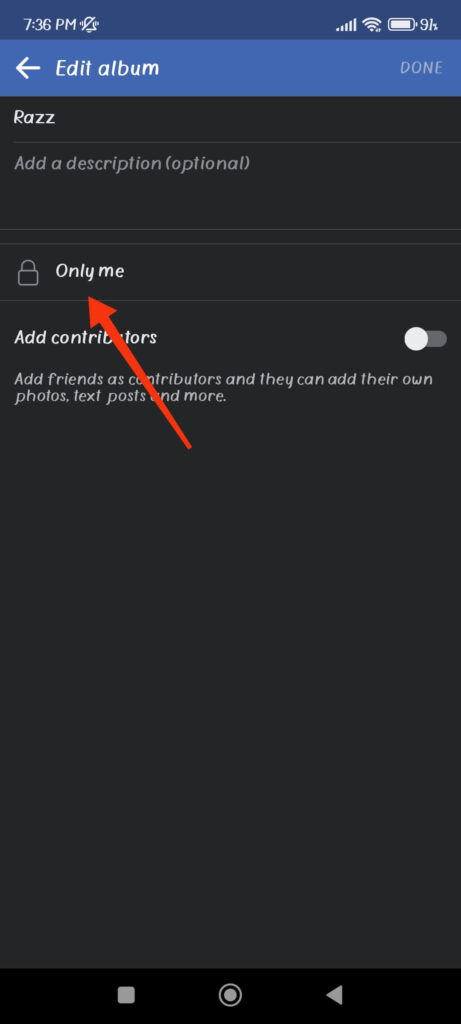
In addition, you can also choose the “Friends except” or Specific friends” option based on your privacy requirements.
Make FB Album Private from a PC
Facebook allows you to edit the privacy settings on your Album using from a desktop. So, to make your Album private using a PC, follow the steps below.
1. First, go to your Profile on the Facebook web and click “Photos” on the menu bar below your Cover picture.
2. Next, press the “Albums” option to see the list of your FB Albums.
3. After that, click three dots next to the Album you want to change the privacy of and select the “Edit Album” option.
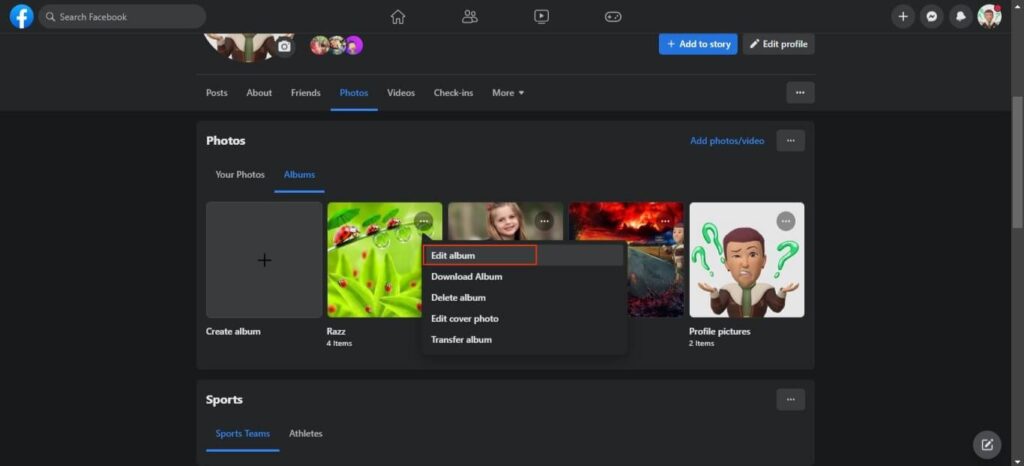
4. You can now see the privacy settings on your left panel. Click on it, and select the “Only me” option to make that Album only accessible to you.
Additionally, depending on your choice, you can select any other privacy options too. After selecting, press the “Done” button to save your settings.
3. Make your Photos Private while Uploading on Facebook
Now that you know how to make your photos private after publishing them, let’s look at how to do it while uploading, so you don’t have to edit later.
You can save time by changing the privacy of your photos before uploading them from your Smartphone or PC by following the steps below.
1. First, go to the “Create post” page on your Facebook account by pressing the “What’s on your mind, …?” option on your home page.
2. Next, tap the photo icon and upload your images from your PC or Smartphone.
3. Now, hit the privacy settings option right below your FB username and select “Only me.” In addition, choose other options like “Specific friends” to share your photos with selected friends.
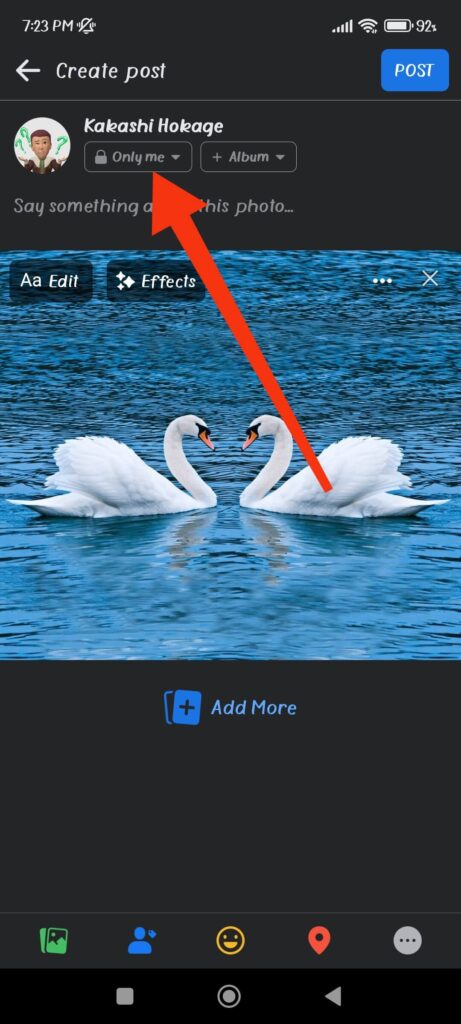
After this, you can click the “Post” button to publish it on your FB account. Do this every time you upload a photo on Facebook, and you won’t need to worry about privacy in the future.
Furthermore, if you change your mind and want to share your photo with the public, you can use our first method above.
FAQs
No, you cannot prevent others from viewing and sharing your public Facebook photos. As a result, if you don’t want others to use your photos, make them private and only share them with your friends.
No, you can only change the privacy settings for your picture on Facebook. If you don’t want to see someone else’s photos on your feed, you can hide that post or unfollow that person.
To hide likes on your Facebook photos, go to Settings >> Profile settings >> Reaction preferences and toggle on the “On your posts” option.
Final Thought
In conclusion, Facebook offers several options to hide photos and restrict who can see your personal information. You can change your privacy settings to limit who can see your photos, set audience restrictions for specific posts, or make custom groups to manage photo sharing.
Disabling tagging, deleting location information, and exercising caution when sharing information online are additional safety measures you can apply.
Remember that staying safe online is a continuous process, so stay informed and keep the privacy of your photos up to date. Additionally, if you don’t want to share photos with someone on your friend list, you can unfriend them on Facebook entirely.


