Facebook allows you to create and share your Albums with friends and family. However, you may sometimes want to make certain Albums private.
While sharing memories on Facebook can be a great way to stay in touch with loved ones, it’s essential to consider privacy to ensure your content is only visible to those you choose to share it with.
If you’re concerned about the privacy of your Albums, you’ll be happy to learn that Facebook provides various settings to help you control who can see your photos.
By adjusting such settings, you can ensure that only the people you want to share your memories with can see your FB Albums.
This blog will guide you through making a private Facebook Album and other tips. Furthermore, if you value your privacy, you can also learn to hide your Birthday on Facebook.
Table of Contents
Reasons to Make Your Facebook Albums Private
It would be best to make your Facebook Albums private and keep your photos safe for several reasons. Let’s discuss a few of them here.
1. To Protect Privacy
Facebook Albums are set to “public” by default, meaning anyone can view them. Hence, if you don’t want strangers to see your photo or Album, ensure your privacy settings are set appropriately.
2. Control who Views your Content
While you may want to share specific photos with family and close friends, you may not want everyone on your Facebook friend list to see them. In such cases, you can ensure that only the people you trust can see your photos by customizing the privacy settings in your Album.
3. Avoid Embarrassing Moments
Sharing photos with the wrong people can result in humiliating situations that can harm your reputation or relationships. You can avoid these scenarios entirely by making your Albums private.
4. Respect Other’s Privacy
You can protect another person’s privacy in your photos by restricting the audience from potentially sensitive images. Some people take the privacy of their photos on social media very seriously.
5. Avoid Spam and Unwanted Messages
By restricting who can see your photos, you can avoid spam and unwanted messages. For your safety, we recommend limiting the audience to your pictures on any social media platform, not just Facebook.
6. Separate Professional and Private life
If you have turned on Professional mode on your account, you must immediately make your personal Albums private. Keeping professional and personal lives separate on social media is always the first step toward security.
These are the most common reasons people make their photo albums private. Remember that you can make individual Facebook photos private that aren’t in any Alubms for added security. Before posting any photos or content, always select an audience.
Furthermore, you can make your entire Facebook account private or hide your Profile, depending on your situation. In any social media platform, your preferences and privacy come first.
How do you Make Facebook Albums Private?
Now you know the reason to make Facebook Albums private, let’s learn how to do it on your account. Making Albums secret is changing their privacy from “Public” to “Only me.”
This way, only you can access that Album on your FB account. Depending on your preferences, you can always change the privacy to Friends, Friends of Friends, Close Friends, etc.
Furthermore, when you make an Ablum secret, you also make every photo inside personal. As a result, you won’t have to change the settings for each photo.
If you have a lot of Albums, you can do so easily with a Smartphone and a PC.
Since the navigation style differs between Mobile Phones and computers, we will discuss the process in separate sections. Hence, you can follow according to your device and make your Album private.
Make Facebook Albums Private using a Smartphone
Using similar steps, you can easily make your Facebook Albums private from your Android or iOS (iPhone or iPad) device. So, follow the instructions below to hide your photo gallery using a Smartphone.
Note: The steps listed below can also be used with the Facebook Lite app to make Albums private.
1. First, go to your Profile on the Facebook application. To do this, tap the hamburger menu on your homepage and select your username.
2. Next, scroll down and press the “Photos” option above your FB timeline.
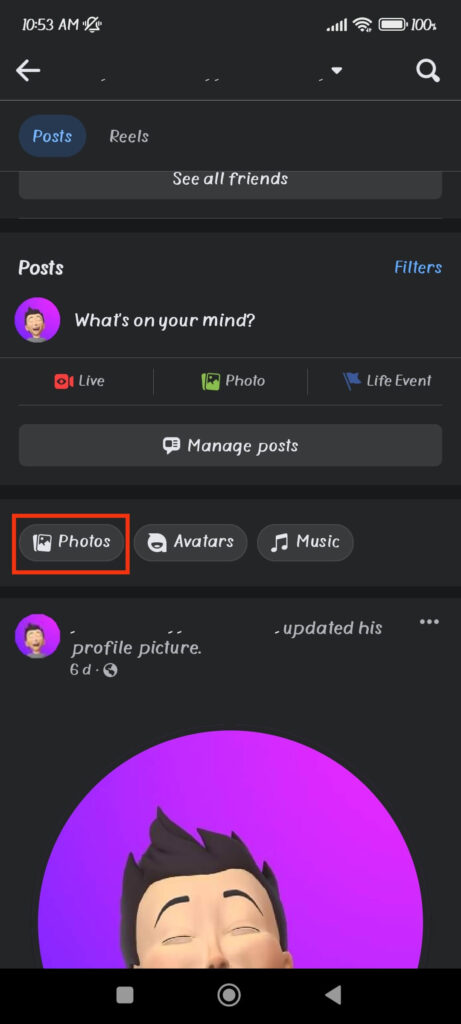
3. After that, choose the “Albums” tab to see all the Albums on your Facebook account. You can now select and open an Album you want to make private from this list.
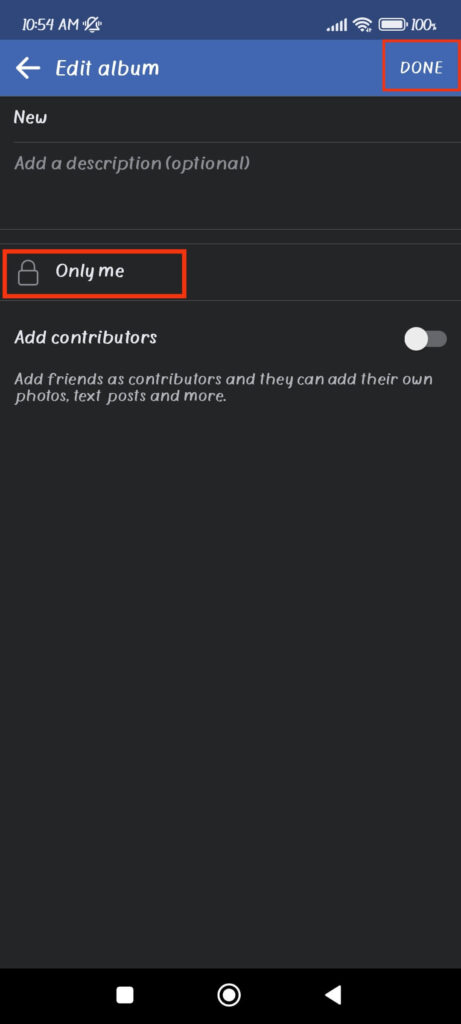
4. Once you open your Album, tap three dots from the top right corner and select the “Edit” option.
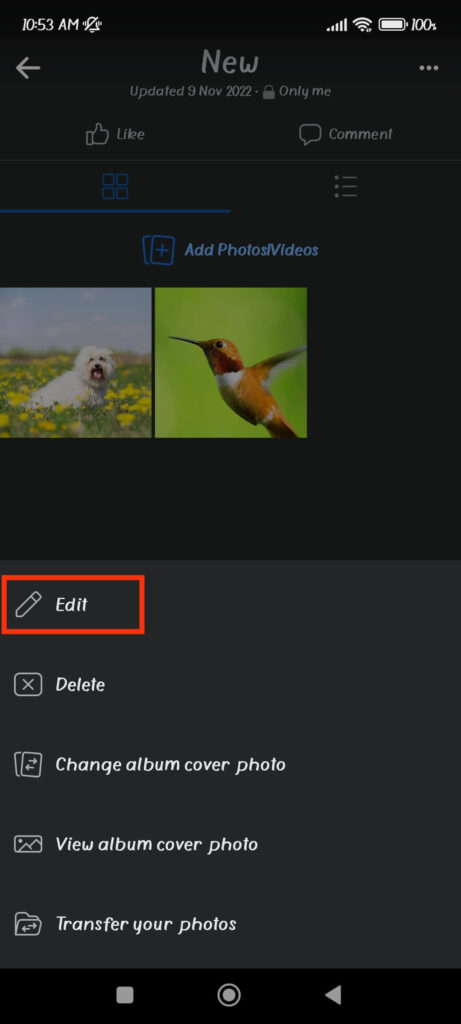
5. Now, go to the privacy settings menu and select “Only me.” Then tap “Done” from the upper right corner, and your Album will become private on Facebook.
Remember, if you have multiple Albums to hide, you must repeat this step for each one. When you make your Album private, you will immediately hide all of the photos too.
Make Facebook Albums Private using a PC (Windows or Mac)
Follow the steps below to make your photo Albums private using a computer or laptop.
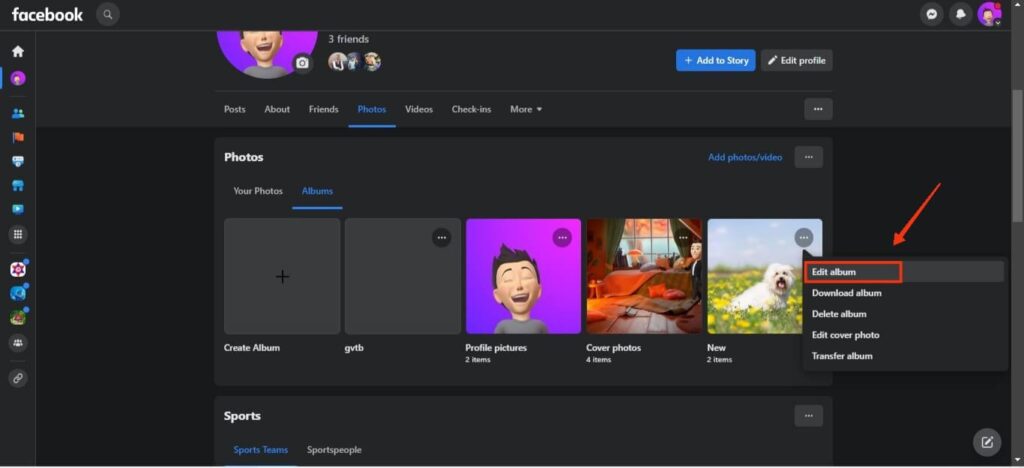
1. First, open Facebook.com on your desktop web browser and go to your Profile by clicking the username on the left panel.
2. Next, open the “Photos” tab and select the “Albums” option on your Profile page.
3. After that, click the three dots next to the Album you want to hide and select the “Edit Album” option.
4. Now, press the privacy settings from the left panel and change it to “Only me.” It will hide your Album from everyone on Facebook except you.
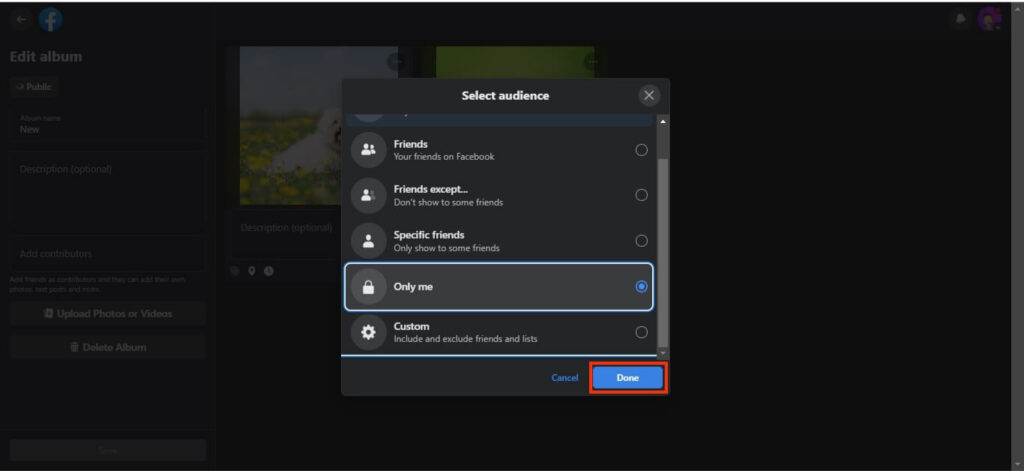
You can repeat these steps for each Facebook Album you want to make private, such as the previous one. Remember that no option exists to make multiple Albums private with a single click.
How to Create a New Private Facebook Album?
We already talk about making existing or old Albums private. Now, let’s also learn to make your Mobile or PC uploads Album private when creating a new one.
So, follow the steps below to create a new private Album using a Smartphone or a PC.
1. First, go to your Facebook Profile and click the Photos tab under your Profile picture.
2. Next, press the “Create Album” option below the “Albums” page.
3. After that, give your Album a name and select the “Only me” option for privacy. If you’re using a PC, you’ll find these options in the left panel.

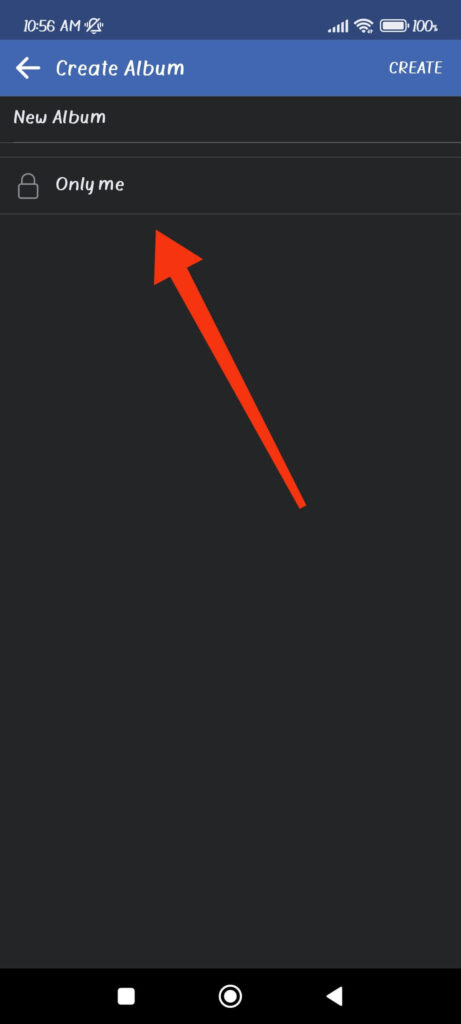
Once you set privacy to “Only me,” your Album is now private. So, feel free to upload photos or videos on this new Ablum that only you can access on Facebook.
Remember to follow the steps above whenever you create a new photo gallery. Furthermore, you can always change the privacy of your Album by visiting it later on your account.
Note: Another option you have other than making your secret is to download all photos from Facebook on your local device. It is better than creating private, and you will have less risk of exposing your images.
FAQs
Unfortunately, Facebook does not allow you to change the privacy settings of multiple Albums simultaneously. Hence, you must adjust the settings for each Album individually.
Yes, making an Album secret reduces the visibility of individual photos within the Album because they are only visible to those who have permission to view the Album.
Yes, you can make some Albums private and others public by individually configuring the privacy settings for each Album.
Facebook only allows you to edit individual photos’ privacy for specific Albums, such as the Cover and Profile pictures. However, if you create a new Album, you can only change its privacy, not individual photos.
Final Thought
Finally, making your Facebook Albums private is essential to protecting your privacy and maintaining control over your online presence.
It is easy to make any of your Albums secret. However, regularly keeping track of all your Albums can be challenging. Thus, it is preferable to customize the privacy of your Albums while uploading.
Remember that setting your Albums to private is an investment in your online safety and peace of mind.
So please don’t put it off any longer; act now and enjoy sharing your memories with confidence and privacy! Meanwhile, let’s also learn to see who follows you on Facebook.


