Sometimes messaging and calling isn’t enough, especially when you need to share information with the other person. In such cases, the screen share feature on Messenger is handy, allowing you to share your computer or Mobile screen with another person in real-time.
Screen sharing on Messenger is a helpful feature that lets you share your screen with others during a Video or Audio call. This feature is particularly beneficial when you require to demonstrate or walk someone through a process on your device.
Whether you want to display someone a new application, teach a skill, or collaborate on a project, this feature can make the process more efficient and effective.
In any case, this guide will walk you through the steps of sharing your screen on Messenger, some precautions, and alternatives to consider. While at it, you can also learn to change your Profile Picture on Messenger if interested.
Table of Contents
Why and When Should you Share Screen on Messenger?
Screen sharing on Messenger can be helpful in many personal and professional situations. Here are some reasons and situations for using this feature on Facebook Messenger.
1. Providing Technical Support
When assisting someone with a technical problem, sharing your screen can effectively show them what steps they need to take to resolve the issue. You can walk them through each step and ensure they’re doing it correctly.
2. Collaborating on a Project
This feature can make working on a project with a colleague or assisting a friend with a school assignment easier. You can both see the same info simultaneously, making collaboration more efficient.
3. Demonstrating a Process
With a screen display, teaching someone to use a new software application or demonstrating to complete a task is easier. Rather than simply telling, you can show what you need to do.
4. Giving a Presentation
It can be helpful when presenting data to a group of people. You can show your slides or other visual aids to help your audience follow along.
5. Sharing Photos or Videos
It can be a convenient way to share Images or Videos with others. Instead of sending them individual files, you can play a Video for them or let them see your entire Photo library.
Overall, screen sharing on FB Messenger can be an easy way to share information with others, whether you’re collaborating on a project or providing technical support. By using this feature, you can make your conversations more interactive and productive.
Who can use Screen-Share on Messenger? (Compatibility and Requirements)
Screen sharing is available on both the desktop and Mobile versions of Messenger. However, certain compatibility and conditions must be met to use this feature.
1. Desktop Compatibility and Requirements
Messenger App or Web: You can use this feature on both the Messenger application and the web version.
Operating System: It is available on Messenger for Windows and Mac OS operating systems.
Browser Compatibility: To use screen sharing on Messenger, you must have the most recent versions of Google Chrome, Mozilla Firefox, or Microsoft Edge.
Messenger Version: You must have the latest version of the Messenger app or web on your computer to use screen sharing.
2. Mobile Compatibility and Requirements
Messenger App: To use screen sharing on Messenger, you must install the Messenger app on your Mobile device. So, avoid using a browser.
Operating System: This feature is available in Messenger for both Android and iOS. This applies to all devices that are screen-sharing with one another.
Messenger Version: To use the monitoring feature, you must install the most recent version of the Messenger app on your Mobile Device.
Internet Connection: Screen sharing on Messenger requires a stable internet connection.
Overall, you must have a compatible operating system, browser, and the latest Messenger app version on your device to use screen sharing. Once you’ve met these requirements, you can easily share your screen with others on Messenger and have fun.
Also Read: Find Someone on Messenger without Facebook.
Precaution to take Before you Share the Screen on Messenger
Taking specific security measures when sharing your screen on Messenger is essential to maintain your privacy and guarantee a seamless experience.
Before displaying your screen, please close your private or sensitive information. This includes windows or apps with private messages, bank statements, or other sensitive data you don’t want others to see.
Furthermore, check to see if your internet connection is steady. It may be difficult for the person you’re chatting with to see what you’re sharing due to lag or blurry Video due to resource requirements.
How do you Share Screens on Messenger in 2024?
Messenger allows you to share your screen across all platforms. That is, you can connect a computer screen to another computer, a Smartphone to a Smartphone, a PC to a Smartphone, and vice versa.
To show your screen on Messenger, you must start a Video or Audio call. So, starting a call on Group chat allows you to use this feature with a large number of friends at the same time.
Anyway, as this feature is available on both a PC and a Smartphone, we will discuss it separately for convenience’s sake. So, let’s get right into it.
Share Screen on Messenger from a Smartphone
You can easily share screens with Messenger on your Smartphone. Remember that Messenger is a cross-platform app. So, you can show your Android display with an iOS (iPhone or iPad) user and vice versa.
It is an excellent tool that can help you in many situations, and learning how to use it is a good idea. So, let’s learn to screen-share on your Mobile Phone using Messenger or Messenger Lite.
1. First, launch your Messenger application and open a conversation with a person or group with whom you want to show.
2. Next, start a Video or Audio call per your requirement from the top bar of that conversation. This feature works both on Video and Audio calls.
3. When the other party accepts your call (Video or Audio), tap the “Video” icon in the bottom middle menu bar.
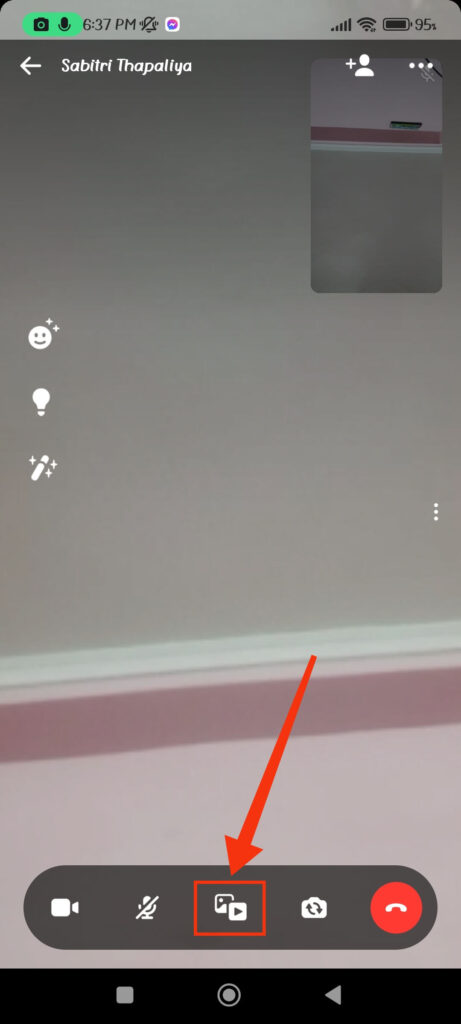
Remember that you can’t press this icon unless at least one person on the other end accepts your calls.
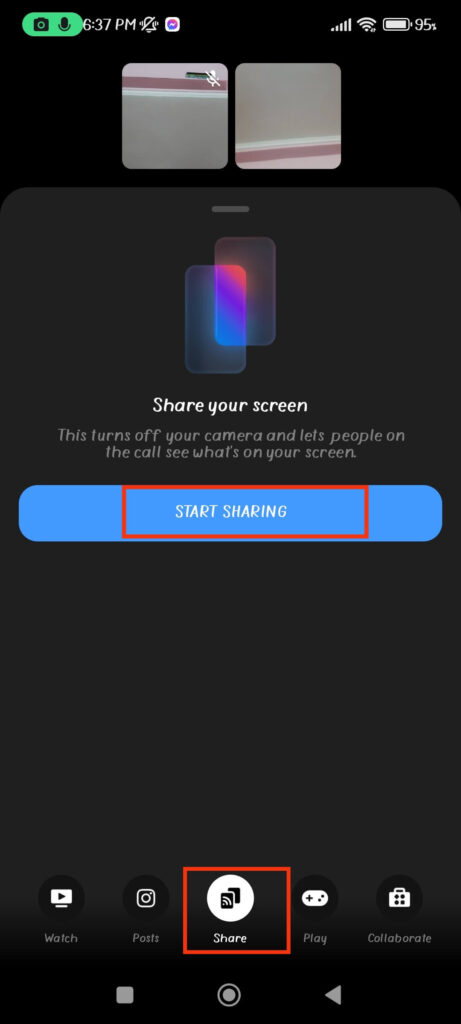
4. Next, go to the “Share” tab from the bottom menu and select the “Start Sharing” option.
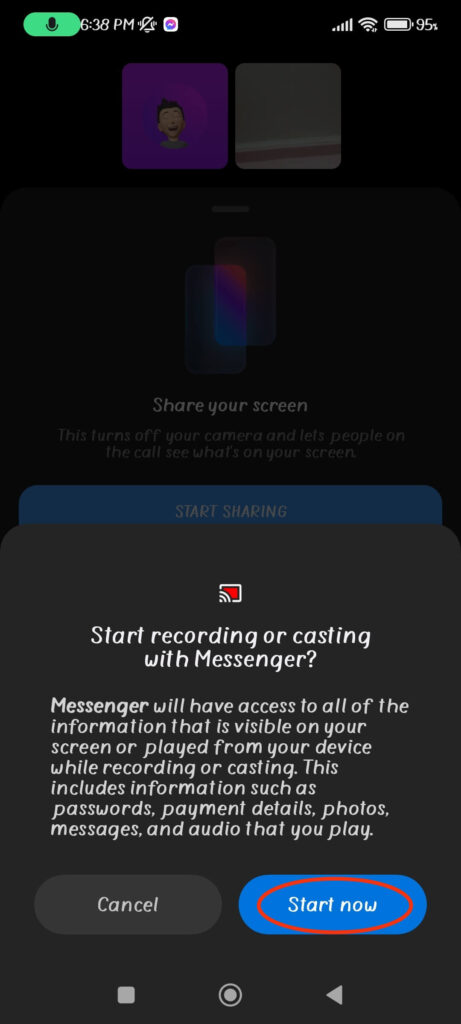
5. Once you permit the prompt by pressing the “Start now” button, you will show your Mobile screen immediately.
6. Now, skip the Video or Audio call or select the “Minimise call” option and begin doing things on your Android screen that you want to show the other party. Please remember not to end the call before this point.
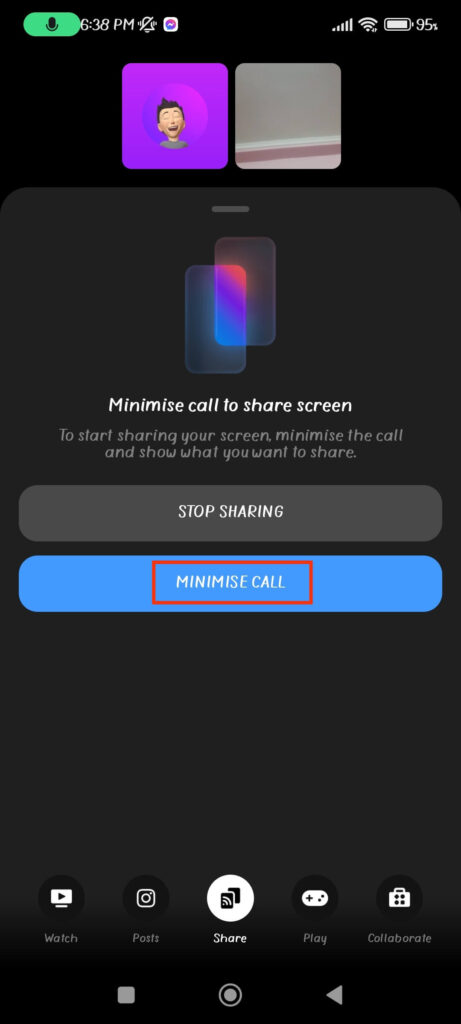
Your friend or friends (Group call) on the other end will now see your screen. If you use a Video call, the camera will turn off automatically until you end your sharing.
Remember, unless you turn off the microphone on your Video or Audio call, your friend can hear you even when sharing your screen. So, Messenger allows you to share your display with Audio in Audio or Video call.
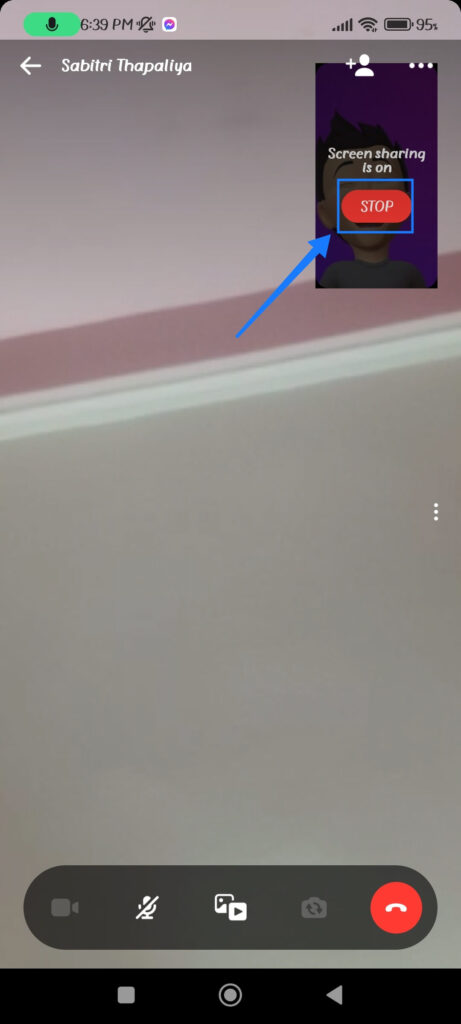
7. You can stop screen sharing at any time. For this, swipe down your notification panel and tap to open your Video or Audio call.
Now, select the Red “Stop” button on your call. This will remove screen sharing from your calls, and you will return to your normal Video or Audio calls.
You can also end your call directly to disable this Messenger feature. Furthermore, remember that by sharing your Android screen, you are sharing everything on it, including your private information, such as passwords.
So, be careful of what you show them on your screen while in this mode. Also, only do this with people you trust to protect your privacy.
Share Screen on Messenger from a PC (Windows or Mac)
You can easily transfer your screen from a PC to another PC or from a PC to a Smartphone and vice versa using the Messenger application.
All you have to do is start a video or audio call from the Messenger app on your PC or from the Messenger web on your desktop web browser.
So, let’s follow the steps below to share the screen on a computer or laptop using your Messenger account.
1. First, log into your Messenger account and call (Video or Audio) your friend. You can use either the Messenger Web or the app version, whichever you prefer.
2. Once your friend receives your call, click the “Share” icon from the bottom left corner of your call.
You will now see three ways to transfer your desktop display: Chrome Tab (or Browser Tab), Window, and Entire Screen. Let’s look at how to use each of them separately.
Option 1:Chrome Tab (Browser Tab)
This option allows you to share any of your Google Chrome tabs or the browser tab in which Messenger is active.
This option is beneficial if you want to show your content on one of your browser tabs but don’t want your friend to see what you do with the others.
For example, if you select the Messenger tab on your browser, your friend will only see what you do on that tab.
Hence, even if you switch to another tab or Window on your computer during screen sharing, they will continue to see the Messenger tab where you left it.
To use this option, click a tab on the left side of the “Choose what to share” page and press the “Share” button. You can only choose the tab which is currently open on your browser.
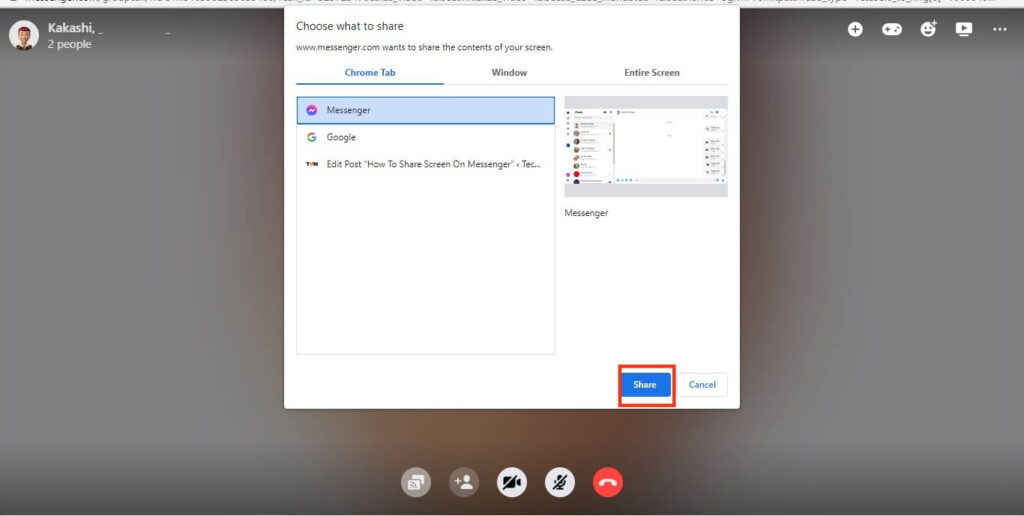
You’ll now return to that same tab on your PC, and your friend on the other side will see what you’re doing there.
Option 2: Window
Compared to the first option, this one allows you to step up your game a notch. This option allows you to share a single Window on your PC instead of a tab.
If you don’t know what Window means, look at your taskbar; each app you open creates one Window on your computer.
So, if you have a browser and a worksheet open on your PC but only want to show what you’re doing on the browser, you can use this method.
To use this method, go to “Window” on the “Choose what to share” page and click the Window you want to show.
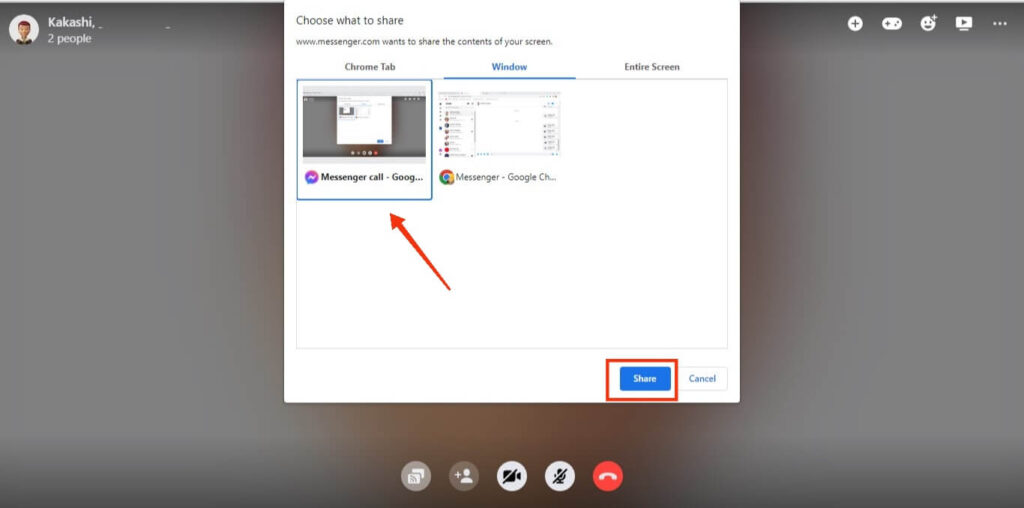
After you click the “Share” button, your friend will see what you are doing on that Window. However, if you close that Window and open another, they will not see it on their display.
Option 3: Entire Screen
If you are dissatisfied with the first two options and want to share your entire computer screen, you can select the third option.
This allows you to connect your entire computer screen with your friends. Remember that this method is a bit risky because there is no going back if you accidentally open a tab you don’t want others to see.
To use this method, click the single option available in the Window tab and press the “Share” button.
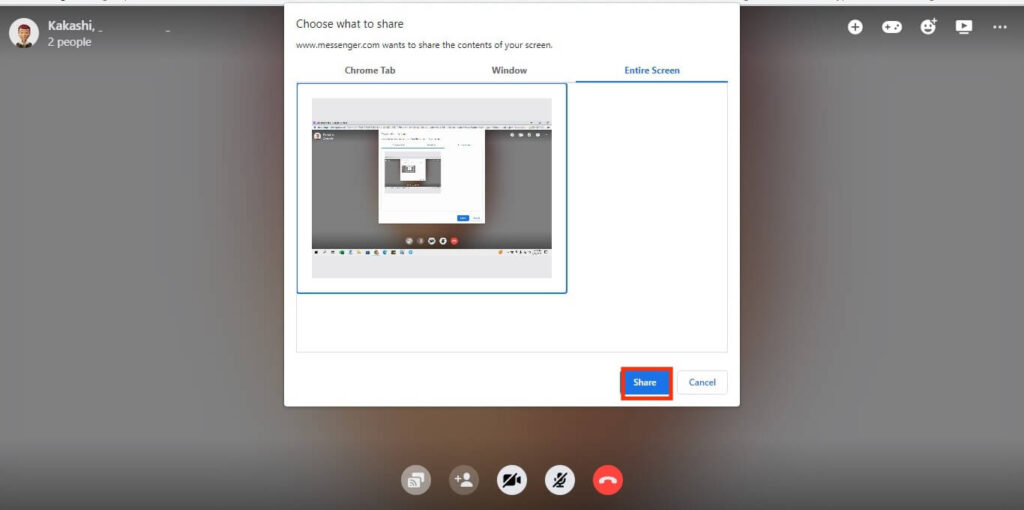
If you do this, the other party will see everything you do on your computer until you stop this feature on Messenger or end your call.
To end the screen sharing for any options above, press the “Stop sharing” button on your PC. You can also directly end your call to stop sharing.
Safe Alternative rather than Sharing Screen
Screen sharing on Messenger is risky, especially if you don’t know to use it properly. So, if you don’t want to take such a risk, there are a few alternatives you can try instead, some of which we’ll go over below.
1. Video or Audio Calls
If you are trying to teach something to your friends, it is preferable to call them rather than directly show your screen. You should only do this if you have no other option.
2. Share Specific Files
Instead of showing your entire display on Messenger, you can use a secure file-sharing service like Dropbox or Google Drive. You can control exactly what information you share and who has access to it this way.
3. Sending Photos or Videos
If you want to show someone’s visual content, you can use the chat function to send Photos or Videos. Taking a screenshot is better than publishing your screen online.
4. Using a Third-party App
Since display sharing is only a side feature, the quality of it on Messenger is not that great. Hence, you can use third-party apps such as Zoom or Skype to share your screen with others if you prefer.
5. Restrict this Feature to only Trusted Contacts
Make sure to only share your Messenger screen with people you know and trust and with whom you feel comfortable. Sharing your monitor with strangers or people you don’t know well can increase the likelihood of privacy and security breaches.
Note: If you don’t trust someone or they are risking your personal information, you can permanently block them on Messenger to avoid future problems.
FAQs
No, you don’t need to download any additional software to show your screen on Messenger, as the feature is built directly into the app.
Before using this feature on your device, you must initiate a Video or Audio call on Messenger. Hence, when you transfer your screen, you also share your voice.
If you accidentally show the wrong things on Messenger, stop the sharing immediately and apologize to the person you’re chatting with. To avoid any potential mishaps, double-check which screen you’re sharing before beginning.
Yes, you can still use Messenger’s chat feature while sharing your screen. However, your friend on the other side will be able to see your conversation, so be cautious.
You can try a few things if you’re having technical difficulties while sharing your screen on Messenger. First, make sure your internet connection is stable and strong. You should also restart your device or the Messenger app. If the problem persists, you can contact Messenger support for assistance.
Final Thought
And that’s all there is to it, folks! With just a few taps, you can now share your screen on Messenger like a pro.
Screen sharing on Messenger is a fun and easy way to share your digital world with friends and family, whether showing off your mad gaming skills or presenting a hilarious cat video.
So go ahead, give it a shot, and start playing around with screen-sharing! And if you have time, let’s also learn the meaning of Bump on Messenger.


