If you’re running Windows 11 and need to access the BIOS for any reason—for example, to change the boot order (USB or CD), enable or disable hardware features, or update firmware—you need to follow a specific set of instructions to get to the UEFI firmware Settings.
Therefore, this guide will walk you through the process of accessing the BIOS on Windows 11 and provide step-by-step instructions to assist you in navigating the new UEFI interface and configuring your system Settings.
However, please remember that accessing the BIOS and changing Settings can impact your system’s stability and functionality. Hence, proceed cautiously and back up your data before making any changes.
Furthermore, always ensure you fully comprehend the options you are changing to prevent any unintended effects. If interested, you can also learn to speed up Windows 11 performance.
Table of Contents
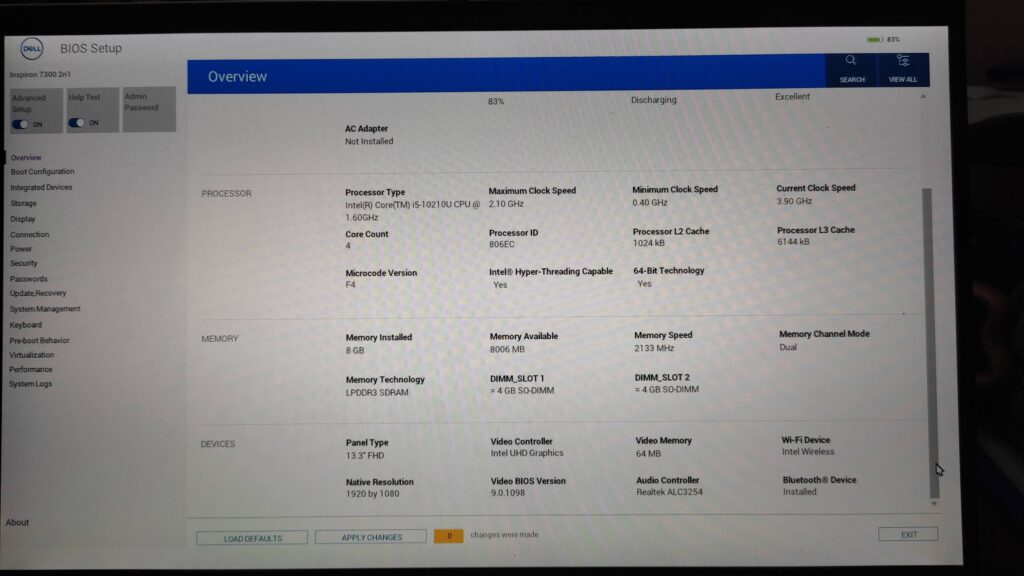
What Is BIOS?
BIOS stands for Basic Input/Output System. It is a type of firmware integrated into a computer’s motherboard and manages and controls the hardware during the initial boot-up process.
It enables low-level interaction and control between the computer’s operating system and hardware.
The initialization and configuration of the computer’s hardware, including the CPU (Central Processing Unit), RAM, storage devices (such as hard drives or SSDs), and other components (such as a keyboard, mouse, and display), is the primary responsibility of the BIOS.
It runs several inspections and tests during boot-up to ensure that the hardware components are in good working order. It loads the necessary Settings and drivers to allow the operating system to launch.
Users can also change several options in the BIOS, including the boot order (the order in which the computer looks for bootable devices), the system time and date, the CPU clock speed, and more.
It’s worth noting that Windows 11 offers a new BIOS interface, UEFI (Unified Extensible Firmware Interface).
In addition to offering a more up-to-date and user-friendly interface for managing the system Settings, UEFI includes extra features like support for more extensive storage devices and enhanced security options.
Also Read: How To Check Graphics Card On Windows 11?
Why do you Need to Access BIOS on Windows 11?
You may encounter issues if you have downloaded and installed Windows 11 on your PC since it is a relatively new OS. To fix this, accessing BIOS is very important.
Similarly, there are many reasons you may need to access the BIOS on Windows 11, which we will discuss below.
1. Hardware Configuration
You can modify several hardware options in the BIOS, including the boot order, CPU clock speed, memory timings, and more. To adjust or optimize your computer’s hardware options to meet your unique needs, you must access the BIOS.
For instance, you may need to alter the CPU clock speed for better performance or the boot order of a particular storage device.
2. Firmware Updates
Updating the firmware can bring bug fixes, performance gains, and new features. Suppose you want to keep your system up-to-date and ensure optimum performance and compatibility with newer hardware or software. In that case, you must access the BIOS to update the motherboard’s firmware.
3. Troubleshooting
Accessing it can assist you in identifying and resolving issues with hardware components, such as accessories or storage devices.
To identify and fix hardware-related problems, you must ensure the BIOS correctly detects the hardware components, changes configuration Settings, or disable/enable specific features.
4. Security Settings
It offers security options like TPM (Trusted Platform Module), password protection, Safe mode, and secure boot. When you want to set up or activate these security features to improve your system’s security and guard it against malware or unauthorized access, you might need to access the BIOS.
5. Overclocking
By increasing the clock speed of your CPU or other hardware components, you can increase the performance of your desktop PC.
If your hardware is capable, you can overclock it from the BIOS, change the CPU clock speed, and other Settings. However, improper overclocking can increase the risk of instability and hardware damage, so take caution.
How do you Access Bios on Windows 11?
Now that you know about BIOS and why you should access it, let’s also learn how to do so. Remember that while accessing this is simple, configuring it to meet specific needs will require technical knowledge.
We will explain many ways to access BIOS on Windows 11 below. We recommend that you learn all of them because we don’t know which method will work when.
Note: Most methods below also work for MS Windows 10 and 8. So, you can test these processes in such OS.
1. Access on Windows 11 using BIOS Key
BIOS is usually required when you can’t open your operating system or when troubleshooting issues. Other methods of accessing it will not work in such cases.
This method comes in handy for such a situation. So, follow the steps below to access it on Windows 11 using BIOS Key.
1. To begin, restart or turn on your computer or laptop.
2. Next, press the BIOS Key associated with your laptop brand as soon as the screen starts or the logo appears. You can press it multiple times to avoid missing it.
BIOS Key refers to the Keyboard Key that directs you to the BIOS Setup during the startup. For example, if you have an HP laptop, press F10 or Escape on your keyboard during startup to access BIOS.
Here are some of the BIOS Keys for popular laptop brands.
- HP – F10 or Escape key
- Dell – F2 or F12 key
- Lenovo – F2 or Fn + F2
- ASUS – F2 + Power button
- Acer – F2 or Delete
3. Select the “BIOS Setup” or “System Setup” option on the next screen.
Some PCs will directly take you to the BIOS by pressing the related Key. In such cases, you do not need to press the options above.
This is how you can get into the BIOS on Windows 11 by using the keys associated with your PC model. If this method does not work for you or you do not know the BIOS Key, try the other methods listed below.
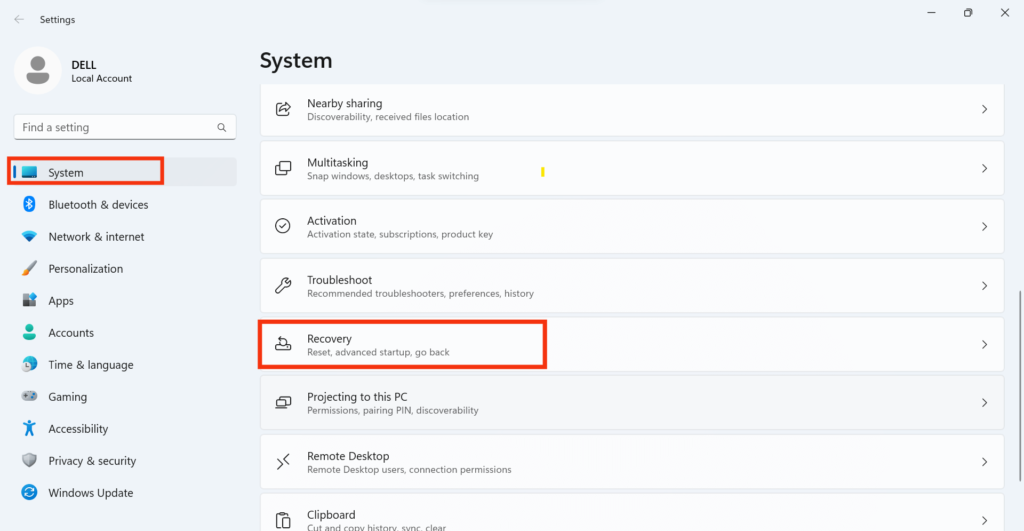
2. Access BIOS using Win 11 Settings
Another method to quickly access BIOS on Microsoft WIn 11 is through Settings. So, follow the steps below to use this method if you don’t want to use the first one above.
1. First, open Settings from the start menu by typing it on the search bar.
2. Next, press the “system” from the right side and select the “Recover” option on the left panel.
3. After that, click the “Restart now” button on the “Advanced Startup” option.
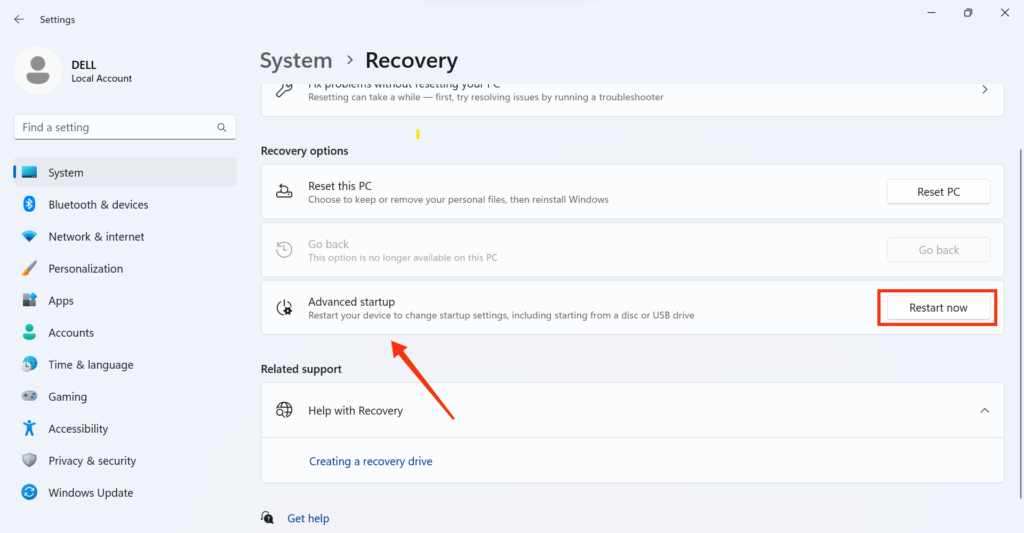
4. Once you press the “Restart now” button from the prompt, your PC will redirect you to Recovery Menu.
5. Now, click the “Troubleshoot” option and then select “Advanced options” on the next page.
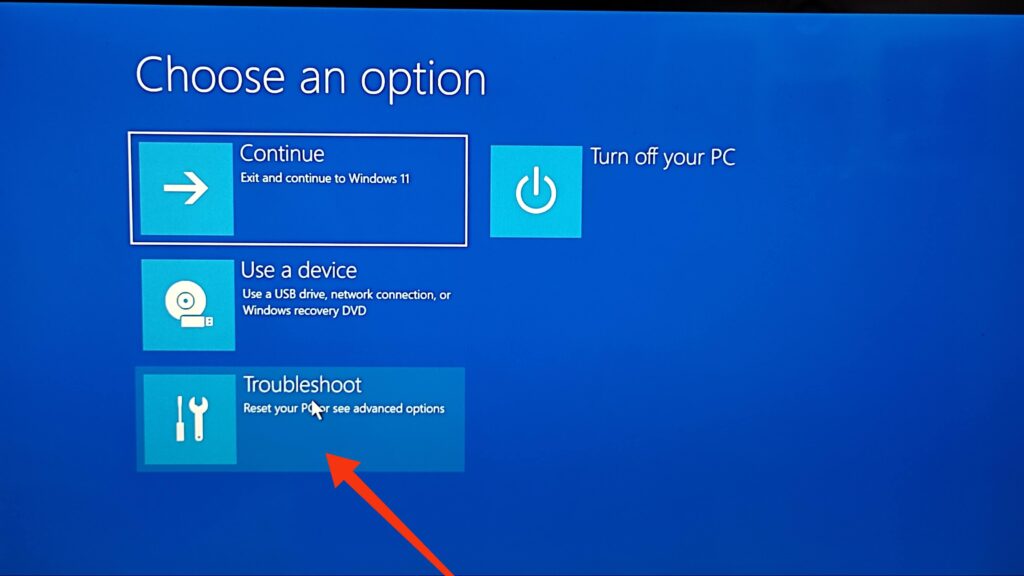
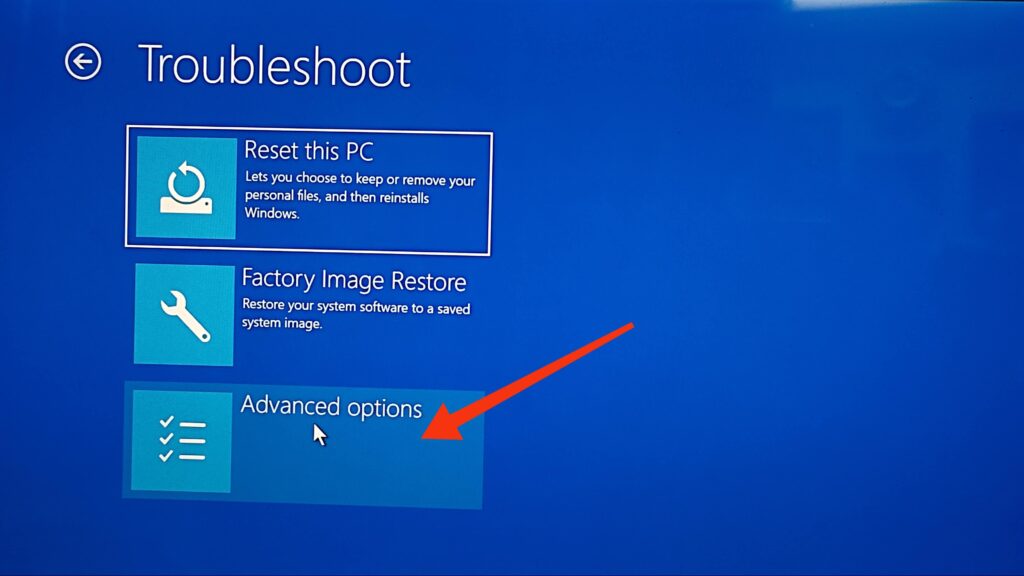
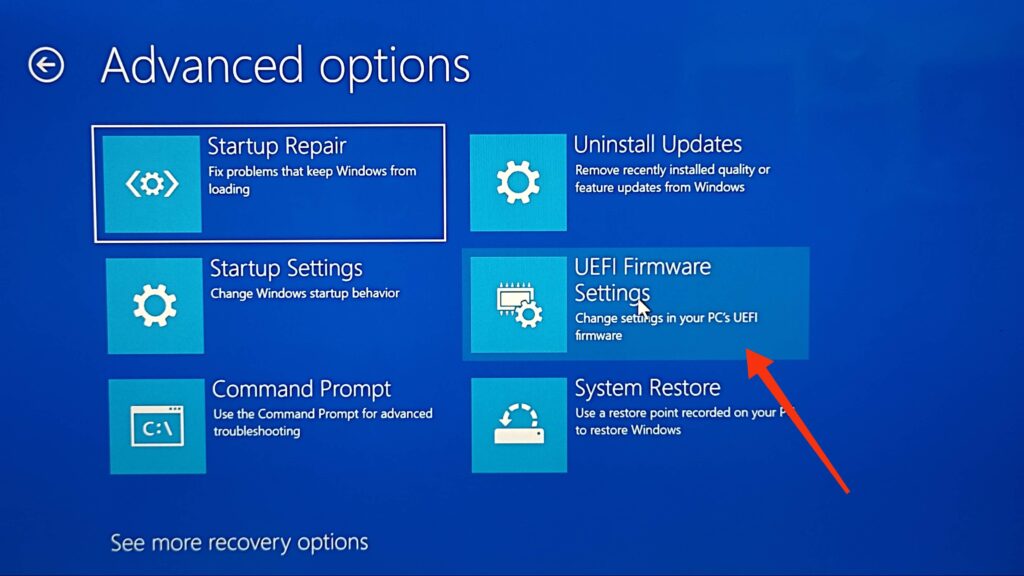
6. Finally, choose the “UEFI Firmware Settings” and Restart your computer to access on Windows 11.
Note: For Windows 10, you will find the “Recovery” and “Advance Startup” options in the “Update and Security” section.
3. Access BIOS using Command
Using the Command line to open the BIOS menu on a computer or laptop is also possible. For this, search Command Prompt on your start menu, right-click, and press “Run as Administrator.”
Next, copy and paste the code below to your Command Prompt and press “Enter.”
shutdown.exe /r /o
Your computer will now notify you that it will shut down in less than a minute. To avoid problems, save your open files and close them immediately.
Once your PC Restarts, you will see the recovery menu. Now, go to Troubleshoot >> Advanced options >> UEFI Firmware Settings and Restart your PC. You will immediately arrive at the menu.
4. Other Shortcuts to Access the Bios Menu
Many keyboard shortcuts allow you to access the Recovery Menu, which leads to your BIOS. Depending on your preferences, you can use any of them to access this Menu.
Shortcut 1:
Open the Startup Menu, press the Power button, and click the “Restart” option while simultaneously pressing the Shift Key on your keyboard. This will automatically direct you to the Recovery screen.
Shortcut 2;
Press Windows + R Key, type “shutdown /r /o /f /t 00,” or “shutdown.exe /r /o” and hit Enter.
Now, like before, select Troubleshoot >> Advanced options >> UEFI Firmware Settings and press Restart to access BIOS setup.
FAQs
If it is not working, double-check the correct Key for your system and try different timings, such as pressing it repeatedly on your keyboard or holding it down during boot-up, etc. You can also use other methods like Settings and Command to access BIOS.
Yes, as long as you are careful and follow the correct steps, accessing the BIOS on Windows 11 is generally safe. However, making changes without proper expertise or understanding of the implications can affect the stability and capabilities of your system. It may even result in data loss or hardware damage.
Therefore, before making any changes in the BIOS, it is critical to employ caution, back up your data, and ensure that you thoroughly understand the Settings you are modifying.
Final Thought
In conclusion, accessing the BIOS in Windows 11 can be a helpful tool for configuring hardware options, updating firmware, troubleshooting, and improving security.
However, exercise proper caution when editing the BIOS. Always verify the correct Key for your system, follow proper procedures, and ensure you understand what you are doing before changing anything.
Finally, if you need more clarification about any changes, consult a knowledgeable source or a professional technician to avoid unintended consequences. In the meantime, let’s also learn to move the taskbar to the top in Windows 11.


