Even though Windows 11 isn’t technically “new” in the traditional sense, it is still Microsoft’s latest and most up-to-date operating system with many useful features worth exploring. So, this might be the ideal moment to upgrade your operating system to MS Windows 11. Here, we will show you various methods to download and install Windows 11 on your PC.
You can easily download and install Windows 11 on your computer, assuming your hardware is compatible and satisfies the system requirements. And even if your computer doesn’t satisfy Windows 11’s system requirements, there is a solution here to solve that problem. You cannot, however, get Microsoft’s help with such an installation.
Therefore, verifying compatibility with your PC before installing this new operating system is best. But don’t panic; if you still want Windows 11, there is a way to install it even if you have an unsupported PC.
Windows 11 is a significant update, with several new features that make it worthwhile to install compared to Windows 10. Therefore, follow the instruction below to download Windows 11 on your PC perfectly.
Why Windows 11?
Windows 11 has been improved to be more seamless and slick than its predecessors. Widgets and a redesigned Start menu are just a couple of the impressive features of Windows 11.
Additionally, this operating system has placed a strong emphasis on gaming. Therefore, this can be the perfect OS for you if you’re a die-hard PC gamer.
A Windows 11 download will provide you with all the most recent updates to ensure the operating system can run properly. You will receive Windows 11 for free, by the way.
Also, you can be sure that any bugs in the system you may encounter have either been fixed by someone else or may have been patched. And, even if you run into a problem, you can solve it quickly. You should therefore think about installing Windows 11 on your computer.
How To Download & Install Windows 11 On Your PC
There are several methods of downloading and installing Windows 11. It depends on whether you want to lose your data or not.
The best and simplest method is to upgrade Windows 10 to 11 through a standard Microsoft update. You will automatically get Windows 11 update from Microsoft.
Another way is to use the installation assistant directly to upgrade your PC forcibly. Lastly, you can use the Windows insider program to update your computer ahead of time.
With the help of these three methods, you can install Windows 11 without erasing your current data. If you don’t mind losing your data, choose the clean installation of Windows 11.
For this, you can either use a media creation tool or a Windows 11 ISO file. If none of the other approaches work for your PC, you can try this as a final option.
Here, in this article, we have covered every installation method of Windows 11 on your laptop or PC. Therefore, you are free to choose whichever method you find effective. Also, while you are at it, check out our article on how to find Windows 11 product key.
Windows 11 Compatibility
Before we start, you must ensure the PC you want to download Windows 11 meets the minimum system requirements.
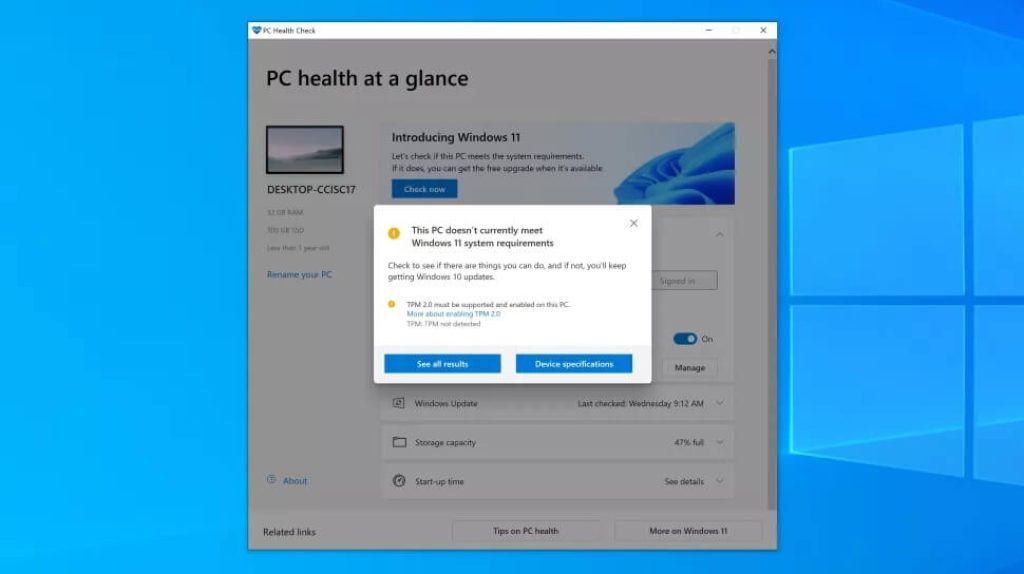
You can also use Microsoft’s PC health checkup app to know whether your Windows 10 meets the required specs for this installation.
First, download the PC health checkup app from Microsoft. Then, launch this app and click on the “Check now” option to check your system compatibility.
You can now determine whether the Windows 11 operating system is compatible with your computer.
You can also look at the specification in the table below to find out your system requirements.
| CPU Processor | 1 GHz or higher on a suitable 64-bit CPU or System on a Chip(SoC) with 2 or more cores. |
| Random-access Memory (RAM) | 4 GB or higher |
| Capacity | 64 GB or higher storage capacity |
| Device firmware | UEFI, Capable of Secure Boot |
| TPM | Version 2.0 of Trusted Platform Module(TPM) |
| Graphics | Direct X12 or later/WDDM 2.0 Driver |
| Display | is 9 inches or larger and has a minimum of 720p resolution |
If your PC doesn’t comply with the criterion, Microsoft doesn’t advise installing Windows 11.
As a result, if your PC doesn’t meet the aforementioned requirements, we also advise against installing it. If you still desire Windows 11, you can do so at your own risk.
Note: If TPM 2.0 is not supported by your PC, you may not be able to install Windows 11. You can still install it without TPM 2.0, but you do so at your own risk because it’s a complex and risky task.
Method 1: Update To Windows 11 From Your Settings (Highly Suggested)
Through a routine Microsoft update, you can quickly update Windows 10 to 11. You can wait for the update notification to arrive on your device if you haven’t received it on your PC for the Windows 11 upgrade.
Don’t worry; using this method won’t result in data loss. So, follow the steps below to continue with the installation.
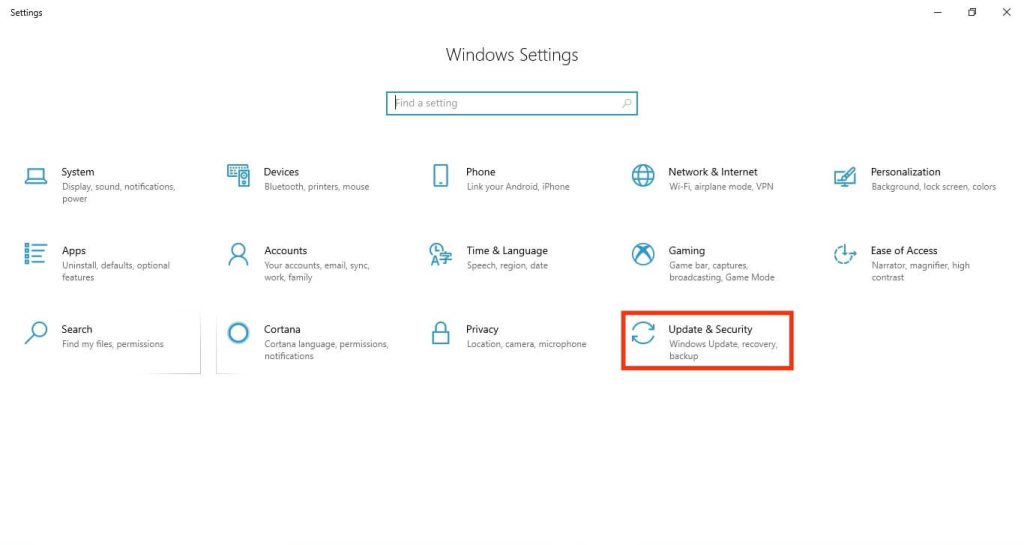
1. First of all, open your Settings on your desktop. You can either press “Windows + I” or search for settings on your search bar.
2. Select “Update & Security” from the range of options. Next, you will come to your regular update page.
To find out if your device needs updates, click on the “Check for Updates” button.
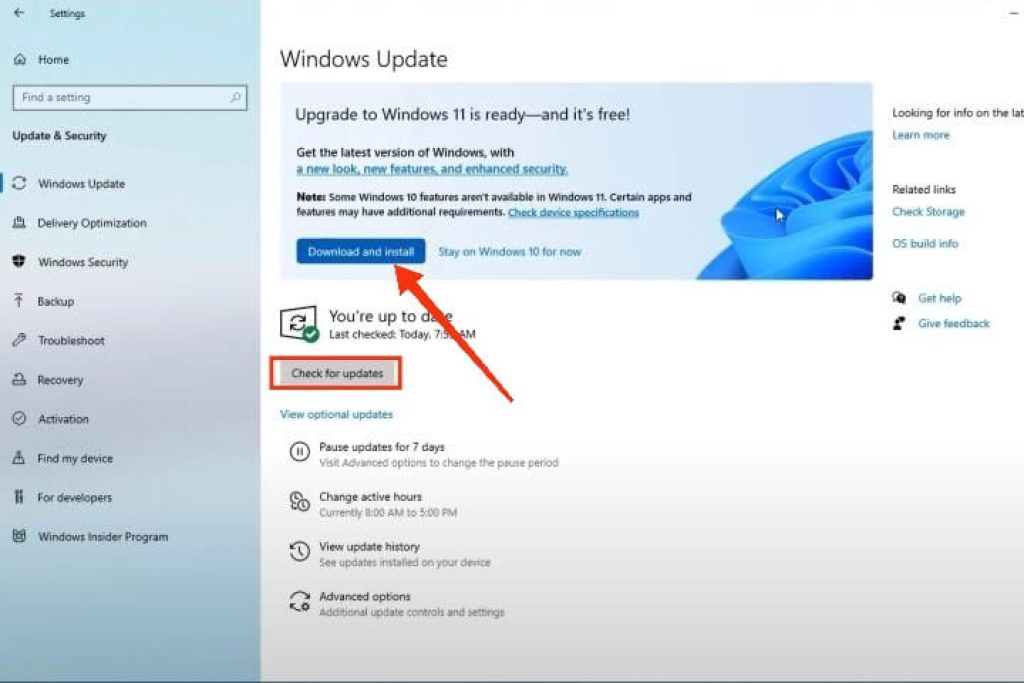
3. If your device is ready, you will get a prompt for upgrading to Windows 11.
Now, tap the “download and install” blue button to start downloading and agree with the terms and conditions.
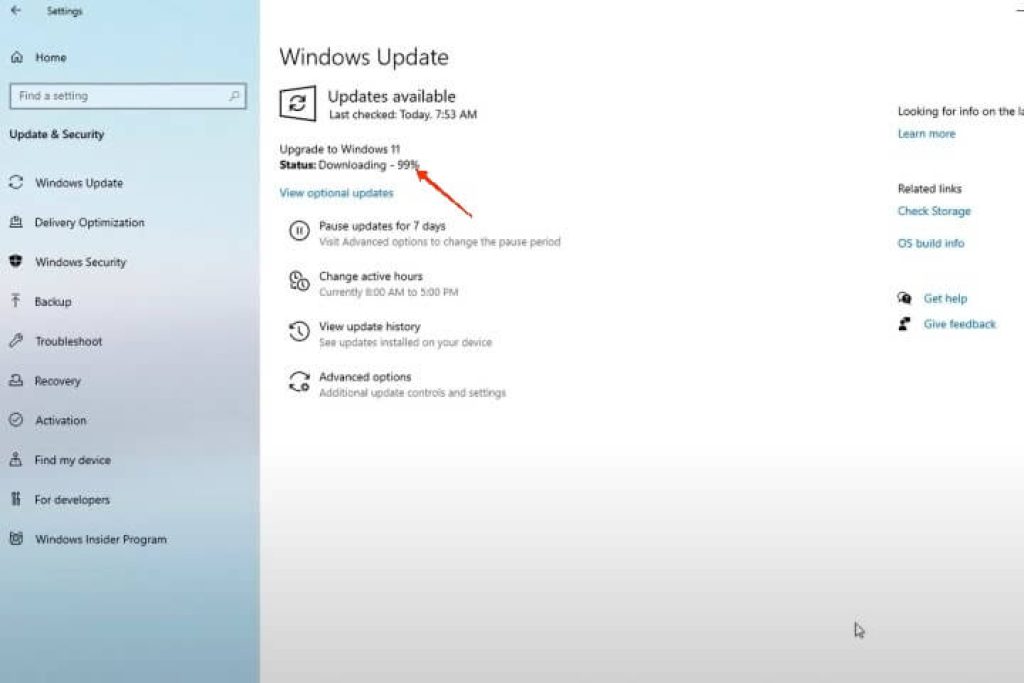
4. Beneath Windows Update, you can see “Upgrade to Windows 11” and the download progress bar.
It might take some time for your PC to download Win 11.
5. Finally, after downloading, you will get the option to restart your PC. Now, select the “restart now” option from the blue box.
Your computer will now restart and begin to install Windows 11.
Always check to see that your computer is connected correctly or that your HP Laptop has enough battery before updating.
During upgrades, your computer can restart numerous times. That’s how you can update Windows 10 to Windows 11.
Method 2: Update From Installation Assistant
If Windows 11 updates aren’t appearing on your usual update list, but your computer is still compatible, you can choose to install them using Installation Assistant manually.
This method won’t cause you to lose any of your files, either. So, follow the steps below if you want to use this method.
Note: You can use this method to update your Windows 7 to Windows 11 or Windows 8 to Windows 11.
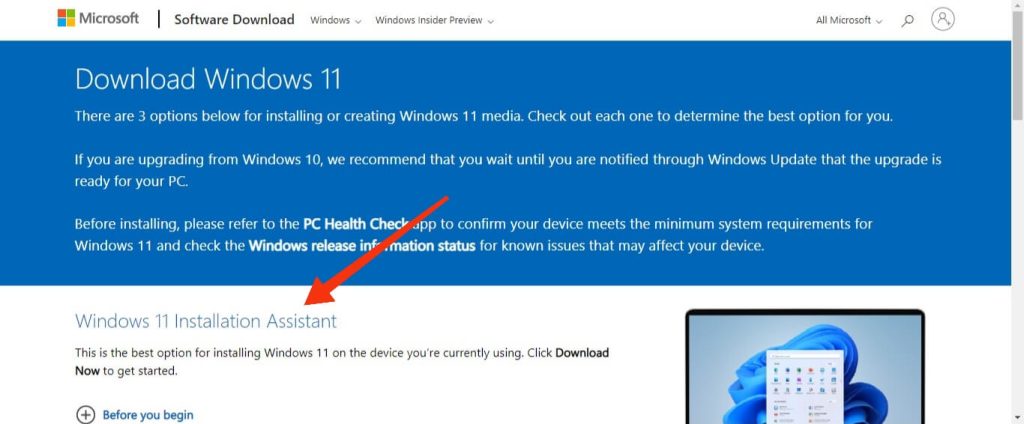
1. First, tap on the download Windows 11 to go to Microsoft’s website for Software download.
Now, look for the “Windows 11 Installation Assistant” among the three choices.
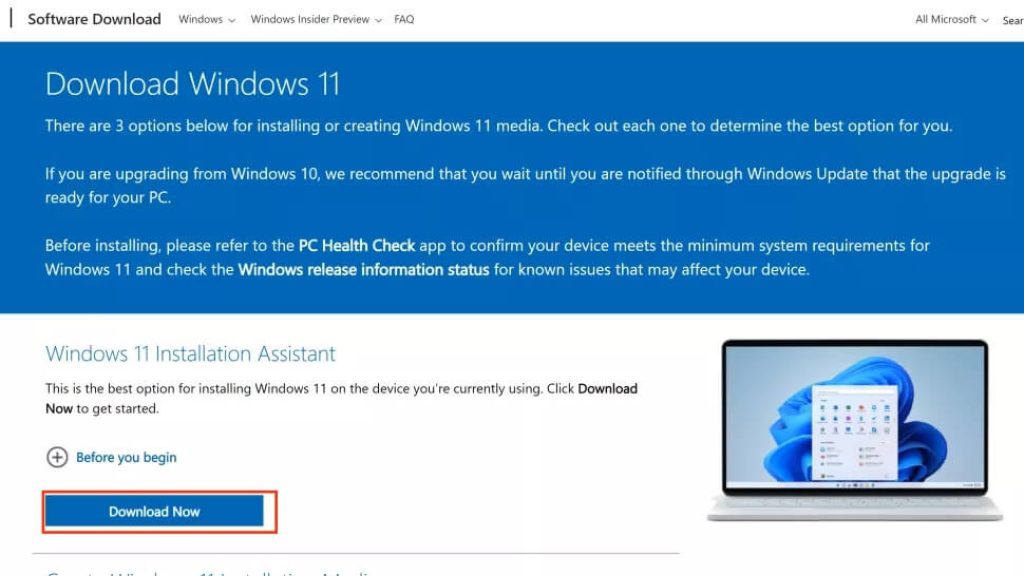
2. Next, click on the “Download Now” button right below the option to start downloading.
3. Open the program once you download it and press the “Yes” button when requested.
4. Now, you will get a pop-up box. Next, select the “Accept and Install” option to install Windows 11 on your PC.
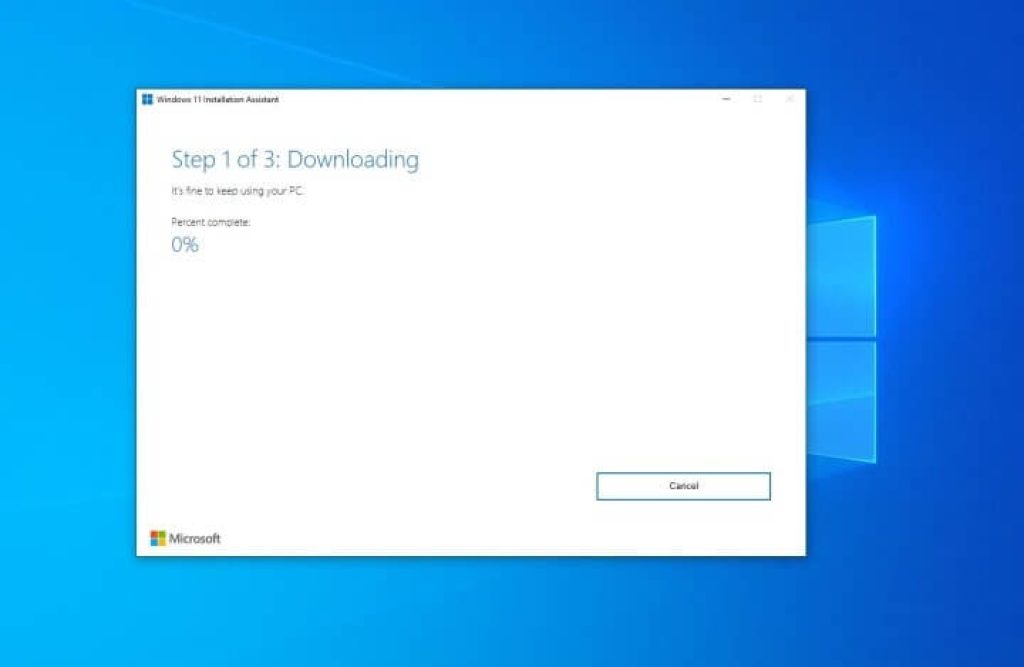
You will be directed to the three-step installation process for Windows 11.
The first step is downloading the Windows 11 operating system. Your PC might take some time to download based on your internet connection. If prompted, accept the Microsoft terms of service.
Windows 11 will check the download’s integrity in the second phase. It shouldn’t take long.
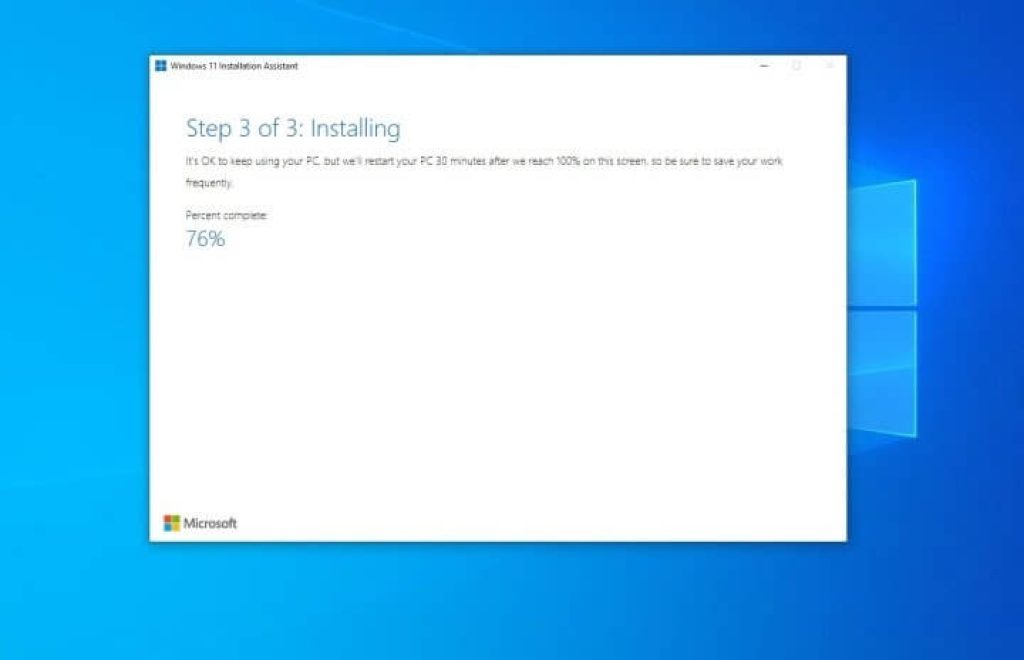
You will be notified that Windows 11 is being installed in the background, just need to wait for it to complete its installation. You won’t need to spend much time on it, so don’t worry.
5. When everything is finished, you will see the option to “restart now.” When you click it, Windows 11 will begin to install on your computer.
It will take a maximum of 1 hour to complete the installation. Ensure your laptop has enough battery power or is connected to a power source.
6. During installation, your PC may restart several times, and your progress will be shown as a percentage. Be patient and wait for it to be properly installed.
After the installation is completed, you will be directed to the sign-in screen of Windows 11. Now, sign in, do all the other setup required, and enjoy your new Windows 11 operating system.
Method 3: Update From Windows Insider Program
If none of the aforementioned methods work for you, your final option is to update your computer via the Windows Insider program.
Because Windows 11 installed through this approach will be an unstable preview version of the software, we have mentioned it as a last resort. So, follow the steps below if you have decided to use this method.
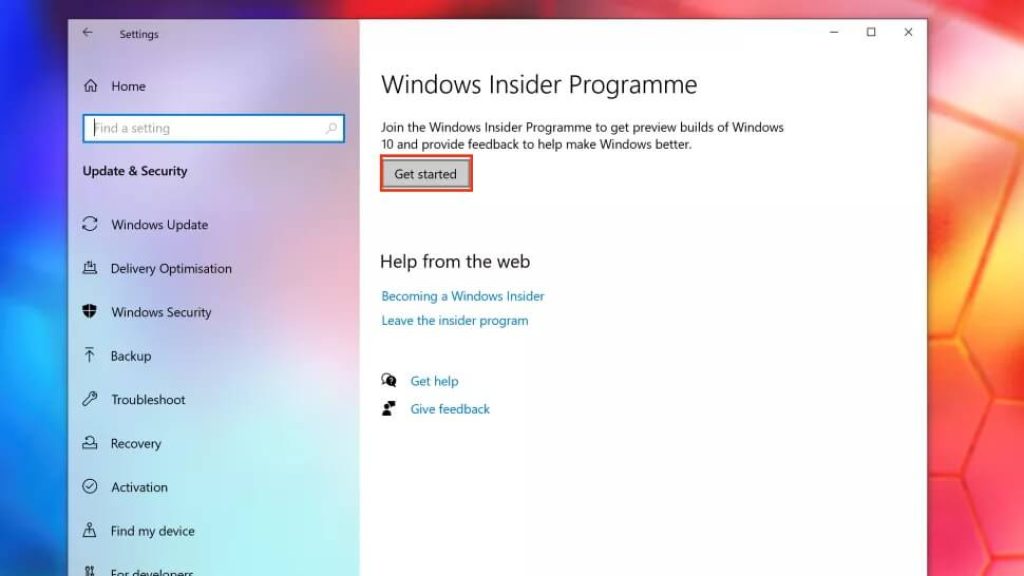
1. First of all, open your Settings on your PC. You can either press “Windows + I” or search for settings on your search bar.
2. Select “Update & Security” from the range of options. Next, you will come to your regular update page. Now, look for “Windows Inside Program.”
If you are new to this, you will see multiple channels like Dev, beta, and release preview.
You can select the dev or beta channel based on your preferences.
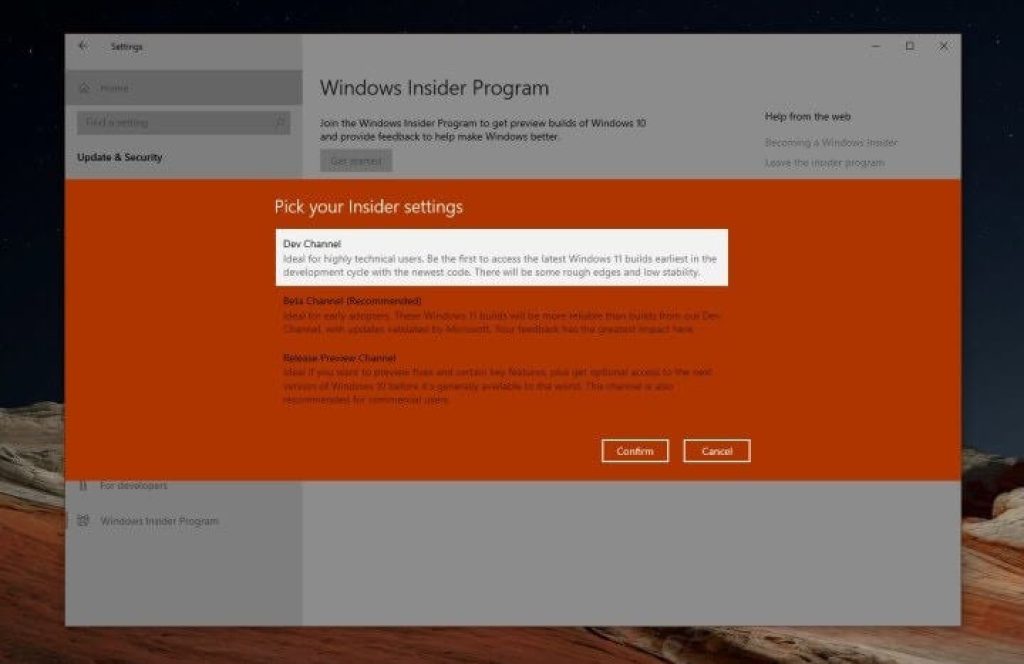
3. Bear in mind that the Dev channel is targeted at app developers. Hence you will get very early builds of Windows 11 from this channel.
Additionally, compared to the dev channel, the beta channel offers a more stable version of Windows 11. You won’t encounter many of the operating system’s problems and issues by downloading Windows 11 beta.
The release preview, though, is where you can get a preview of future Windows 10 releases.
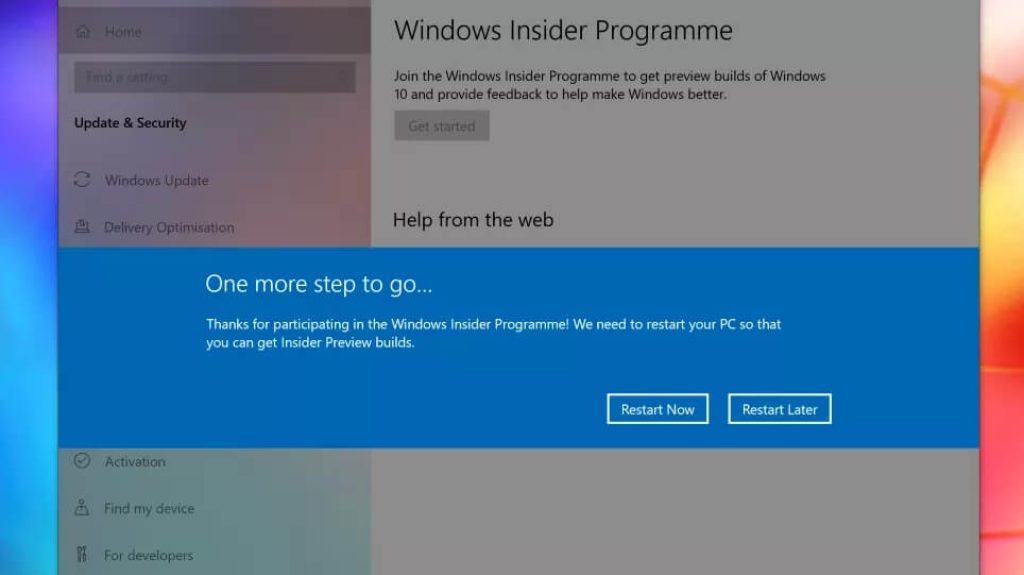
4. Select the one that best suits your requirements, then confirm your selection. You may now be required to sign in to your Microsoft account if you aren’t already logged in.
5. After that, you can restart your PC. After your PC returns to your homepage, like earlier, go to your Settings >> Update & Security. You can now check your updates again, and you will be able to see Windows 11 listed there.
You can choose to download and install Windows 11 anytime you want now. Make sure your laptop has enough battery power or is connected to a power source.
Unexpected obstruction during installation may corrupt your operating system.
Method 4: Clean Install Windows 11 From Installation Media
Now that we have covered all the installation methods where you can preserve your data, we will now discuss the clean installation of Windows 11.
Warning: We don’t recommend this option for you because it can completely erase all of your data. You must therefore do so at your own risk.
This method allows you to “clean install Windows 11” through a bootable USB drive. Don’t forget to back up your file before you start since this method will erase all the files and data.
So, follow the steps below if you have decided to use this method.
1. First, tap on the download Windows 11 to go to Microsoft’s website for Software download.
Among the three choices, look for “Create Windows 11 Installation Media”.
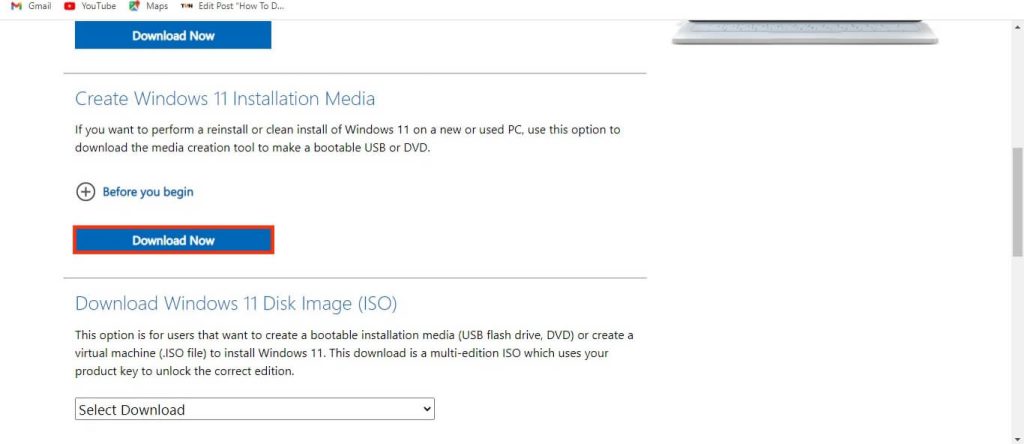
2. Now, insert your USB drive into your PC. Ensure your USB drive has at least 8 GB of free storage.
3. Next, click the “Download Now” button right below the option “Create Windows 11 Installation Media“. The Windows media creation tool will download. Once it is downloaded, start it.
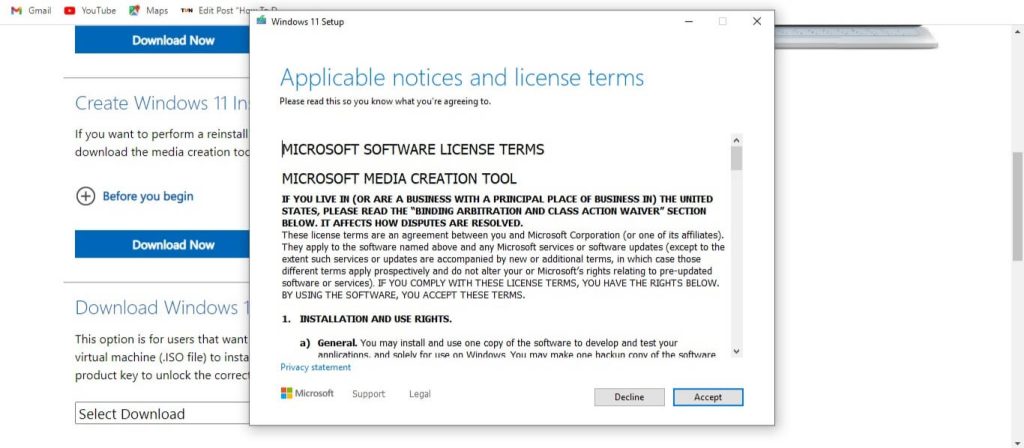
4. Now, you will come across Windows 11 setup box. Press the “Accept” button at the bottom to agree to the terms and conditions.
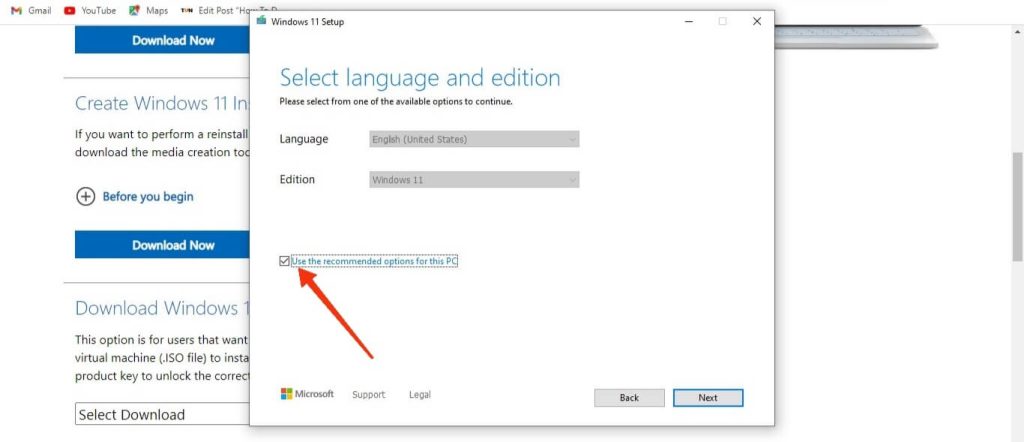
5. After that, click on the box next to the “Use the recommended options for this PC” sentence. To continue, click the “Next” button.
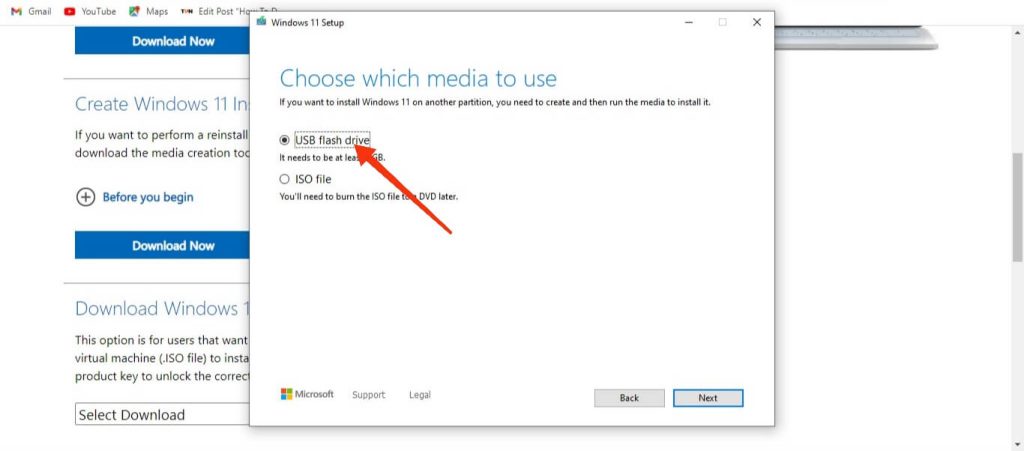
6. You will now choose between two media types: USB Flash drive and ISO files.
Press the “Next” button in the bottom right corner of the screen after selecting “USB Flash drive.”
7. Now, Windows 11 will be downloaded to your USB Flash drive. Be patient and wait for it to be properly downloaded.
After it has been downloaded, you will receive a notice stating that your drive is ready.
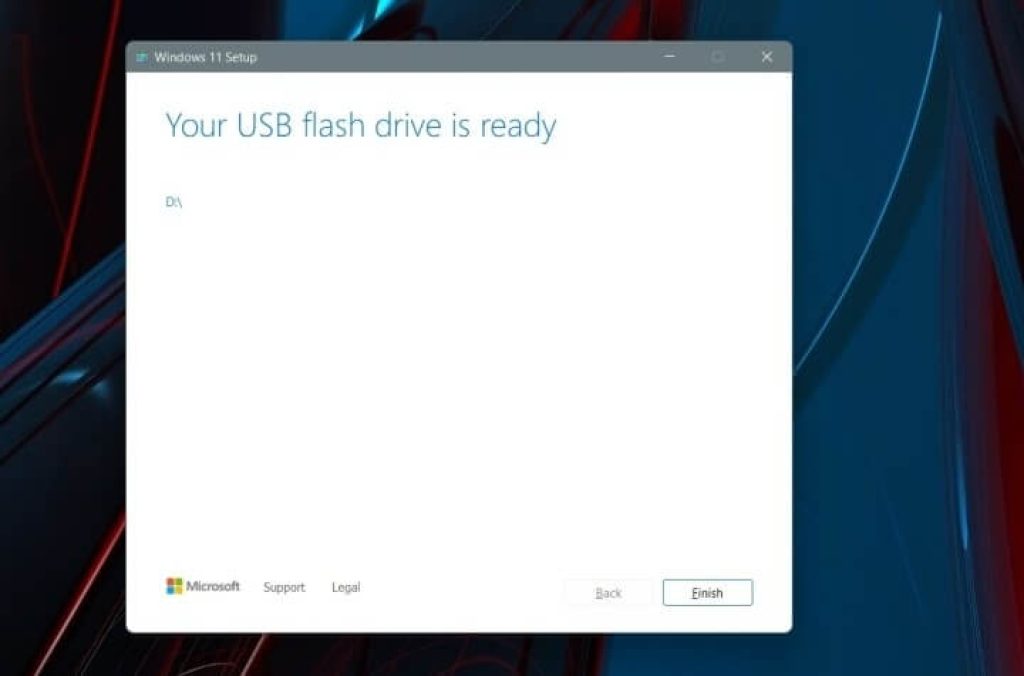
8. You can tap the “Finish” button to close the media creation tool. Don’t take your USB drive out of the PC, though.
9. Now, head to Settings >> Update & Security and select the “Recovery” option from the left panel.
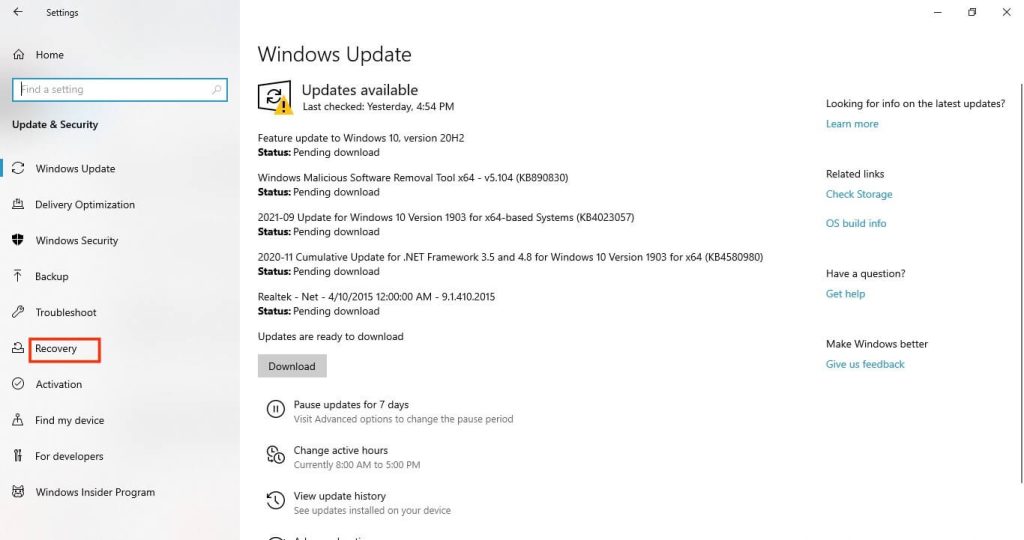
Then select “Restart now” from the “Advanced Startup.” Now you will come across the “Choose A Option” page where click on the “Use a device” option.
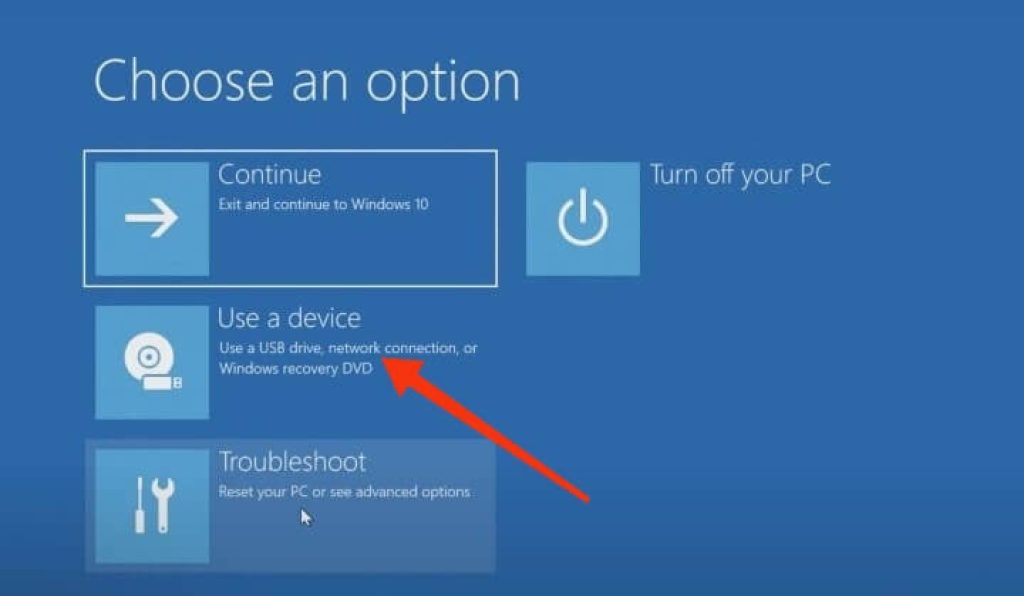
10. Your USB drive will be listed among the available options. Choose your drive, and your PC will restart on your USB drive and install the Windows 11 operating system.
If you can’t see this option, you may need to go to your BIOS or UEFI and boot your PC on your USB device. Pressing the F12 key on your keyboard immediately after your computer turns on will open your BIOS for most PCs.
If you have a problem accessing this on your PC, you may need to search for your specific problem or consult with your PC manufacturer.
11. Next, you need to choose the language in Windows 11 installer. Press “Next” and choose the version that matches your version of Windows 10 to start installing it. When you’re done choosing, click “Next.”
12. Now, choose the “Custom” option and select the drive on which you want to install Windows 11.
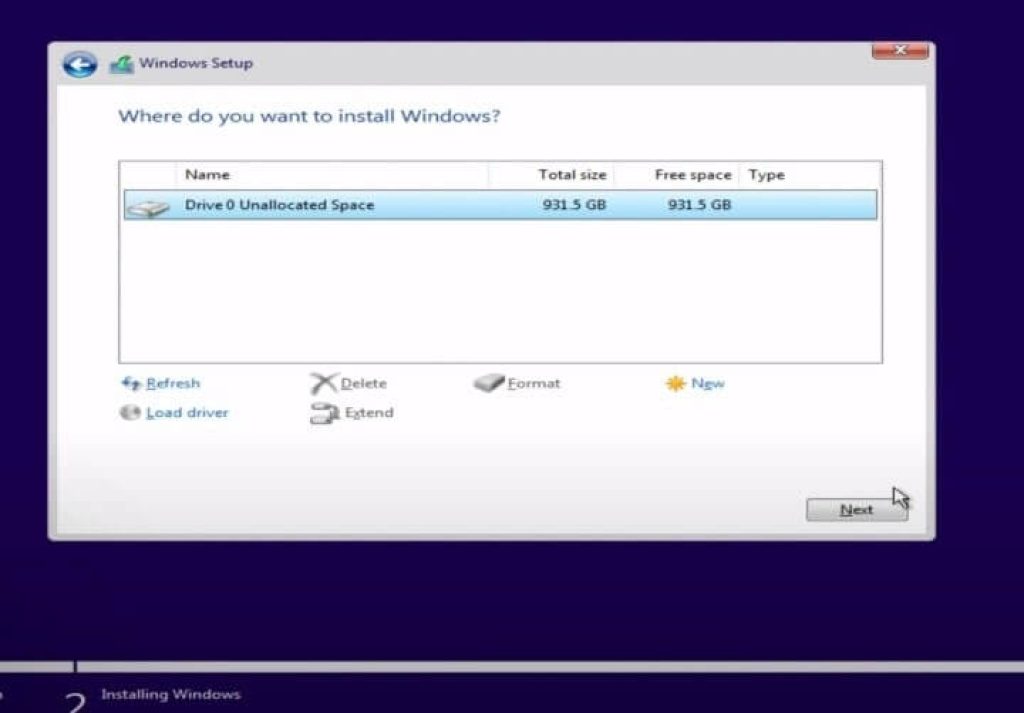
Note: You need to format your drive first before installing Windows 11. So, tap on the format button and delete all the files. After you are done, select that drive to install your new operating system.
13. Click “Next” after doing everything needed, and Windows 11 will begin to install on your computer.
Ensure your laptop has enough battery power or is connected to a power source.
Sign in, do all the necessary setup required, and enjoy your new Windows 11 operating system.
Be sure to set your admin password for security, and if you don’t know how to change your Windows 11 password, you can visit this article.
Method 5: Clean Install Windows 11 From ISO File
This method is your final choice if you can’t use any of the above methods. We don’t recommend this method to you on normal occasions. You must therefore do so at your own risk.
Don’t forget to back up your file before you start this method since this method will erase all the files and data. So, follow the steps below if you have decided to use this method.
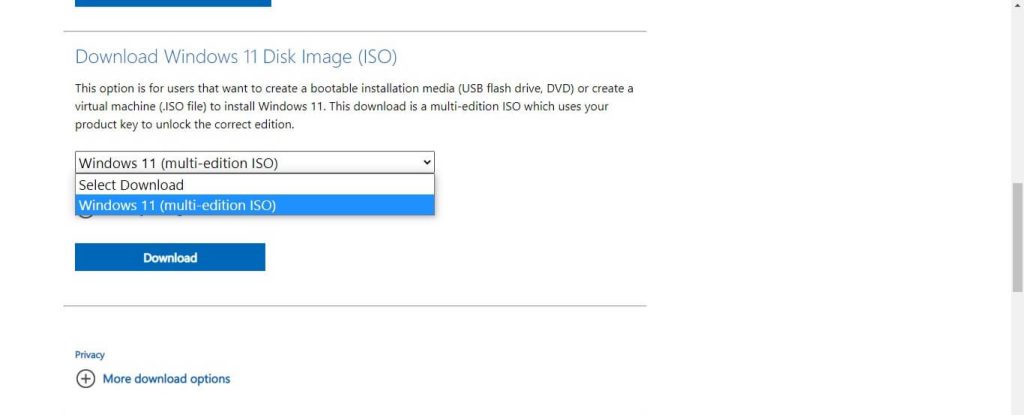
1. First, tap on the download Windows 11 to go to Microsoft’s website for Software download. Among the three choices, look for “Download Windows 11 Disk Image(ISO)“.
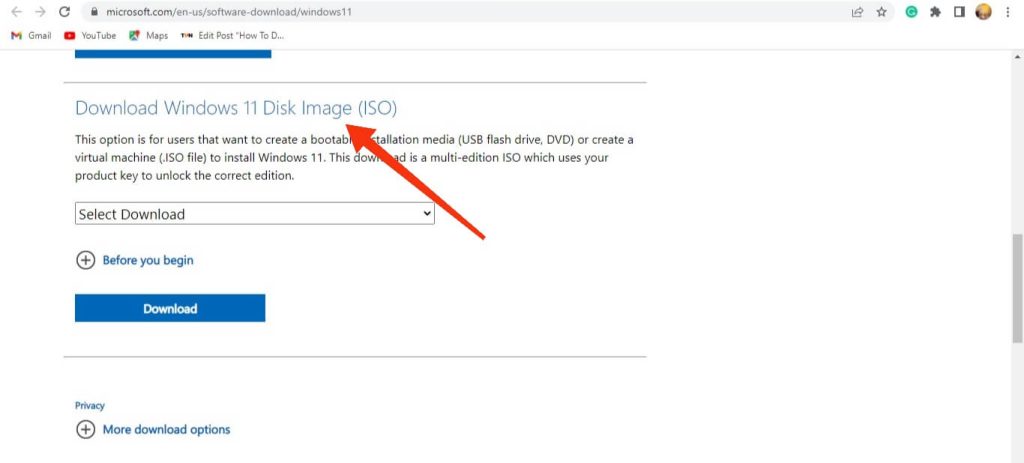
2. Next, click the “Download” button after selecting “Windows 11 (multi-edition ISO)” from the selection menu.
Now, select the language and tap on “Confirm” after you are done choosing.
3. After downloading the file, you will require external software’s help in a clean installation. Here, we have used Rufus to create a bootable USB drive.
4. First, you need to download Rufus from this website. Once it has been installed, open it and select “yes” to launch it.
Now, you must choose your USB drive from the Device dropdown menu. Ensure your USB drive has at least 8 GB of free storage.
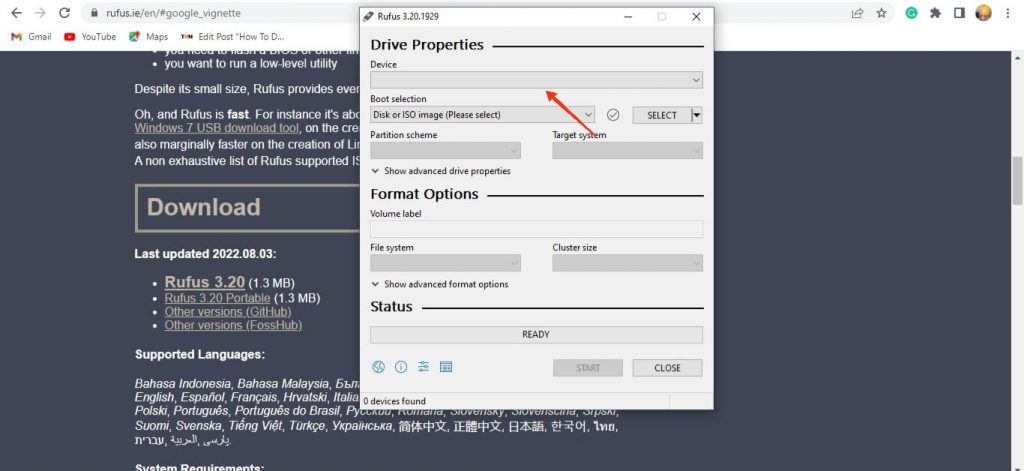
5. Now, on the “Boot selection” dropdown menu select the “Disk or ISO image” option.
Next, tap the “Select” button right next to it and navigate your downloaded ISO file and open it.
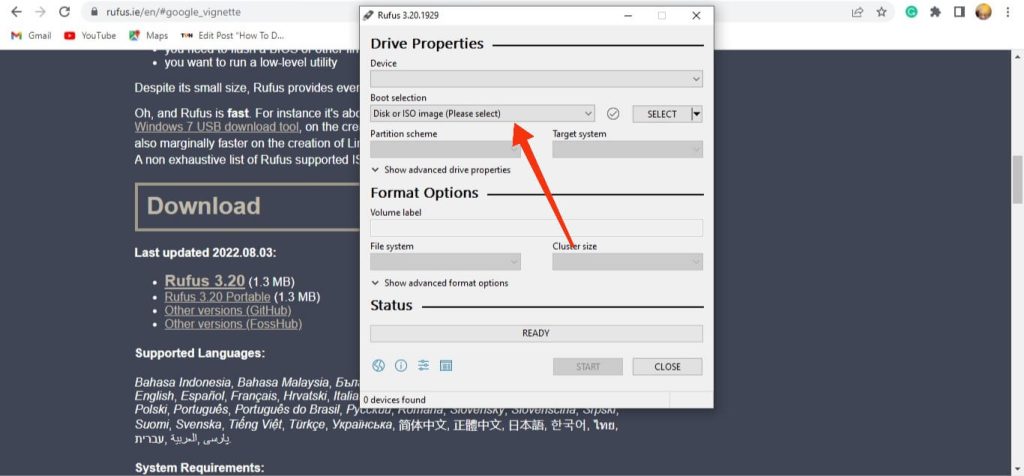
6. You can now choose between Standard Windows 11 installation and Extended Windows 11 installation.
Choose Extended Windows 11 installation only if your PC doesn’t meet the specification for Windows 11. Now, click “Start” and wait for the process to finish.
7. After your USB drive is ready, close the Rufus and restart your computer by following the steps mentioned above in Method 4 in our earlier section. Don’t take your USB drive out of the PC, though.
Ensure your laptop has a sufficient battery life or is linked to a power source. Unexpected obstruction during installation may corrupt your operating system.
Sign in, complete the remaining setup steps, and then enjoy your new Windows 11 operating system.
FAQ
There could be several reasons why Windows 11 won’t install on your computer. Driver error, out-of-date drivers, a defective Windows 11 ISO file, non-compatibility of your PC, etc., are some reasons.
To solve your problems, check to see if your PC is compatible, and then search the forum for your specific issue.
Windows 11 download size is approximately 3.5 GB if upgrading from Windows 10. If you clean install Windows 11 through an ISO file, you require a minimum of 5.37 GB of space.
If your PC takes forever to install Windows 11, the problem might be your slow hardware component. You can choose to upgrade to SSD from HDD to solve this issue.
Even with only 4 GB of RAM, Windows 11 can run on your computer. However, if you could not have a pleasant experience with it, thus we advise you to upgrade the RAM on your computer.
Yes, you can switch to Windows 10 again if you don’t want to use Windows 11. For this, go to Settings >> Windows Update >> Advanced options >> Recovery >> the Previous version of Windows(Go Back).
Final Verdict
For your convenience, we’ve provided a list of five methods to download and install Windows 11. You can choose whichever method you believe is ideal for you and apply it to any PC brand, whether a Dell, Lenovo, Asus, or HP.
Also, you may encounter various issues during the installation of Windows 11. So, make sure to follow every step carefully. You can use our recommended method to install it to avoid encountering such problems.
Finally, enjoy your new operating system, and if you want, you can check out our article on how to install fonts on Windows 11.


