Did you recently switch to Windows 11, the most recent version of the operating system? You should experience speed issues with this new version. So, a quick modification to the settings will get your job done. This article will take a quick look at methods to Speed Up Windows 11 Performance.
There are times you have pretty good hardware, but issues with your operating system can affect the performance of your PC.
Therefore, knowing different settings that can impressively improve your computer performance would be helpful. This will also help you get the best out of the hardware.
Why is Windows 11 running so slowly?
There might be a variety of causes behind Windows 11’s poor performance. It might be due to a lack of updates, an out-of-date operating system, or several other factors.
Here are some probable causes for Windows 11 performing slower than usual:
Too Many Startup Apps
If your computer has a large number of programs and apps installed, the startup procedure may take some time.
These are the apps that are set to load at startup, increasing boot time and significantly impacting Windows performance. So, removing unnecessary applications from the startup is a good idea to increase boot speed.
Lack of Sufficient RAM
A computer that does not have enough RAM will run slowly and may crash. If your operating system runs out of RAM, it may use a portion of the storage disk as virtual memory, resulting in poor performance. You may address this problem by using RAM cleaning software.
Devices that are old or fragmented
Old or broken devices can slow down a computer in various ways. Furthermore, outdated or cracked equipment might cause faults and instability, affecting speed and dependability.
These can degrade computer performance to unusable levels. In addition, as previously stated, Windows 11 does not support outdated devices. This is also a possible reason for your device to run slowly.
Disk drive space is running out.
You may need to delete some files to free up disk space. This one is comparable to running out of RAM in that it is explained similarly. You may upgrade to a new SSD if you want extra storage capacity.
Why is my disk drive space running low?
There are several reasons why your disk drive space may have run out:
- Your disk drive may contain a significant number of huge files.
- Your disk drive may contain a large number of little files.
- You may have many apps installed on your computer, each of which consumes disk space.
- Your disk drive may be fragmented, meaning the files are not stored in a single continuous block but spread throughout the drive. This might happen when you add and delete files over time.
- You may have a virus or other sort of malware on your computer that is consuming disk space.
Malware and viruses
When you download various apps or programs, computer viruses might be obtained from untrustworthy sources. So, double-check them and use one of the top antivirus choices for Windows 11.
If you have no idea about Malware in Computers, Malware is software created with the intent of causing harm or damage to a computer system.
It is capable of stealing personal information, deleting data, and even taking control of a machine. Malware may be transmitted via email attachments, websites, or simply by opening an infected file.
Windows or driver updates
Failure to keep your software and hardware up to date can lead to significant computer failures. You may also utilize the different application on the market, which automatically upgrades missing or outdated graphic drivers, substantially impacting Windows 11’s overall speed.
Also Read: How To Update Windows 11
If you want to speed up Windows 11, we have some performance adjustments and changes to help your computer or laptop function smoothly.
Methods to Speed Up Windows 11 Performance
There are several tips for improving the performance of outdated hardware. Windows offers hardware upgrades and various built-in options to enhance the device’s version and make it function faster. Let’s take a look at the procedure one by one.
In the next section, let’s discuss the best methods to Speed Up Windows 11 Performance. It is recommended that you test this on non-production Windows 11 devices to ensure everything is operating correctly.
Method 1: Expanding the Device’s Physical Memory
As we all know, physical memory is utilized to improve system performance. Physical Memory is the most traditional method of speeding up your gadget. You can add/upgrade Random Access Memory (RAM) to your device for quicker performance.
Another approach to boost the performance of Windows is to upgrade to a SATA Solid State Drive (SSD). SATA SSD is quicker than you might imagine. For instance, a Hard Disk Drive (HDD) with a read/write speed of 100 MBps is 5x faster than a SATA SSD with a read/write speed of 500 MBps.
Method 2: Expanding Virtual Memory
Operating systems use virtual memory as a memory management strategy. Combining RAM and disk storage enables a computer to store and utilize more memory than is physically accessible.
Method 3: Disable Startup Programs
Programs frequently add themselves to the list of startup applications. As a result, too many startup programs might overburden your machine and prevent it from booting up efficiently.
When installing software, it’s usually a good idea to check the starting programs list and eliminate bloatware regularly.
Method 4: Uninstall Unnecessary and Unwanted Software
The primary cause of your computer’s slowness is too much software loading. These needless programs not only consume system resources but also slow them down. You should remove any unwanted applications from your PC.
If you want to uninstall the application, we have a dedicated article on How To Uninstall Apps On Windows 11.
Method 5: Clear the Device’s Disk Space
You can empty the disk space on your computer to make way for new files. You cannot store any more data on your disk if it is complete.
Also, freeing up disk space might enhance your computer’s speed. When your drive holds less data, your computer has to seek less for the required files, which can improve overall performance.
Method 6: Disable Visual Effects
You may disable visual effects in Windows for various reasons. One reason is that they can slow down your computer, especially if it is old or has limited resources.
Furthermore, some people find visual effects to be distracting or even irritating. Finally, some visual effects can interfere with the operation of specific programs.
Method 7: Turn off Notifications and Tips
You will not get advice or suggestions if you disable this setting. However, you will still receive notifications from Windows, such as when your power is low when you need to back up your files, and when updates for your device are available.
In addition, Windows 11 includes a Notifications and Tips feature that alerts users to any system activity.
To provide this, the system scans and runs a background application to collect information. As a result, this may affect system performance; disabling this may help improve system performance.
Method 8: Disable Game Mode
Windows Game Mode is a new feature introduced in the Windows 10 Creators Update, aimed at making your system more responsive when gaming. However, there are some potential downsides to using Game Mode.
If you are not a gamer and do not require gaming capabilities to be enabled in Windows, you should deactivate such settings on your device.
Method 9: Avoid installing third-party antivirus software
The common assumption is that third-party antivirus software must be installed on Windows 11 and 10. There were days of third-party applications. There was a time when you required a specific antivirus tool to safeguard your device from malware or virus infection.
On the other hand, Microsoft has created protection for its consumers through Windows Defender. This Windows Defender is sufficient to secure our computers, and Microsoft also updates the malware definitions regularly.
Some third-party antivirus programs may interfere with the installation or function of Microsoft apps. You can disable or uninstall if you have third-party antivirus software installed on your device.
Method 10: Disk Defragmentation
Disk defragmentation is reorganizing fragmented data on a disk to store each data unit in the exact location. This procedure can make your computer function better. Disk fragmentation occurs when files are broken into nonadjacent chunks and distributed over the hard disk.
This can happen when files are produced, destroyed, or updated. When a file fragments, the computer must seek the individual bits, which might slow it down.
By eliminating fragmentation, disk defragmentation can help enhance the speed and efficiency of your computer.
Method 11: Use a resource-friendly Browser
When your PC satisfies the minimal requirements for running Windows 11, you will also want a resource-efficient browser for a quicker connection.
Google Chrome is resource-consuming; due to this, you can have a look at other alternatives. Here are some suggestions:
Method 12: Remove Temporary Files
Temporary files are a form of cache. Many programs produce temporary files while they are running. For instance, when you open a document in Google Chrome, the application has a temporary file. Shutting down the laptop doesn’t erase the temporary files permanently.
When you execute any activity on a laptop or PC, temporary files are produced automatically to ensure the operations go smoothly.
Unfortunately, these files take up space in the system, which is why they slow down the PC and must be eliminated.
How to Increase Windows 11 Virtual Memory
Virtual Memory can be helpful when your physical Memory runs out of space. Here are some steps to Increase Virtual Memory in Windows 11:
Step 1: Firstly, press the “Windows key + I” from your keyboard.
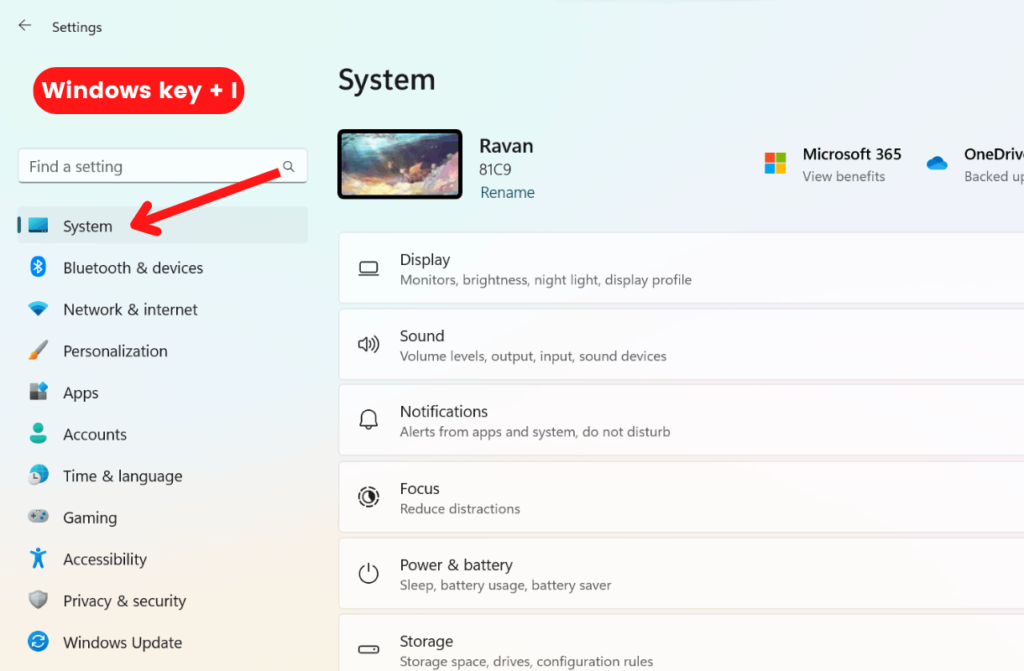
This will let you open the Settings app. The setting app can guide you to Virtual Memory settings.
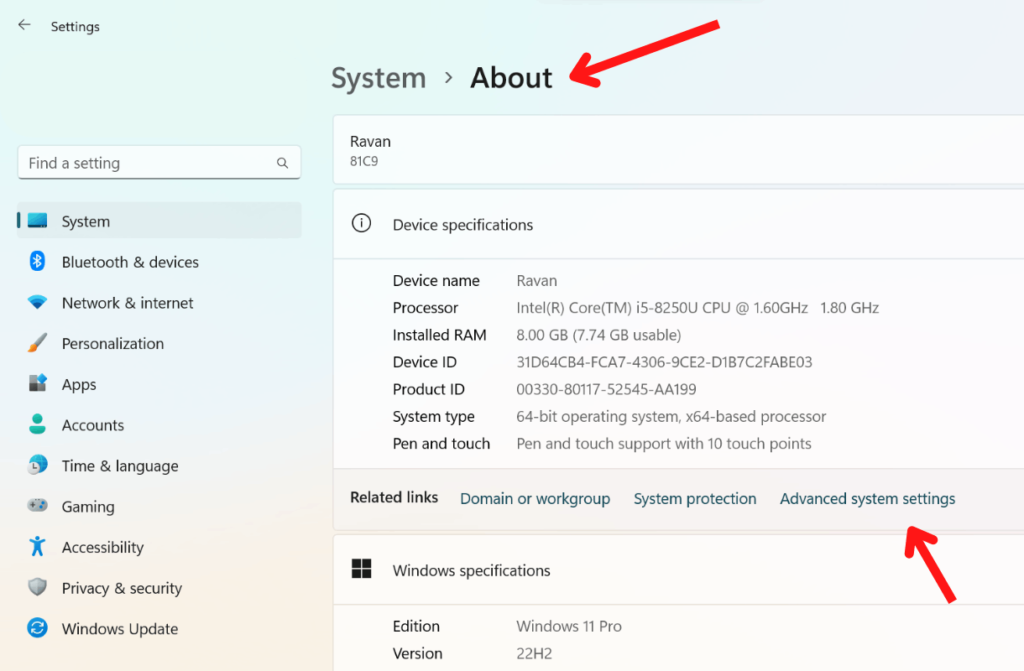
Step 2: Secondly, you can navigate to System >> About. This portion of the settings contains device information with the Device ID, RAM, System Type, and so on.
Step 3: Following that, select “Advanced system settings.”
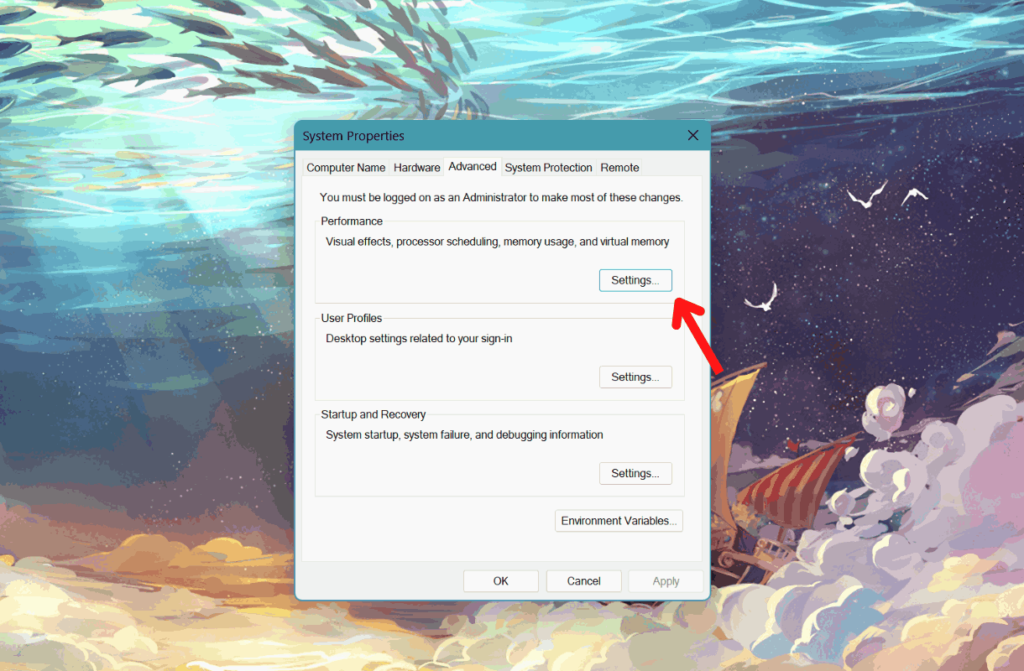
Step 4: Now, click on “Settings,” under the Advanced tab.
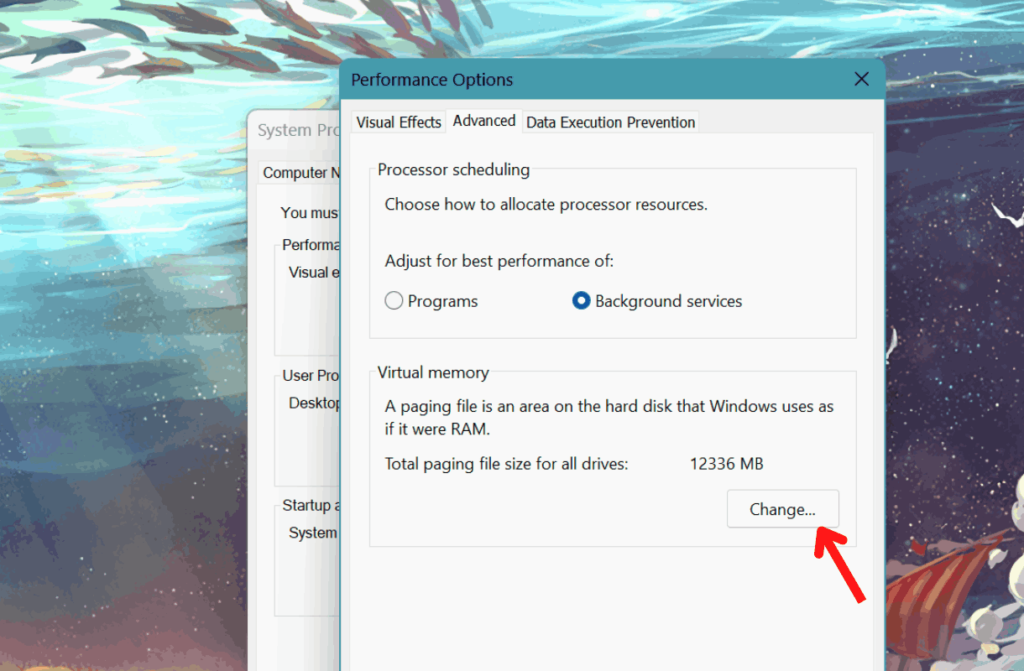
Step 5: Finally, Choose “Change” under Virtual memory. Here are your Virtual Memory selections.
Here, you can allocate your Virtual Memory for a specific process. For instance, you can adjust the best setting for programs or use it for Background services.
Note: The minimum and maximum sizes of the Virtual Memory can be up to 1.5 times and four times the actual memory of your machine, respectively.
For instance, if your machine has 1 GB of RAM, the minimum size equals 1.5 GB, and the maximum file size should be 4 GB.
How to Disable Startup Apps in Windows 11
Windows 11 has more consistent performance and other significant improvements, but it might still suffer from delayed starting times thanks to background programs.
Furthermore, never using these programs may affect your Windows PC’s speed and battery life.
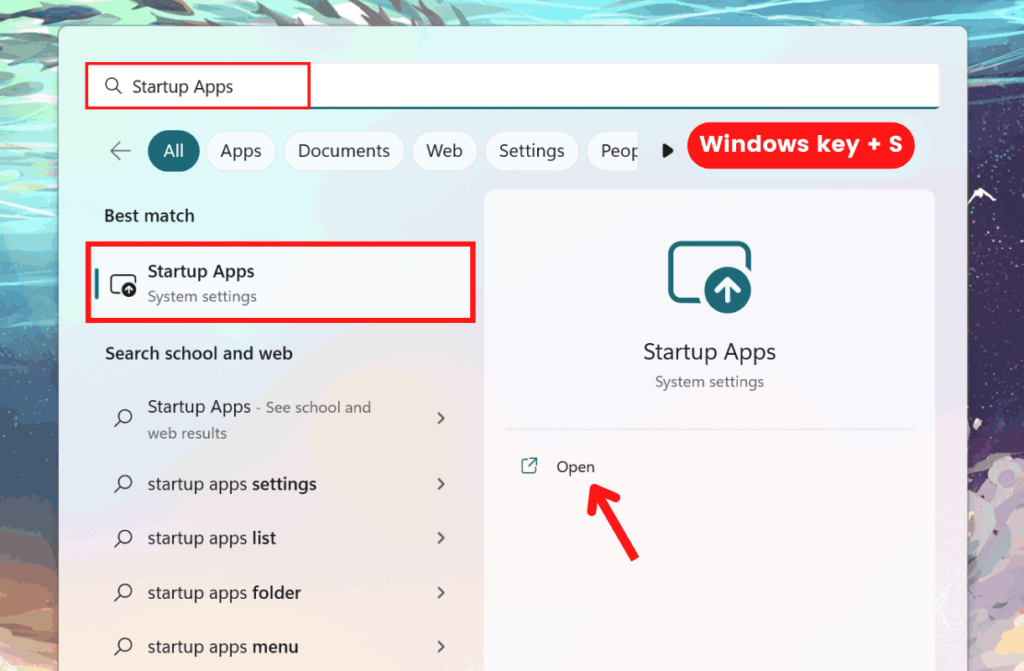
Step 1: Select the “Search” option from the taskbar. You can also access the search section using Windows 11 Shortcut, which is “Windows Key + S.”
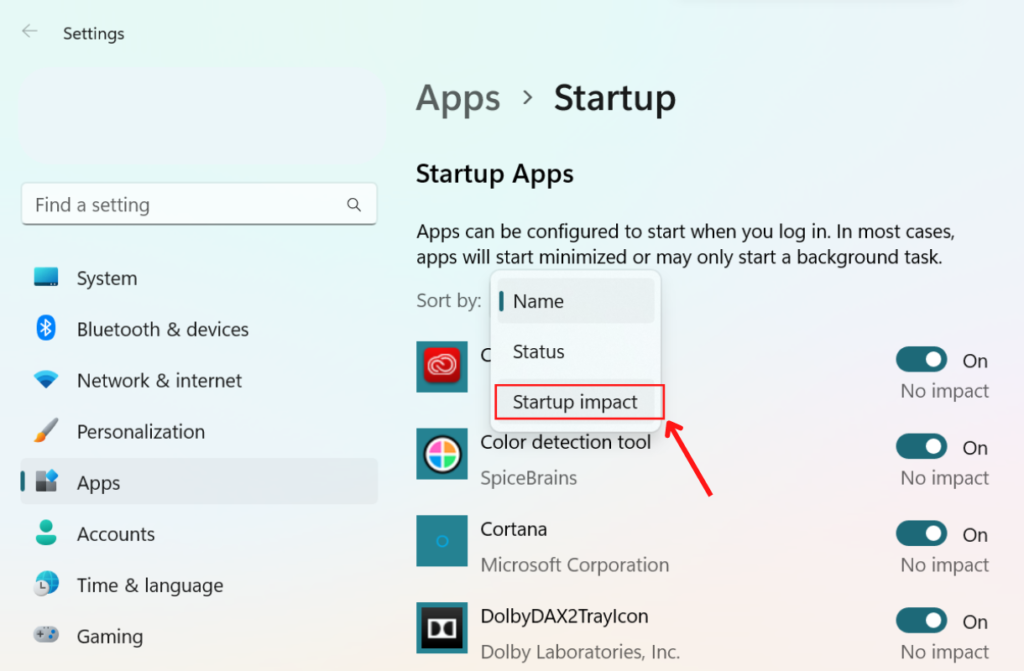
Step 2: Secondly, It will redirect you to the screen with the list of different applications. Ultimately, you should see a drop-down menu. You can click on it and switch to “Startup impact.”
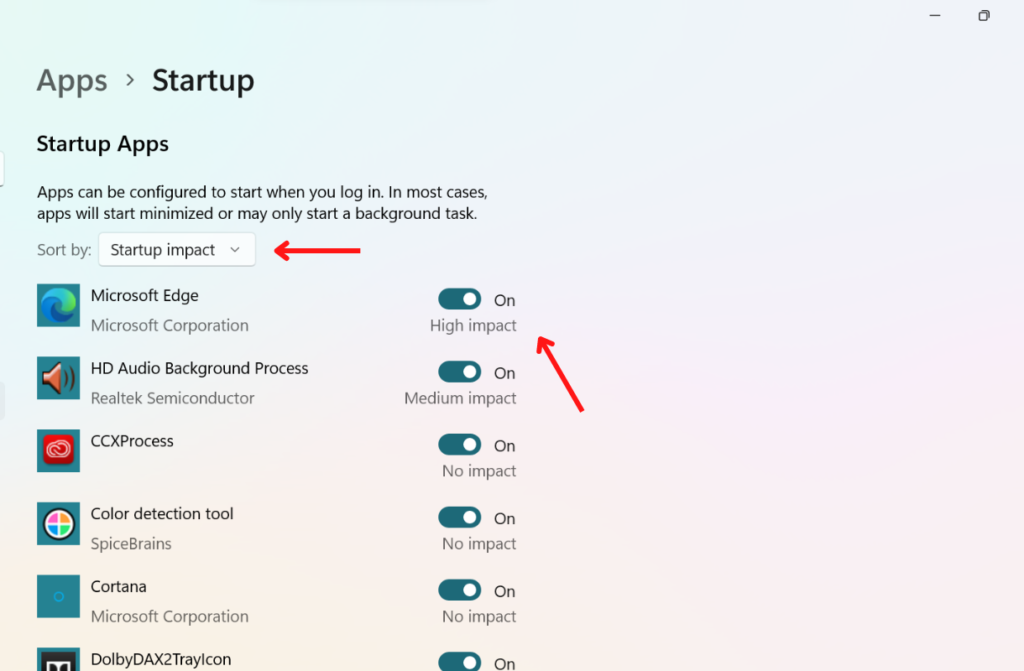
Step 3: Finally, you can disable the application by turning off the toggle. We recommend you turn off the startup application labeled as high impact.
Microsoft enables various apps to begin immediately at startup on Windows 11. While this is useful as soon as you log in, specific programs may start minimized or conduct activities in the background without your knowledge. This can slow down startup times and impair PC performance.
So, it’s always a good skill to know the method to Disable Startup Apps in Windows 11, which can directly help you Speed Up Windows 11 Performance.
How to disable visual effects in Windows 11
Windows offers several visual effects, such as fading or sliding menus, tooltips, or window animations, to improve the look of Windows.
Deactivate all visual effects in Windows 11 if you want to increase system efficiency and battery life, and make the experience seem quicker.
Step 1: First, press the “Windows key + I” from your keyboard.
You may access the Settings app by doing this. You can find options for visual effects using the setting app.
Step 2: Secondly, Using the arrows, select System >> About. Device information, including the Device ID, RAM, System Type, and other details, are in this section of the settings.
Step 3: Select “Advanced system options” after that.

Step 4: Next, select “Settings” from the Advanced menu.

Step 5: You’ll be taken to a screen with settings for certain visual effects. Choose “Adjust for best performance” here.
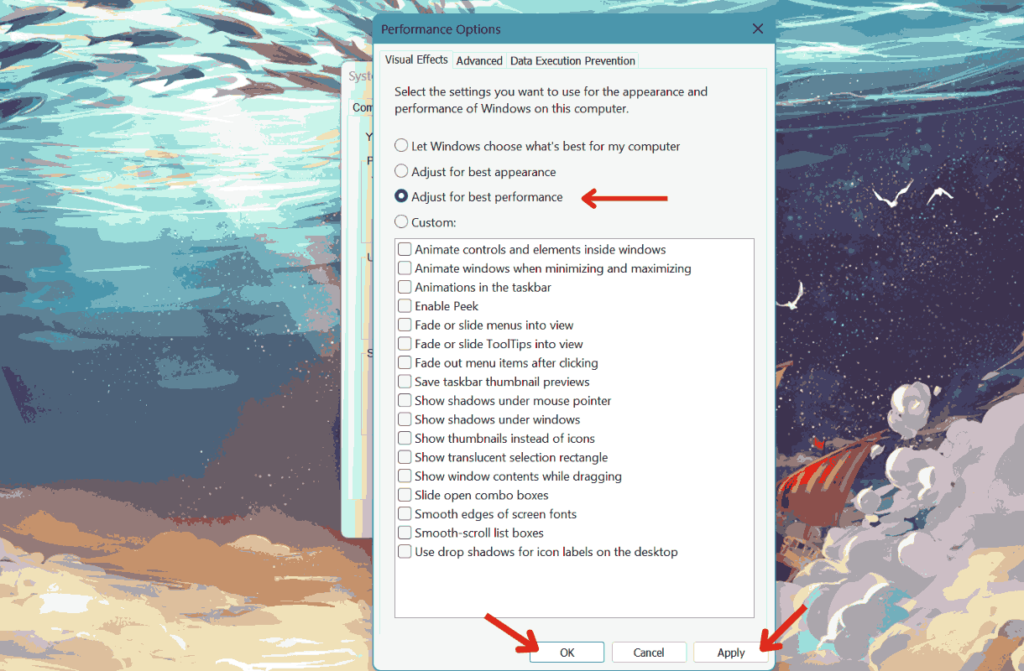
You can pick a customized option or a wide range of custom options. This can enhance computer performance.
Step 6: Finally, you can save the modifications. You can choose the “Apply” and “OK” options.
Although they can produce a more distinctive visual experience, visual effects use many system resources. This will ultimately cause slower PC performance on outdated hardware.
Turning off the visual effects can reduce almost 20% of the GPU’s burden. In addition, by disabling visual effects, you may quickly speed up your Windows 11 computer.
How to Remove Temporary Files in Windows 11
In Windows, temporary files are useless files that are only used briefly before being deleted once the work is finished. In order to store data temporarily while a file is being generated, processed, or used, such temporary files are created.
Here are some easy steps you can follow to Remove Temporary Files in Windows 11:
Step 1: Firstly, to access Windows Settings, use the keyboard shortcut “Windows key + I.”
Step 2: Secondly, navigate to System >> Storage. This area of the settings offers storage information.
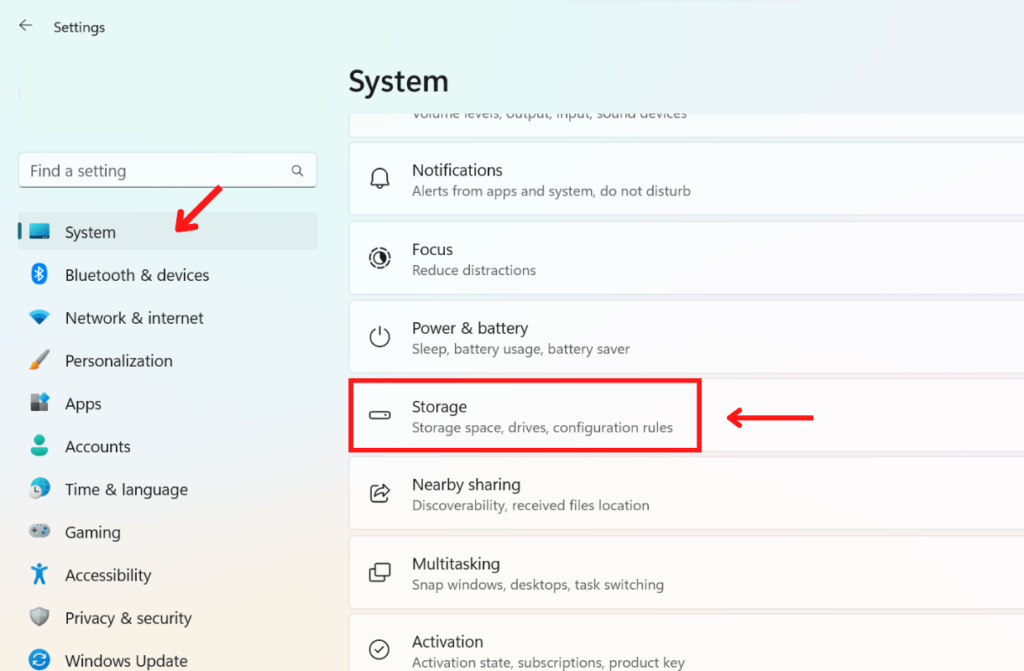
Step 3: You’ll see a “Temporary Files” option. Simply click on it.
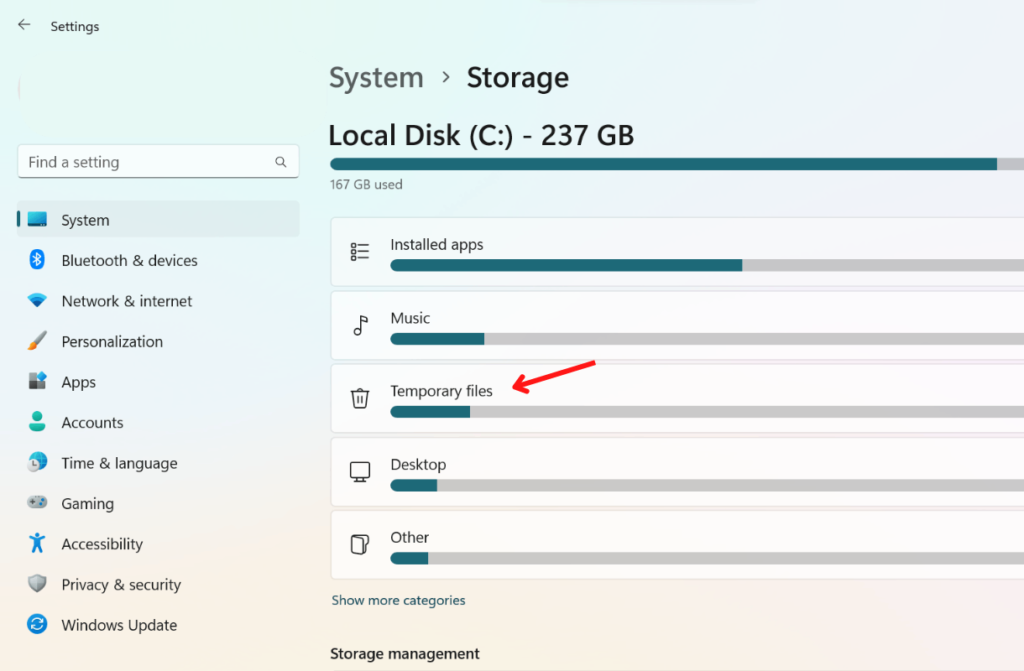
Step 4: Finally, select all files that you don’t want or want to delete, then click Remove files.
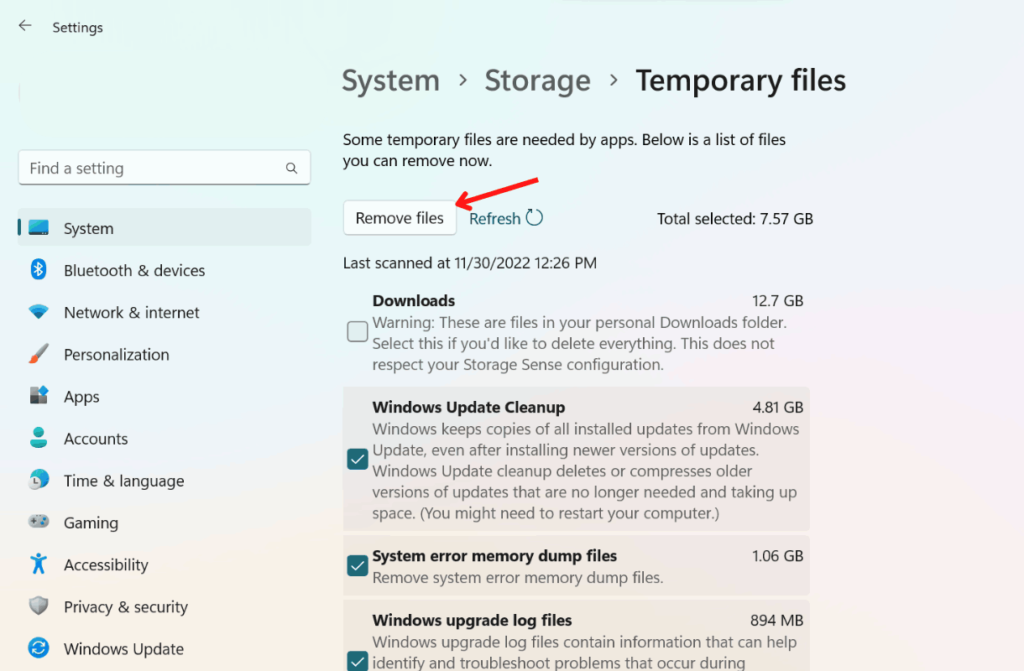
Getting rid of temporary files might help your Windows 11 run more quickly. Internet history, cookies, and cache are all included.
They take up a lot of space on your device, so eliminating them frees up storage space, allowing you to Speed Up Windows 11 Performance.
How to Disable Game Mode in Windows 11
Game Mode in Windows 11 is a fantastic feature. However, if your hardware is outdated or inefficient, this might slow down your performance. Here are some easy steps you can follow to Disable Game Mode in Windows 11:
Step 1: Firstly, use the “Windows Key + I” shortcut to access the Windows Settings.
Step 2: Secondly, navigate to the “Gaming” option. You can find this option on the left option pannel.
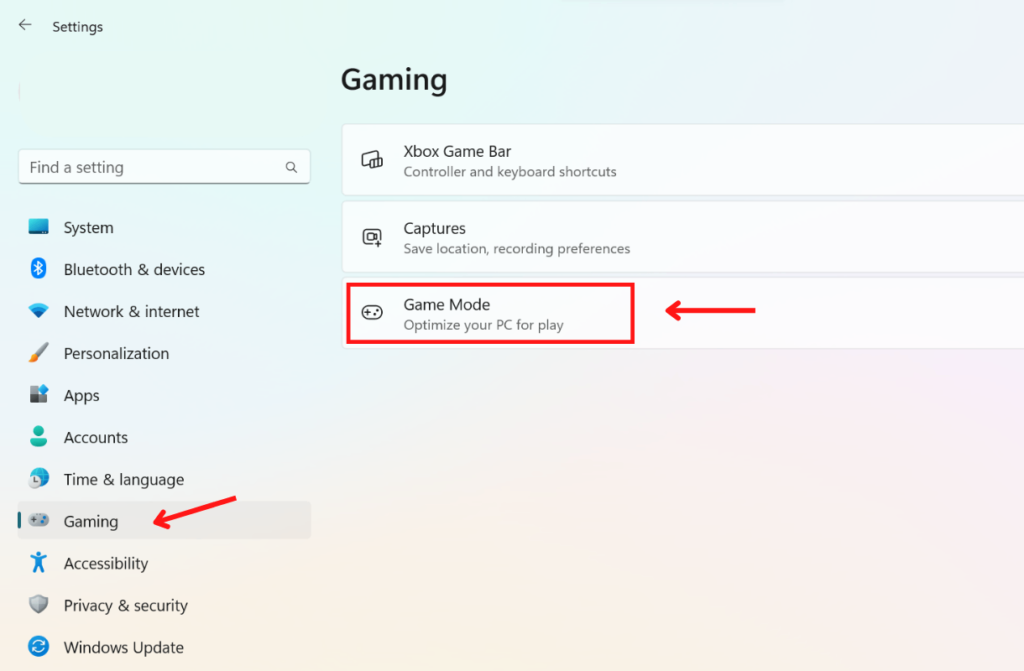
Here you have three options. Xbox Game Bar, Captures, and Game Mode. We will use Disable Game Mode to Speed Up Windows 11 Performance.
Step 3: Now, Click on the Game Mode option.
Step 4: Finally, turn off the Game Mode.
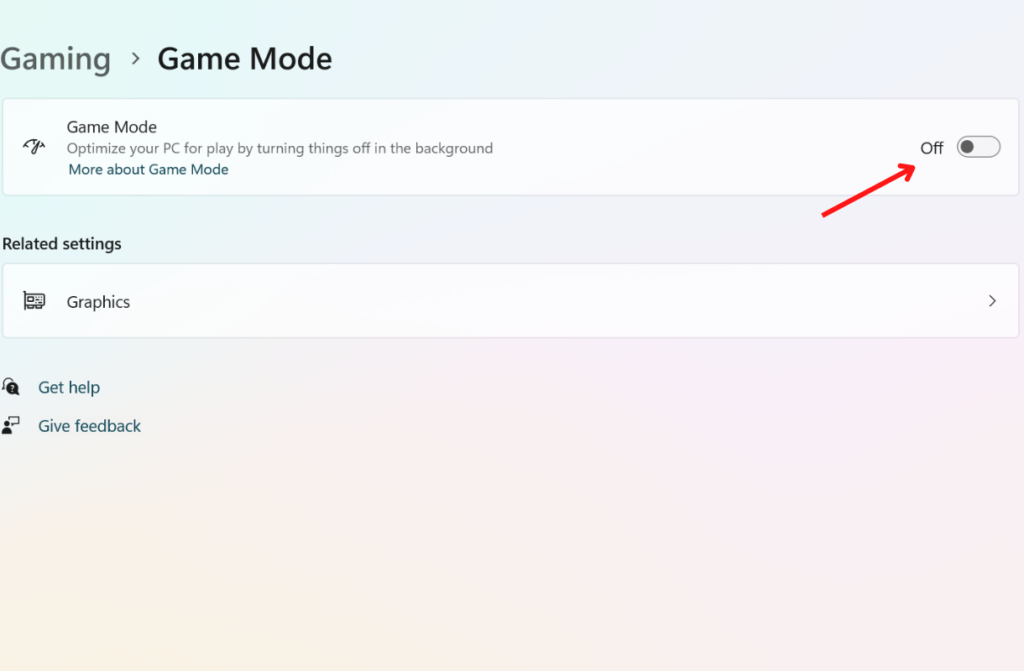
Evidence suggests that Game Mode causes the system to slow down. If this happens, it’s most likely because Game Mode prioritizes the game you’re playing above critical background activities, which might have system-wide consequences.
Final Thoughts
In this article, we’ve just covered software changes because hardware upgrades are a completely separate story. Nevertheless, they may undoubtedly assist with the addition of more RAM or a super-fast SSD. Hardware upgrades can marginally Speed Up Windows 11 Performance but may cost you a heavy amount.
If you are still on Windows 10 and can’t decide Why you should upgrade To Windows 11, you can check our article.
Windows 11 has several features and performance enhancements that can help you speed up your Windows 11 machine. These features are superior to Windows 8. The hardware also plays a vital role in overall performance; it’s doesn’t matter which brand you use. You may have Dell, HP, or Lenovo laptop, but the problem is always a result of outdated hardware.
Following this article’s tips and methods, you may optimize your system and get the most out of your Windows 11 experience. Furthermore, excellent maintenance practices, including frequent scans and updates, will help keep your system working smoothly and effectively.


