We often need to work on multiple apps or software simultaneously on a PC, and shifting between apps on a different tab can be time-consuming. Hence, to solve this issue, you can split the screen on Windows 11.
As you know, you can split screen on Windows 10 and Windows 8, too. However, Microsoft has made it even easier for Windows 11 by updating this feature to Snap layouts.
Now, you can easily split your screen up to 4 times on your PC. Also, it is quite easy to split screen on MS Windows 11 compared to its other OS.
If you have a small screen, you can split your screen twice and use two apps simultaneously.
However, with a large screen, you have other options available on Windows 11 for better productivity.
In this guide, we will let you know how to split your screen on Windows 11. Also, see our guide on how to check RAM information on Windows 11.
Before we begin
Before we begin, you need to know that on Windows 11 split screen feature is known as Snap Layout.
Also, though this feature is enabled by default on Win 11 OS, it is important to confirm from settings.
Hence, first, we will show you how to enable “Snap Windows” on your Windows 11 PC.
Then, you can try out different methods to split screen on your computer or laptop.
Note: You can split screen on Windows 11 operating system using the methods below on any brand of laptop, including Dell, Lenovo, Asus, and HP.
How to turn on “Snap Windows” on Win 11
You need to navigate the settings to check or enable the Snap layout feature on your Windows 11 PC.
So, follow the steps below to turn on the “Snap Windows” option on Windows 11.
1. First, you must access the settings app on your PC.
For this, press the Windows+ I keyboard shortcut or search “Settings” from the search bar.
2. After opening the settings page, click System from the left sidebar.
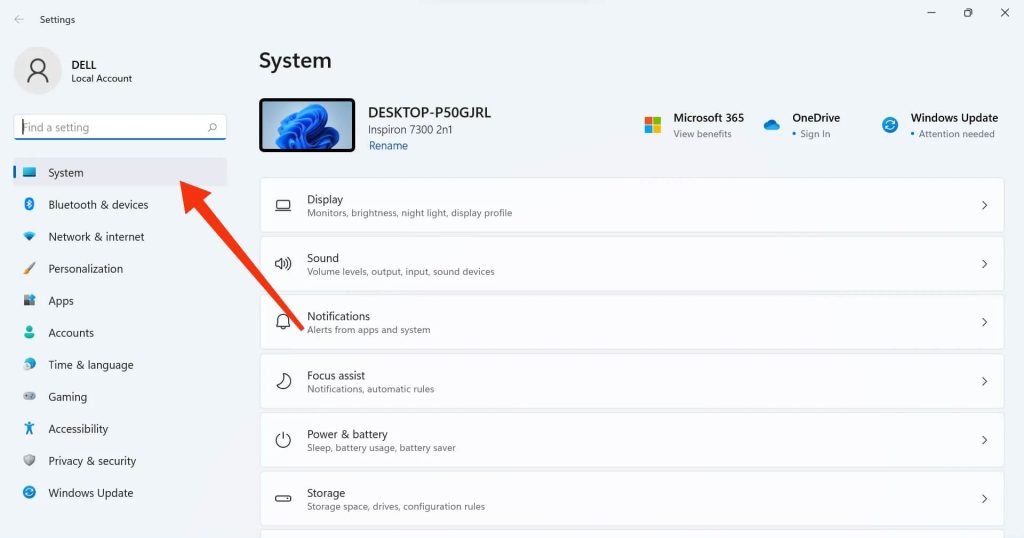
Note: Generally, you will be on the System page by default.
3. Next, select the “Multitasking” option from the right side of your Settings page.
4. Now, look at the first option, “Snap Windows,” on your PC’s “Multitasking” page.
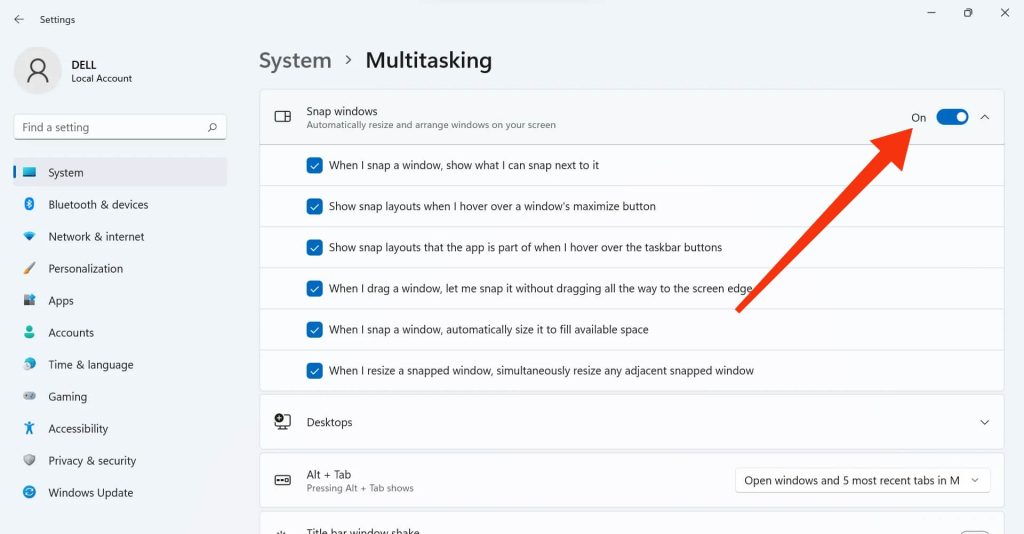
See if the toggle is on for this option. If it is on, leave it, but if it is not, then enable it on your Windows 11 PC.
You can also look at the other options on the drop-down menu and customize this feature on your PC.
How To Split Screen On Windows 11
After you have enabled the snap layout feature on your Windows 11, you can now split-screen easily.
You can use three methods to split screen on your desktop PC.
You can use the newly updated Snap layout feature, the old dragging method, or the keyboard shortcut.
Here, we have described each method separately. So, you can use either of them for multitasking in Windows 11.
Split Screen On Win 11 using Snap layout
With the new Windows 11 OS, you can easily split your screen to multitask from Snap layout shortcuts.
This Snap layout feature by Microsoft is new to Windows 11, and now you don’t need to drag or use keyboard shortcuts to split your screen anymore.
If you want to split your screen, hover your cursor on the maximize button of any application window.
Now, you will see different options at the top right corner of that tab on your Windows 11 PC. You may see four or six different snap layouts depending on the screen size.
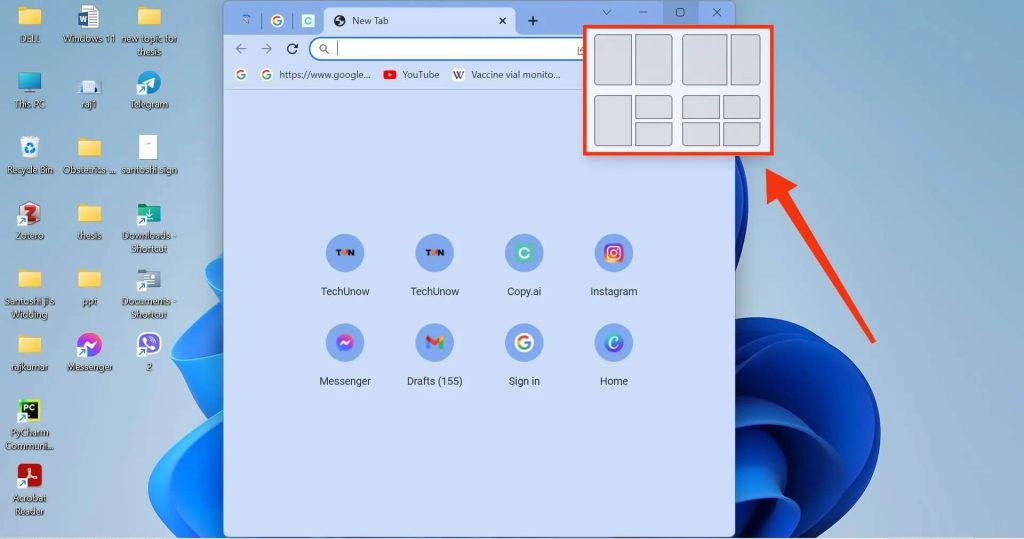
Here, we will show you what those options do on your computer or laptop.
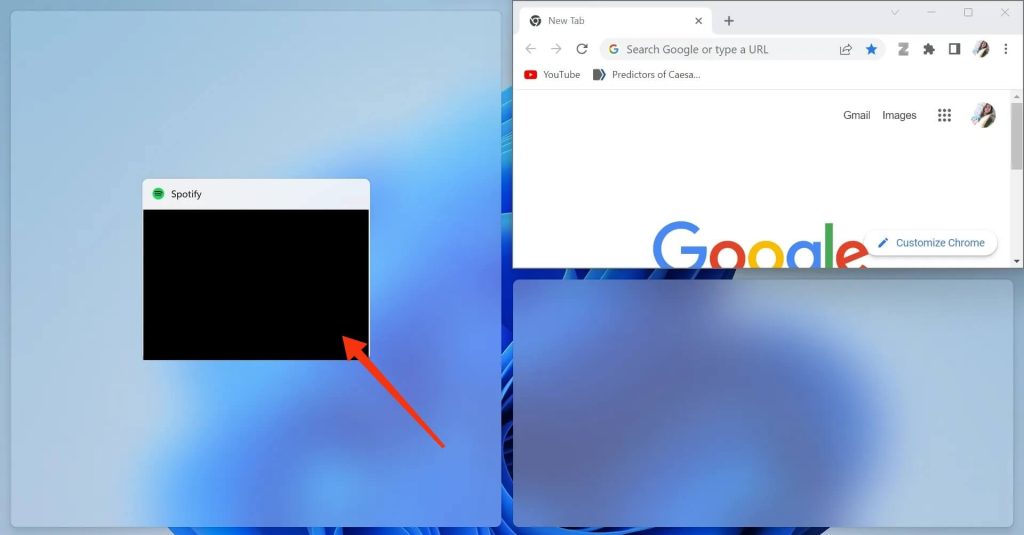
1. Split your Windows screen into two part
To split your Windows screen into two separate parts, launch the application and hover your mouse cursor on the maximize button.
Then, choose the first option. You can select either the right or left part. Your current application will be divided into the sections you have selected.
You will now see your current tab in the selected sections, whereas thumbnails of other apps you have opened in the background in another section.
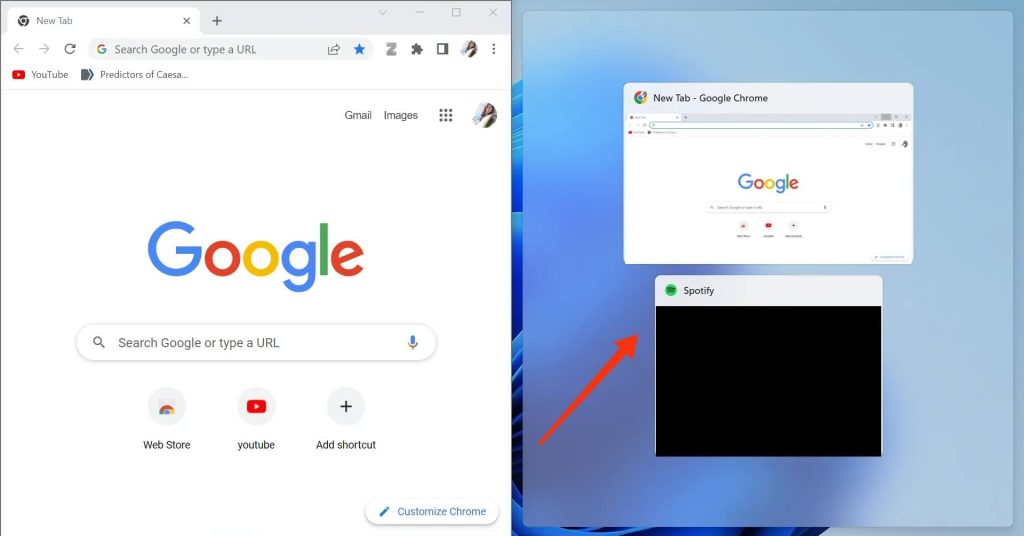
Tap on any app you want in another section of your Windows. You can now use two windows side by side on your screen.
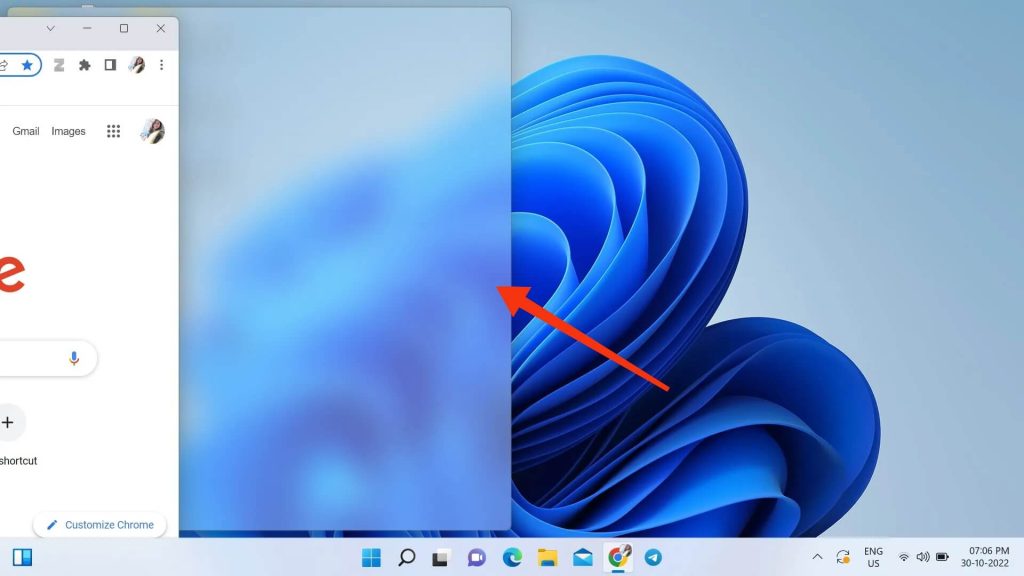
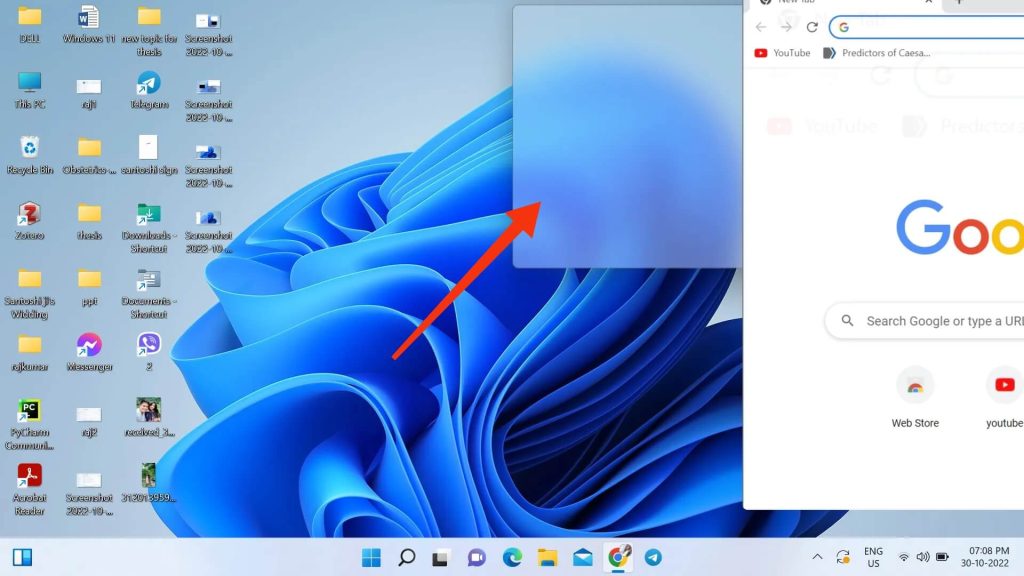
The second option is the Snap layout on your Windows 11 PC, letting you split your screen into two sections.
However, with the second option, you can split your screen unevenly. It lets you open the left section on a larger screen than the right one.
You can also adjust the size of the split screen by moving your cursor at the junction between two tabs and dragging the line in any direction you want.
Note: When you move your cursor at the junction between two windows, you will see a dark line or double-headed arrow as a reference.
2. Split your Windows screen into three-part
If you are trying to use three apps on your Windows 11 at the same time, then you can choose the third option.
Just hover your cursor on the maximize button and choose the third option. Like before, you can click any of the parts on this option, and your current tab will be opened in that section.
We suggest you open the app, which requires higher quality and clarity as a major section.
Now, choose any app from a thumbnail on both remaining parts, and you will be able to operate three apps simultaneously on your screen.
Also, you can readjust the size of any parts by simply dragging the line between the junction of these windows.
3. Split your Windows screen into four-part
If you want to split the screen into four sections, you can choose the fourth option on the snap layout.
Like above, you can hover your cursor on the maximize button and choose any part from the fourth option on the snap layout feature.
Now, your current screen will be split into the selected part, and you can choose other apps for the remaining parts from the thumbnail.
Additionally, you can adjust the screen size by dragging the line between each window.
Note: We suggest you split your screen into four parts only when your PC has a larger display. You may not get the required clarity if you use this option on a smaller screen.
Split Screen On Win 11 using Snap Assist
If you are not interested in this new feature, “Snap layout,” on Windows 11, you can still use the old method used in Windows 10 and Windows 8 to split the screen on your computer.
This method lets you split your screen by holding and dragging the tabs on the corner of your screen.
So, follow the instructions below to split your Windows into two, three, or four parts.
1. Split the screen into 2 parts
If you want to divide your screen into two sections, start by holding and dragging the application windows from the top.
Next, move that window to any side as far as your cursor allows. You will now see the outline on your screen.
Just remove the cursor if you see the outline fits your criteria. Now, your current window will be split into that part.
You can now select any other application displayed on another part of your screen.
Additionally, you can drag the line between these two sections/screens to readjust their size.
Also, you can split your screen into two parts when you need to copy some code from the browser to the Windows terminal, command prompt, etc.
2. Split the screen into 3 parts
To split your screen into three sections, hold and drag the app’s windows into the corner of your screen.
Now, you will see the outline covering a quarter of your screen. Remove your cursor on that part, and your current window will be displayed in that section.
Next, you can use the same methods as above, drag a window to another corner, and release it.
Additionally, you can choose the thumbnail shown on the remaining parts to split your screen into three sections.
Just drag the line seating these parts from your screen to resize them.
3. Split the screen into 4 parts
Like before, to split your screen into four parts, you must drag and drop a window into the corner of your screen.
Next, you can repeat the same process for another window or choose from the available thumbnails.
And to resize them, drag the line separating these parts on your screen.
Split Screen On Windows 11 using Keyboard Shortcut
Another alternative that you can use to split screen on Windows 11 is to use a keyboard shortcut.
If you use this feature often, then a shortcut is the better choice.
Here are the shortcuts you can use on your keyboards to split your screen into different parts.
1. To split your screen into two sections, press the WINDOWS and the Left/Right key on your keyboard at the same time.
Your current screen will now be opened on the left or right side, depending on what you press on your keyboard.
Now, open another window into the remaining parts by clicking on the thumbnail.
2. To split your screen into three sections, press the WINDOWS and UP/DOWN keys on your keyboard at the same time.
Now, you can choose from the thumbnails for the other parts of your screen or use the same method to split your screen into three parts.
You can also use the same shortcuts as above to split the screen into four parts.
FAQs
If your Windows 11 PC isn’t showing the snap layout feature when you hover your cursor on the maximize button, then it may be disabled on your PC. So, first, go to your system settings and open the Multitasking option. Now, see if this option is enabled. If not, turn on this feature on your PC and see if the snap layout is working properly.
Yes, if you don’t want to split screen on Windows 11, you can switch between different windows quickly. To do this, you can press the “Alt” button on your keyboard and hit the “Tab” button at the same time to switch to different windows. Press the “Tab” button once while pressing the “Alt” button. You will be able to see all the open windows from this shortcut. Now, release both keys on your keyboard after you select the desired tab.
Yes, you can also split different tabs from the browser on your screen. You can open different tabs on separate windows and use snap layout features to do this.
If you don’t want to open each tab in different windows, then just hover your cursor on the tab you want to split and drag that tab out of the browser to one of the corners of your screen. You can repeat the same process to get multiple tabs in a split-screen view.
Wrap Up
So, this is how you split your computer or laptop screen in Windows 11. You can use the new Snap layout feature or the old method (Snap assist) to split screen on your PC.
You can also try using keyboard shortcuts to split screen on your Windows 11 OS quickly.
Overall, this pretty much concludes our guide. We will update you on any new features if available in the future. In the meantime, check our guide on how to create a new folder in Windows 11.


