Though Microsoft supports the automatic installation of drivers via its regular Windows updates, sometimes it may miss or malfunction. Hence, it is important to know how to install the driver on your Windows 11.
Drivers are the bridge between your system and hardware, allowing for your system’s smooth running. Many PC components like graphics cards, network adapters, video cards, keyboards, Bluetooth, etc., require drivers for their smooth operation.
You may not encounter problems with drivers easily since your Windows updates regularly update it for you.
Updating manually also solves your problems, even if you encounter them. In fact, we have a comprehensive guide here on how to update your drivers on Windows 11.
But, sometimes, Windows updates may miss certain drivers or may not include them in its update (like graphics cards).
Hence, installing the driver on your MS Windows 11 can solve your problems.
When to install drivers on Windows 11?
Before we begin, you must first know that you don’t need to install every driver on your Windows 11 PC. Microsoft automatically keeps your Windows 11 up to date for your regular operations.
However, if you use a third-party or cracked version of Windows OS, you may encounter bigger problems with your drivers. And, even if you are using the genuine version, Windows updates may not include or miss certain drivers on your PC.
In such cases, simply updating your drivers may not help with your problems and may require a new installation. You may need to know the admin password to access your admin account for some drivers.
Anyway, whether to solve issues with existing drivers or clean installation of new drivers, this guide will help with your issues.
Install drivers on Windows 11
There are various ways you can install drivers on your Windows 11. Here, we have described these methods in order of complexity.
So, whether you want to install it manually or automatically, follow the best methods.
Method 1: Install drivers on your PC from Windows updates
This procedure is the most reliable and riskless way to install drivers on your Windows 11.
If you have just installed Windows 11, you can update your PC from the settings menu. When drivers are not available, Windows will automatically seek and download them from their respective websites.
Also, your Windows will automatically install these drivers on your computer after downloading them.
You may get a prompt to restart your Windows operating system after installation is completed for some drivers.
Anyway, let’s discuss how to use Windows updates to install drivers on your Windows 11 PC.
1. First, open the Settings app on your PC by searching for it in the start menu.
You can also hit your PC’s “Windows + I” button.
2. Next, from the left panel, select “Windows Update“. You will now be able to open up your update page on Windows 11.
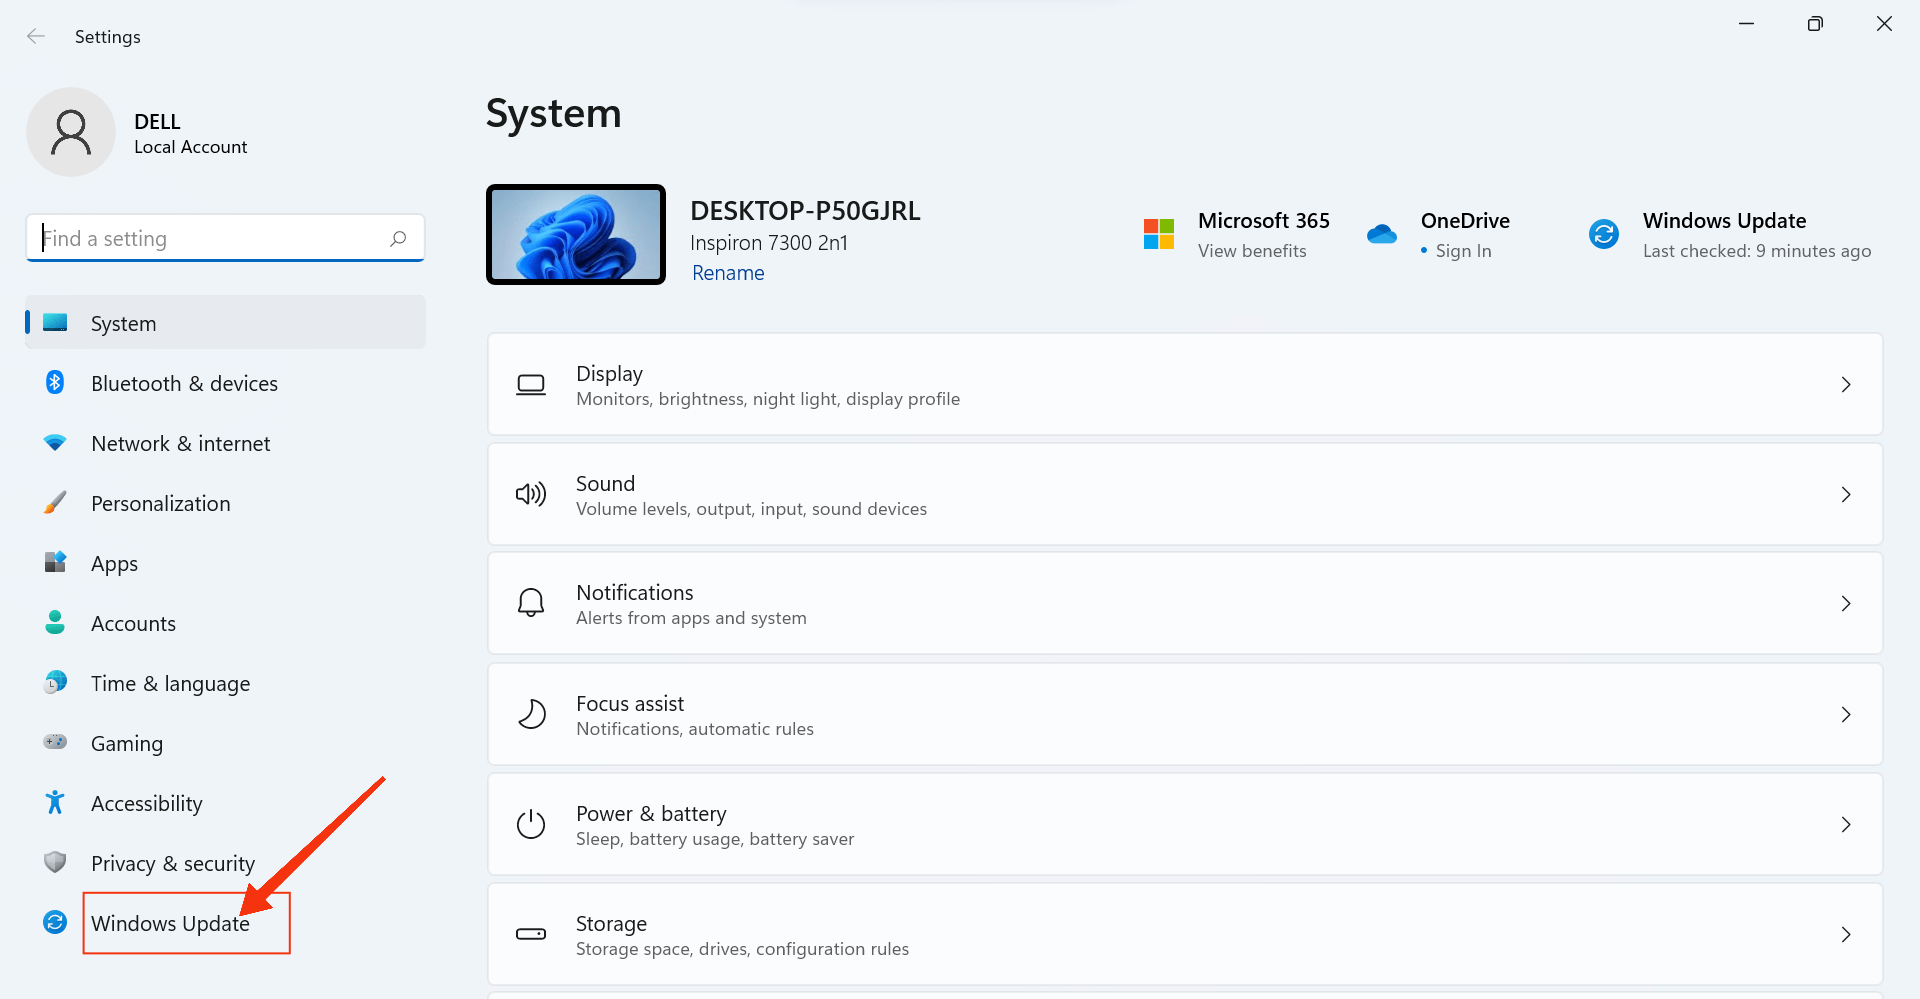
3. After that, by clicking “Check for updates,” you can see what updates are available for Windows 11.
Your Windows will automatically download all the drivers and install them on your PC. You can restart your PC after installation for better performance.
We suggest you use this method before anything else since the driver can easily get corrupted if you don’t know what you are doing during manual installation on your PC.
Method 2: Install drivers on your PC from Device Manager
If your Windows updates cannot solve your driver issue or install them on your PC, then you can manually install drivers using the device manager.
Device manager lets you manage all the drivers installed on your PC, and you can update, roll back, or newly install each driver.
Hence, follow the steps below to manually install drivers on your Windows 11 PC using the device manager.
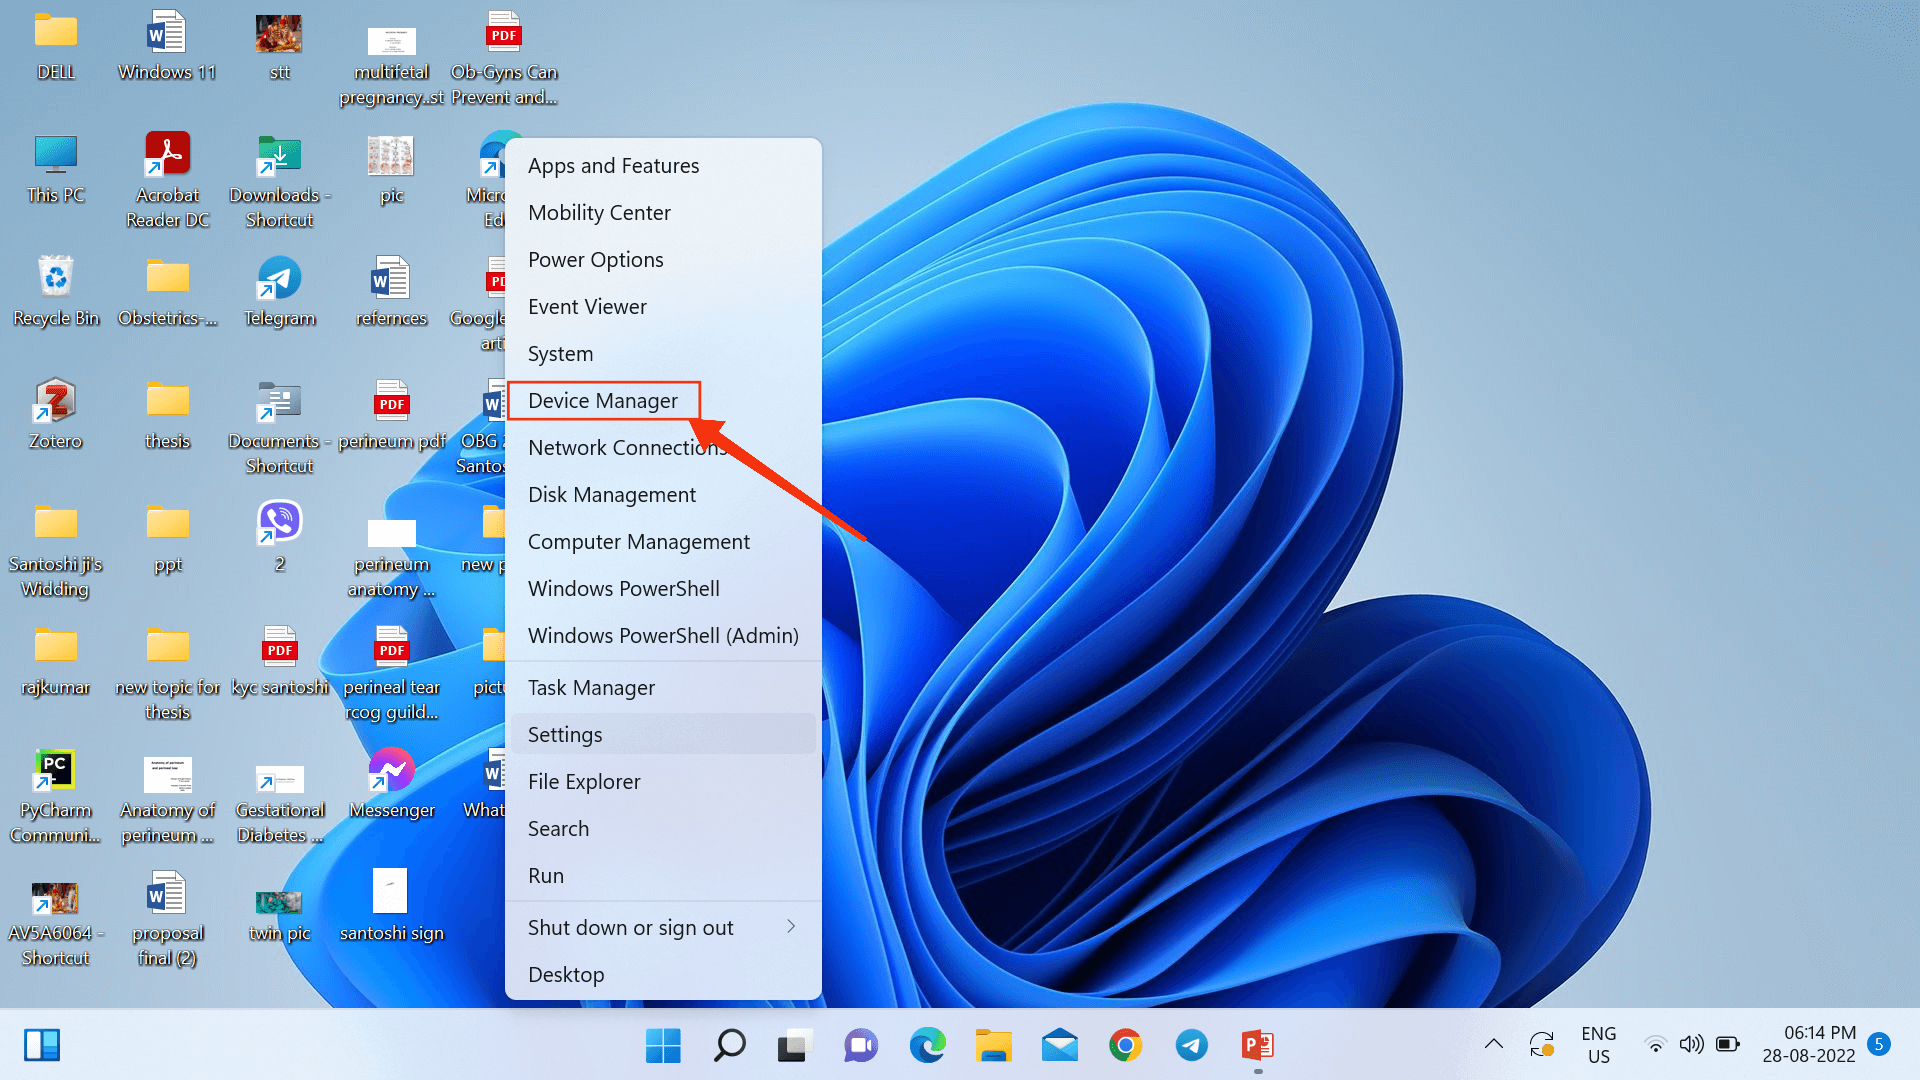
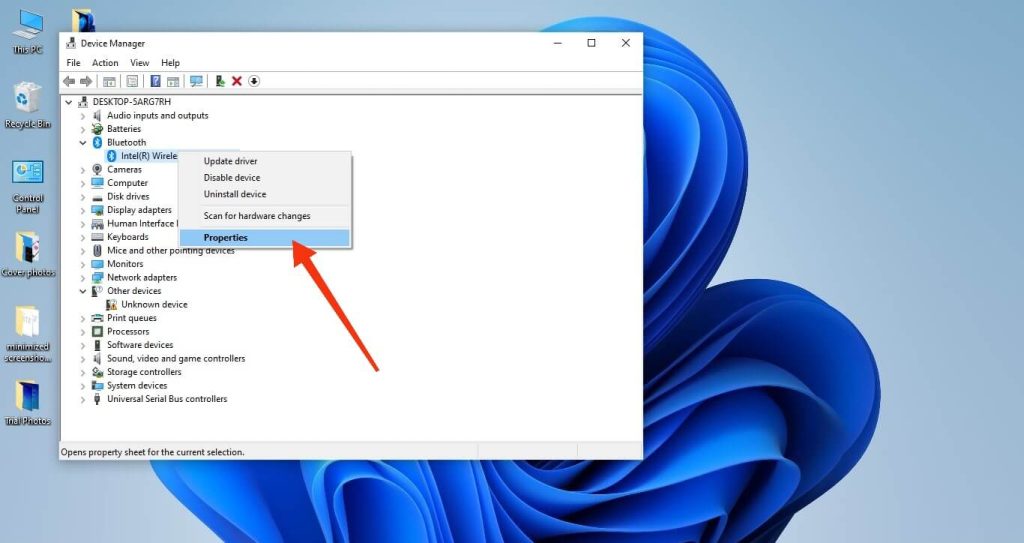
1. First, you need to open the device manager on your PC by searching it on the start menu.
You can also right-click the Start or Windows icon on the taskbar and select “Device Manager“.
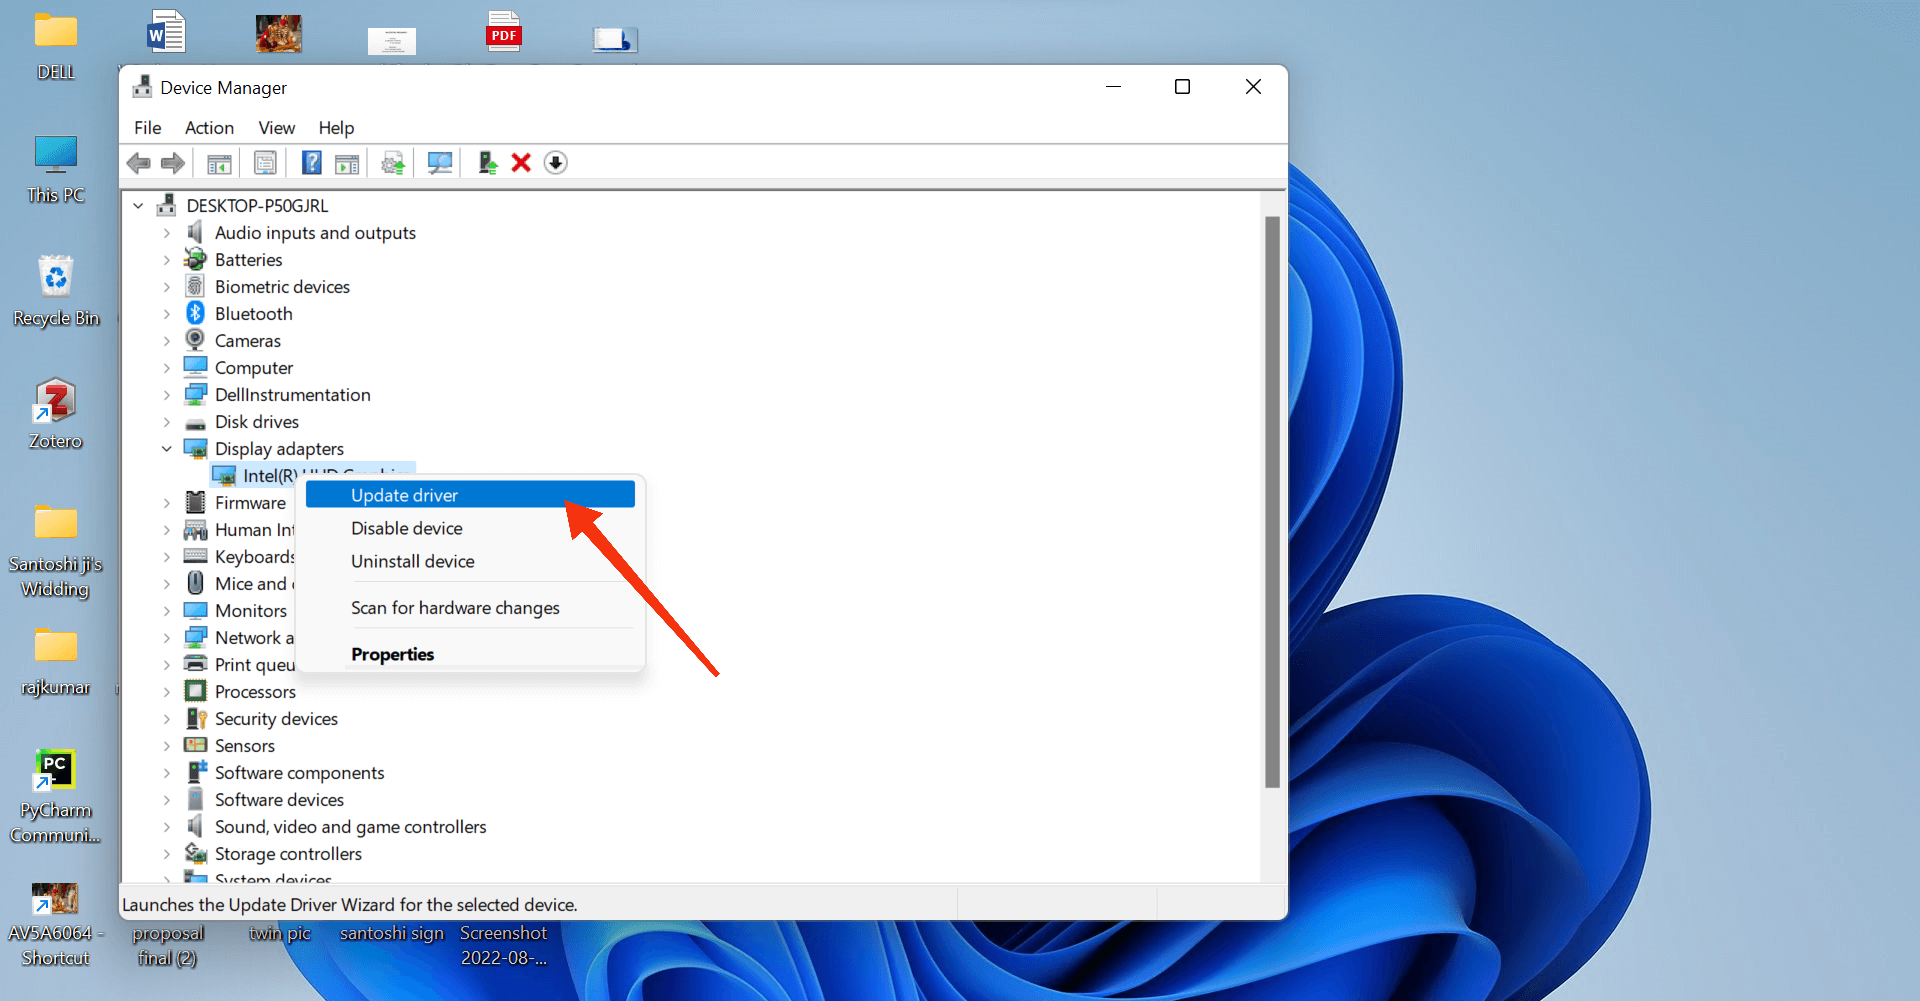
2. After you open the device manager, you will see all the drivers installed on your PC.
You can now expand and right–click on the drivers to see various options.
3. After right-clicking on a driver, choose “update driver“.
Now, select “Browse my computer” to locate your downloaded drivers on your PC.
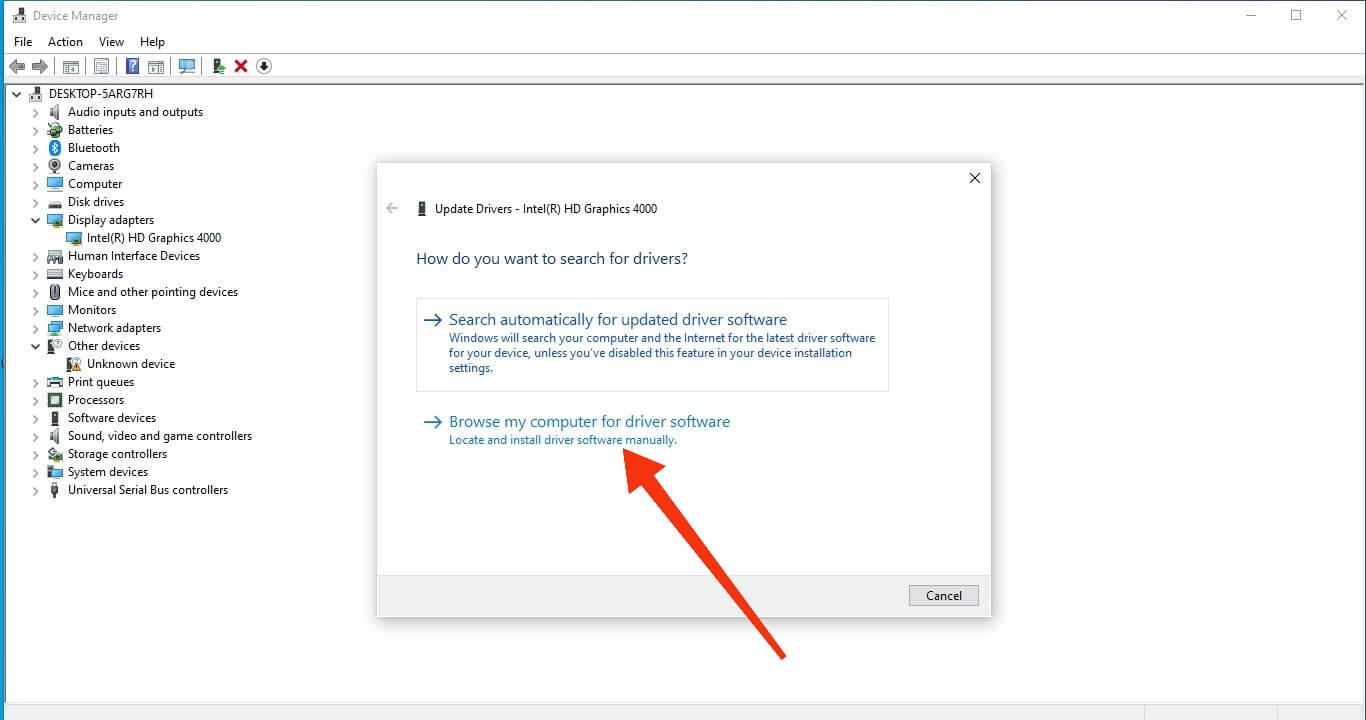
Note: Alternatively, you can select “Search for drivers automatically.” Your Windows will automatically search for drivers and install them on your PC.
4. After you have selected the correct file, click the “next” button.
Now, your Windows will start to install that driver on your computer. You can restart your PC after the installation is completed.
Also, if you find out that the driver is not working properly, you can also choose to roll back to the old version. Simply right-click on that driver and choose “Rollback driver“.
Note: If this method doesn’t work, you may also try reinstalling the driver. For this, open your device manager and choose “Uninstall” after right-clicking the driver. Windows will now try to reinstall the driver when you restart your PC.
Method 3: Install drivers on your PC from the Manufacturer’s Website
If nothing works out for your driver’s problems or you cannot find the specific drivers on your PC, you can use the manufacturer’s website to install them directly.
To install the drivers manually from your manufacturer’s website, you need to know the properties of the driver that you want to install. Then, search for it on your PC manufacturer’s website and download and install it on your PC.
If you know the name of your PC or laptop like HP, Dell, Asus, Lenovo, etc., then you need to search the official website of it on the internet.
Then, go to their page for drivers and search it on their website. You may need to type your PC model number/Product ID to get the exact drivers for your PC.
For example, if you have a Dell laptop, you first need to go to their driver support page. Type your Product ID or Model on the search bar to get the drivers list. You can now download and install any required drivers on your computer or laptop.
Hence, this is how you can download and install the latest version of the driver on your Windows 11 PC.
Method 4: Install drivers on your PC from Optional Updates
If you can’t find your required drivers on Windows update, you can try locating them on optional updates instead. Here, you can search for specific drivers to install from the available options.
So, follow the steps below to install drivers on your PC using the Optional update feature.
1. First, open the settings app on Windows 11 PC and hit the “Windows update” option from the left panel.

2. Next, choose the “Advanced Options” button from the right panel.
3. Now, you can select “Optional updates” under the heading of additional options and hit the “Drivers updates” button.
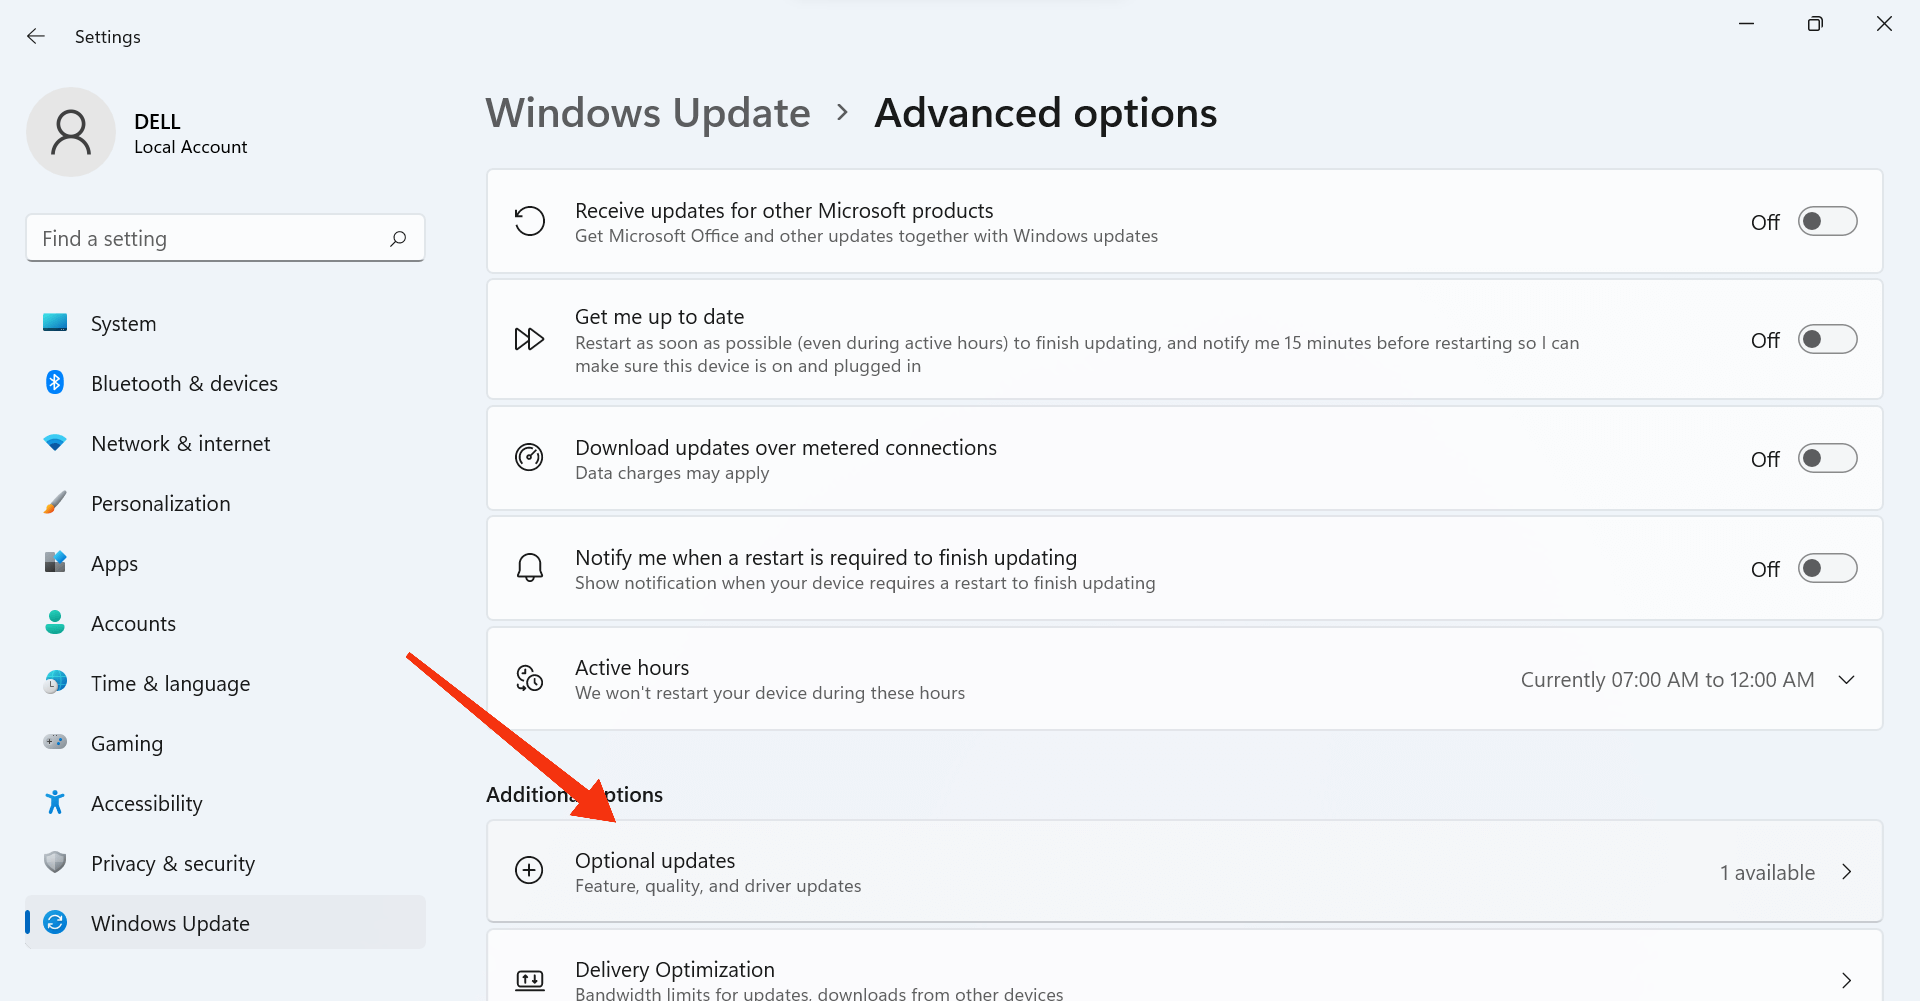
4. You may see a list of driver updates for your PC. Select only the drivers that need to be installed.
Installing drivers that are working may lead to more problems instead.
After confirming the installation, restart your Windows 11 PC and see if your driver is installed.
How to know if drivers have been installed on Windows 11 PC?
Now that you know how to install drivers on your Windows 11 PC, please confirm it too.
So, follow the instructions below to confirm if drivers are installed on your PC.
1. First, right-click on the Start or Windows icon on the taskbar and select device manager.
2. Now, expand the category from the list of drivers and locate the drivers you want to confirm.
3. You can right-click on the drivers and choose the “Properties” option to open device properties.
4. Now, from the box, hit the “Driver” tab next to “General” to open the drivers’ information.
Now, you can compare the information of the drivers that you installed with these properties. If it matches perfectly, you successfully installed those drivers on your Windows 11 PC.
Also, you can see the date when the driver was last updated from here. From this, you can confirm the installation of drivers.
FAQ
If you are getting an error message and cannot install drivers on your PC, then it may be corrupted. To solve this problem, you can try removing external hardware, reinstalling drivers, scanning for viruses, updating your Windows, etc. If you are still unable to solve the issue, you can try running Windows Troubleshooter or searching for your problems on the internet.
Windows 11 store installed drivers on the Driverstore folder. To access this folder, you need to go to C:\Windows\System32\DriverStore. Now, select File repository, and you can access individual files for each driver.
If you have the latest version of Windows 10 on your PC or laptop, then the drivers on your PC may also be sufficient for Windows 11. But, if you are jumping from Windows 8, then you must update your drivers for Windows 11. We suggest you update your Windows 11 to avoid any other issues with drivers.
Conclusions
You do not always need to install drivers on your Windows 11 PC. Keeping your PC up to date with regular updates can solve most driver issues. And, if you are forced, you can use our methods to install drivers for wifi, audio, camera, sound, audio output devices, printer, scanner, etc., depending on your problems with your PC.
Additionally, if you are missing drivers on your desktop computer, are having problems, or need to install drivers for whatever reason. You can use any of the four methods above as per your situation.
Finally, we hope our guide has been able to satisfy your query. We will update you on any other methods that may be available in the near future too. Also, you can check our article on how to update your Windows 11 PC.


